Mar 29, 2014

Hesaru Kalu and Sabsige Soppu Palya


A Happy Ugadi to all readers. Wishing plenty of good health, happiness and laughter in all your homes. All who celebrate must be busy with the shopping and cooking of the special Ugadi feast. Ugadi, Yugadi, Gudi Padwa are different names to the New Year Celebrations across Karnataka, Andhra and Maharashtra. As part of festivities, I bring to you an extremely flavourful and healthy dish from the North Karnataka region.
If the name of the dish sounds tongue twisting to non-Kannadigas,  I apologise. Do not let the long name fool you. It just means ‘a curry with mung bean and dill leaves’.The dish itself is quite easy to put together. A North Karnataka special recipe, I was introduced to this super aromatic and healthy dish at my dear friend Deepa’s place. Deepa’s enthusiasm for life and generous nature is so infectious. I do have a feeling that she is so high on life because she makes and shares dishes like these, which are so nutritious and lip-smacking tasty at the same time.
Dill leaves are used in several cuisines around the world. What’s good about dill leaves? This amazing aromatic green is very low in Saturated Fat and Cholesterol. It is also a good source of 1.Dietary Fiber, and a very good source of 2. Vitamins - Vitamin A, Vitamin C, Riboflavin, Vitamin B6, Folate, Niacin as well as 3. Minerals - Phosphorus, Zinc and Copper, Calcium, Iron, Magnesium, Potassium and Manganese.
To those not familiar with the flavour, it does take some time to accept. To be honest with you, my family was not so welcoming of the dill flavour when I made it first. At the next attempt, I reduced the quantity of dill leaves to half that of the mung beans. This then, found appreciation among my ‘testers and tasters’ - (read family).
Dill leaves and Mung bean
You Need
  1. Mung Bean – uncooked, 1 cup
  2. Dill leaves – pick leaves, discard thick stem and measure 1/2 cup packed
  3. Onion – diced, 1/4 cup
  4. Oil – 1 tbsp
  5. Mustard seeds – 1/2 tsp
  6. Green chilli – 4-5 chopped fine
  7. Salt – 1 level tsp or less
To Assemble
  1. Rinse the mung beans well, pressure cook them in just enough water for only 2 whistles or till just cooked but not mushy.
  2. Was the picked dill leaves under several changes of water, chop fine and set aside.
  3. Heat oil in a pan, add mustard to crackle, pour in the chopped green chilli and diced onion. Toss well till light brown. Saute onion in oil
  4. Add the dill leaves, sauté on high heat, stirring briskly. Add chopped dill leaves
  5. When the leaves have been tossing for a couple of minutes, add the cooked mung beans, add salt to taste. If there is extra water from the cooked beans, add only if required to the pan at this point. The curry should be moist but not ‘gravy–ish’. Add cooked mung bean
  6. Stir on high heat for 2 more minutes, switch off flame, cover and set aside for flavours to blend well. Ready to serve after half an hour with Steamed rice or Jowar Roti.
Palya ready! Don't you like the red hot chili?
Hesaru kalu sabsige soppu palya - Happy Ugadi

Mar 16, 2014

Thandai Panna cotta


Wishing all readers a very colourful and happy Holi. The season is filled with fun, happiness, spring and a riot of colours. I find all food sites, blogs filled with recipes for the special festival menu. Mawa gujiya, samosa, kachori, and several other delicacies.

Festive Dessert Platter

My dessert is inspired by the flavours of the festival too. I had tried out a Thandai mousse last year. Somehow, I’m surprised it has not found it’s way to the blog. So it had to be panna cotta this time. I have kept the cream to milk ratio at 1/2:1, thereby reducing on the fat content. I plan to try it out with skim milk alone the next time.

Initially, I was quite worried about getting the consistency, flavour and proportions right. After making a mental map of the procedure, and after discussing the recipe with two of my great friends, Deepa and Sreelatha, I decided to go ahead and test it out. Quite happy with the outcome, even if I say it myself. But then, unless you try it out and fill me in, I wouldn't know for sure.

For the main flavouring, I followed Tarla Dalal's recipe to make the thandai paste. For the Panna cotta, here is what you need -

  1. Home made or store bought Thandai paste – 2 level tbsp
  2. Skim milk – 1 cup
  3. Fresh cream – 1/2 cup ( I used Amul )
  4. Sugar – 5 tsp
  5. Agar agar – 7 gm
  6. Water – 1/2 cup
  7. Butter or vegetable oil – 1/4 tsp, for greasing

Optional – 2 tbsp Khus Syrup as a top layer for the panna cotta. I used store bought syrup.

Scooped out deliciousness!

To Assemble

  1. Combine the skim milk, fresh cream, sugar in a heavy bottomed saucepan, and set on heat. Keep over medium flame and stir constantly.
  2. In a separate smaller saucepan, heat the 1/2 cup water, and stir in the agar agar. Set this over a low flame too and keep stirring to mix well and to avoid burning. If you cannot manage to stir both at the same time, get the milk mixture boiled first and then proceed with the agar agar.
  3. When  the milk mixture reaches a boil, add the thandai paste and simmer for a minute, and keep stirring again. After a minute, set aside. Be alert to the milk mixture, it can boil over quite suddenly. Strain through a mesh sieve into a suitable bowl.
  4. If you have not started on the agar agar + water boiling as yet, go ahead with it now. You may need to simmer it for 5-7 minutes over low flame until it has blended into a homogenous jelly like texture. Pour through a sieve or tea filter directly into the milk mixture. Mix well, and return the milk to heat. Simmer again for a minute, remove from heat and cool to room temperature.
  5. Grease 6 dessert bowls / katoris / cups with the butter/oil. Divide the mixture into the bowls. Cover with cling film / lids and refrigerate for an hour or two.
  6. To unmould, run a wet sharp knife through the sides of the panna cotta and invert into serving plate. You may serve directly from the bowls too.
  7. Optional toppings include some khus syrup drizzled,  or few strands of saffron, or some cardamom powder sprinkled, or rose petals for garnish!
  8. Happy Holi and enjoy your wonderful Panna cotta.

Happy Holi with Thandai Panna cotta

Feb 21, 2014

White Radish and Tomato chutney


A chutney a day as accompaniment to breakfast or tiffin is so required in a South Indian home. Often it involves grinding of fresh coconut with some green chillies and perhaps some chutney dal added. I often hear my elderly clients telling me they cannot eat breakfast without chutney but their diet restrictions does not permit them to include as much coconut as they would wish to.

A vegetable based chutney such as this one is the answer to such dilemmas! This recipe does not require coconut or peanuts, has vegetables as it’s base and the best part is you would not miss the coconut at all.

So if you are just looking for a new way to make chutneys or need to replace coconut or peanut in your chutney, this could be just what you would like to try out. This recipe serves as accompaniment for 4 people. Halve to serve 2 or freeze for later use.

Delicious chutney, want some?

You need

  1. White radish – grate or slice thin and measure 1 level cup (about 2 medium size radish)
  2. Tomato – chopped, 1 cup ( about 3 small Roma tomatoes)
  3. Green chillies – 3-4 depending on heat preference
  4. Chana dal – 2 tbsp
  5. Vegetable Oil – 1 tbsp
  6. Salt – 1 tsp

For seasoning

  1. Vegetable Oil – 1/2 tsp
  2. Mustard – 1/4 tsp
  3. Urad Dal – 1/4 tsp
  4. Curry leaves – 4-5
  5. Asafoetida powder (hing powder) – a tiny  pinch

To Assemble

  • Wash, peel, radish. Slice into thin disks or grate. Measure 1 level cup.
  • Clean and chop tomatoes and green chillies.
  • Set a kadai / fry pan over flame, heat oil. Add chana dal, saute. When the dal turns golden brown, (fry for approx. 2 minutes) add the radish, saute over high heat for 2 minutes.

All ingredients from frying pan to...


  • Tip in chopped tomatoes and green chillies. Cover and cook for another 2 minutes or until the tomatoes look squishy.
  • Cool and grind to smooth paste. Remove to bowl.

...To the mixie jar!

  • Set a small fry pan / tadka pan over flame, add oil, heat ingredients for seasoning, pour over chutney.
  • Serve as accompaniment to dosa, idli, vada, upma, pongal, well, actually with anything you may want to eat.

'Seasoned chutney' ready to serve

Feb 10, 2014

High–Ultra lounge, the newest high


High Ultra Lounge at 421 feet, on the 31st floor, is the highest food and beverage destination in India apart from Mumbai, and will probably remain the ‘highest’ Lounge for quite some time to come. Very different from any so far, the property has been developed by Brigade Hospitality under Nirupa Shankar, Director and Vineet Varma, Executive Director. Their hands-on involvement has borne fruit and how.
THE SPACE
An exclusive  elevator takes you in a trice to the 31st floor. The glass capsule elevator gives an amazing view of the outside cityscape even as one rapidly reaches High. Once inside, the lush interiors and unique lighting amps the mood and increases curiosity on what awaits inside!
Bloggers on a tour of High View
Four zones of entertainment, High View, High Dine, High Edge, High Mix with a slightly different personality to each space along with the flexibility to blend into one seamless space.The High View, with its glass window view captures the sunset in all its brilliant hues. Open to the sky, this space beckons! Sunbeds are thoughtfully set out here to lap up the sun’s last rays of the day! High Dine, the dining space is open to the sky again. With a Pan Asian cuisine, the customer can look forward to a fine meal under the stars. High Mix with its mood lighting, bar which churns out unique cocktails and mocktails, and music is an energetic space. High Edge has been designed as a private space, made available by prior booking only.
 The edge of High Edge
THE EVENT
I was invited to a bloggers’ preview of the Lounge before its launch. We reached just in time to watch the setting sun cast its multiple hues on the space. We were taken on a tour of the facilities.  We were able to understand the intricacies of outdoor seating, elements of design of individual spaces, the choice of lighting and such through this tour.
Bloggers meet at High View
Deepasri capturing the foliage
It was then time for expert Mixologist, Guruprashanth to demonstrate his skills. He wowed the audience with new techniques in mixing and his choice of herb infusions to add magic to his creations. The group, after sampling his drinks were quite appreciative! I quite enjoyed his mocktails, Citrus Punch and Why Goa.
Tour of High mixGuru with his potent potions!
Guru's Love PotionInception
The Guru!Bloggers sampling
Chef Zhang Hao, put us through a guessing game. We were offered two starters and asked to list out the main ingredients in them. All of us really enjoyed this activity. The peanut flecked cottage cheese wasabi tikkis were so distinctive in choice of ingredients.
Chef Zhang Hao

Wasabi Paneer Tikkis
Then followed a climb to the helipad. The view from this altitude was quite extraordinary! The idea of an exclusive table for two at the helipad had all interested.
Dinner Table at High Dine
Dinner was laid out for bloggers at the High Dine space. I dined on their vegetarian selection. The Miso Soup, Sweet Potato with Teriyaki reduction, Fried Tofu, very fragrant Jasmine Rice with aromatic Thai Veg Curry were the high points of the meal for me. Special mention must be made of Vegetarian Sushi with outstanding wasabi as accompaniment. A few other dishes like Sweet corn with coriander butter,Chinese stir fried vegetables, or the spicy Soba Noodles were good but did not surpass expectations. Banofee Pie stood out for its caramelly, fresh banana and creamy flavours. Lychee Ice Cream could not match up to the Pie’s brilliance.
Through the course of dinner conversation, I enquired and learnt from Anand Nayak, the Marketing Manager, that the restaurant has well segregated kitchen space. Folks with specific food preferences like vegetarian, gluten sensitivity or nut allergies need not worry. The kitchen and the staff are well informed and equipped to handle special requests such as mentioned above.
Unbeatable location, mood-enhancing ambience, carefully chosen cuisines and menu selections and comprehensive beverage selections are all huge points in this destination’s favour. If the food and beverage team can keep up the good work we witnessed that evening, it is sure going to be the most sought-after location at Bangalore.
Location - Roof Top, World Trade Centre, Brigade Gateway Campus, 26/1 Dr. Rajkumar Road, Malleswaram West, Bangalore 560055
Cuisine - Japanese, Korean, Chinese, Thai
Price Range – Rs.1500 per person (average)

Feb 7, 2014

Once upon a time….. and they baked happily ever after


There once was a little girl who clamoured to go to school even before she turned 2. She watched wistfully when all the ‘grown up kids’ would trudge to school with their backpacks and lunch boxes in hand. She longed to walk the walk too. Unable to put up with her clamour, her mom sent her along with an older girl to the friendly neighbourhood ‘nursery school’.

Once there, this little girl loved to drink in the sights of the class room. She adored the smiling teacher who would draw pretty pictures on the black board with coloured chalk. She took care to never upset the teacher because then, the teacher would make a very stern face and rap the offending child’s bottom with a small wooden ruler. Yes, these were the days before disciplining an errant kid by spanking was either sinful or unlawful. The mild spank had an immediate effect on all kids, for sure, for everyone would behave well for the next hour!

Our little girl would trudge home after school, wear her mom’s saree, find a pair of spectacles, perch them on her nose, use her slate and pencil as black board and would start her school. She taught invisible children, drew pretty pictures for them, sang them lilting nursery rhymes ( ‘I hear thunder’ became ‘Aaya thanda’) and did not forget to rap the noisy kids with her ‘ruler’! Her only aim in life was to become a teacher.

Have you guessed who this little girl is? Of course, it is me Open-mouthed smile

I got the chance to become teacher to a bunch of excited teenage girls who wanted to learn how to bake. They were fired up after hearing that their moms had attended a baking workshop that I conducted earlier in December. The moms and I had baked Basic Vanilla Sponge and Chocolate Cakes.

Chocolate cake made on the dayCake decorated ( splattered) with ganacheAnother chocolate cake better decorated

Catching the children young and teaching them Healthy Cooking is one of the best ways to teach them healthy eating habits. The moms were only too happy to let their young ones pick up useful skills.  I seized this opportunity to share several nutrition tips with the receptive children.

On the first day, the girls learnt how to make chocolate cake and frost it too. The second day was devoted to learning how to make whole wheat burger buns and pav bread. All girls took turns at kneading the dough. It  was fun to watch them set a stop clock for themselves and divide the kneading between them. We also enjoyed making black eyed bean burger patties, and a very healthy ‘bhaji’ using plenty of seasonal vegetables like sweet potato, fresh peas and cauliflower to go with the breads.

An eye on the bhajiVery enthusiastic young bakerProud kids setting the table

At the end of the workshop, the tired girls sat down to lunch on their own creations. Once they started eating, all tiredness was forgotten. They were so happy that they had learnt how to make their own burgers and super healthy ones at that. The pav bhaji was ‘superb’, ‘awesome’, ‘yummy’, they informed me in between mouthfuls.

Whole wheat sesame buns just out of the ovenBlack eyed bean patties in burger

Lunch - super healthy burgers, pav bhaji and chocolate cake

This was an amazing finish to the workshop. Did the participants enjoy the workshops? I think so. Did I like it? Of course, I loved and enjoyed every moment of both the workshops. Did I have to rap any kid? No, NO NOOO.. I did not.Rolling on the floor laughing Just look at them, aren’t they so adorable and happy?
All this would not possible without the help of my great friend Deepa Annigeri who hosted the workshop at her home. Thank you Deepa, for your support and help throughout.

One goofy picture for the record!

Jan 25, 2014

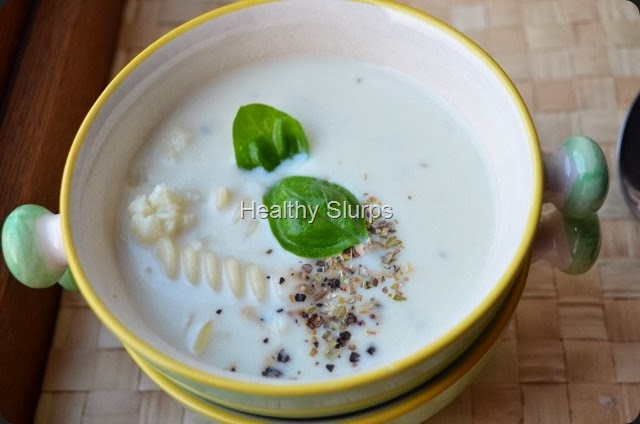
Cream of Cauliflower Soup


I am surprised that I have not posted a single recipe for a soup so far. Rather unexpected, because I do make soups so often. To make amends for that lapse, here is a recipe I made for my daughter. She is enduring a bout of viral fever and nothing like a hearty soup to perk her bored spirits up.

Soups are very versatile. They can be made with minimal ingredients, can range from clear to rich and creamy. A soup can stimulate appetite, can cure anything from cold, flu to heart breaks. Soups are especially welcome during chilly wintry evenings.

What are the benefits of eating soup during / before a meal?

  1. A soup combines dual advantage of being nutrient dense and not energy dense. In simple speak, soups offer more nutrients and less calories.
  2. Vegetable soups are a tasty way to include more vegetables to daily intake.
  3. Broth based soups help to lower hunger, manage food cravings, increase fluid intake.
  4. Having a soup before the main meal helps to decrease intake of calories by at least 20%.
  5. Homemade soups with fresh ingredients are the healthiest, most nourishing and wholesome.

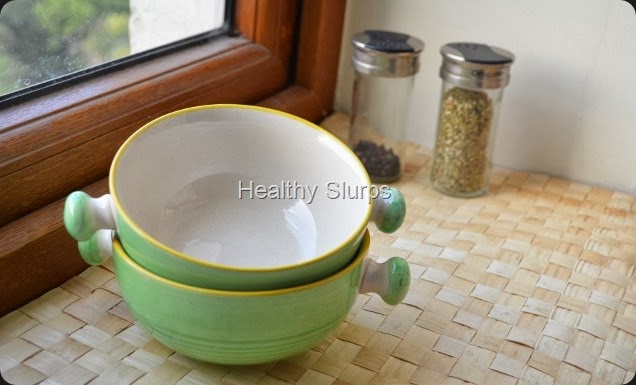
Soup Bowl waiting for the soup

You Need

  1. White cauliflower – 10 medium florets
  2. Cabbage –1/4 cup, shredded
  3. Onion – 1/8 of medium onion, sliced
  4. Skim milk – 1 cup
  5. Fresh water – 1 cup
  6. Butter – 3/4  tsp
  7. Salt – 1/2 tsp
  8. Black /White Pepper – 1/2 tsp
  9. Oregano powder –  1/4 tsp

To Assemble

  1. Blanch cauliflower florets for only 2 minutes ( to remove unwelcome guests such as worms)
  2. In a pressure pan, heat butter, fry onion to light pink, add cabbage followed by cauliflower. Toss until all vegetables are coated with butter. Add 1/2 cup skim milk, pressure cook till 1 whistle.
  3. Cool the contents, reserve a couple of florets for garnish and run in a mixer till it becomes a smooth puree.
  4. Return to pressure pan, rinse out mixer jar with freshwater, add that to the pan too. Add the reserved 1/2 cup milk to adjust consistency. Add salt, oregano.
  5. Simmer the soup until it just comes to a boil. Keep stirring to avoid scorching the base of the pan.
  6. Add crushed black / white pepper to taste.
  7. Grate the reserved cauliflower, divide among soup bowls, pour hot soup over that and serve piping hot.

Variations -

You may add rosemary or thyme instead of oregano if you prefer.

A pinch of grated nutmeg at the end will also be great.

A few pasta shells can also be boiled and added if serving to a sick child (for some calories and to make it more appealing).

Creamy Cauliflower Soup

Jan 17, 2014

Peanut Chutney

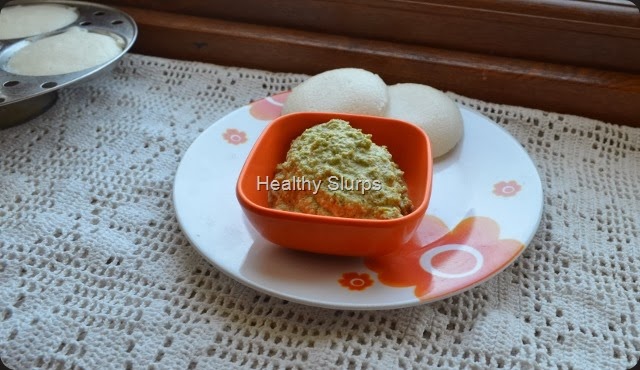
Peanut chutney and idli - power breakfast

My daughter is a total peanut fan.  She eats peanuts roasted, fried, boiled, in salads, asks for them in lemon rice, or if I am not looking, she gobbles them even raw! A jar of peanuts are never safe around her. To the extent that she is called the ‘ Li’l monkey’ of the house. She pouts and sulks when called so, and that tickles her big brother. So he runs her insane by chanting ‘monkey, monkey monkey’. Her dad calls her his fav  cute Li’l monkey – that did not seem to appease her either.
And then one day, I made this peanut chutney. Obviously, you cannot see the peanuts in them cos they are ground! Guess what? Her dad loved the chutney so much, he asked me, “What chutney is this? It pairs so well with idli” . My daughter was delighted. She ran to her dad, and told him “You are my favourite big monkey now, cos you like peanuts too! This is peanut chutney!” All of us had a hearty laugh. And peanut chutney came to stay forever at our home.
There are many versions of peanut chutney made, here is my unique combination of ingredients. I often add some coriander leaves, or mint leaves, a clove of garlic or even curry leaves to the mixture and then blend it up. You could try those variations too.
You Need
  1. Raw peanuts with skin – 1/2 cup
  2. Coconut, grated – 2 tbsp
  3. Onion – 1, medium sliced
  4. Green chilli – 4, cut in halves
  5. Tamarind pulp – 1 tsp
  6. Salt – 1/2 tsp
  7. Vegetable Oil – 1/2 tsp
  8. Drinking water – 1/4 to 1/2 cup for grinding
For Seasoning -
  1. Vegetable Oil – 1/4 tsp
  2. Mustard seeds – 1/4 tsp
  3. Urad dal – 1/4 tsp
  4. Curry Leaves – 4-5
Fry ingredients for chutney
To Assemble
  1. Take oil in a fry pan / wok / kadai, Heat it.
  2. Add whole peanuts to it, fry for 2 –3 minutes.
  3. Next, tip in green chilli cut in halves, followed by onion slices, last comes the tamarind.
  4. Fry well over medium to high flame, for 2-3 minutes more. Do not burn the ingredients. Stop frying when the peanuts look golden brown and the onions turn translucent.
  5. Add salt and grated coconut to this mixture, switch off flame ( cool it if you have time) and blend in a mixie to a coarse-ish smooth paste. You may need to add some water, say 1/4 cup while grinding to get a thinner chutney.
  6. Heat ingredients for seasoning, when the dal gets a warm golden hue, pour on top of chutney.
  7. Enjoy with idli, dosa, use as sandwich spread, or even with hot steamed rice.
Tasty tangy peanut chutney
Please do read the allergy information before trying out this recipe, especially if you have never eaten peanuts in any form before or if you have noticed any other food allergy symptoms too.
IMPORTANT ALLERGY INFORMATION
Some people develop an allergy to several nuts including peanuts. Symptoms may range from itching around mouth or throat, skin reactions, digestive disturbances, or more serious symptoms like breathing trouble too. In such situations, please stay away from peanuts in all forms – whether raw, boiled, roasted or fried. However, refined peanut oil seems to be tolerated even by people with peanut allergy. Still, do consult with your doctor before attempting to include peanuts in your diet.
PEANUT NUTRITION INFORMATION
Peanuts are a high energy food, most of the energy coming from fats and protein. As we know, all fat is not bad fat, peanuts are cholesterol free, have omega 3 and Omega 6 fatty acids.
To give a better picture, the total fats in 100 gms of raw peanuts is 49 gms, of which monounsaturated fats are 24 gms and polyunsaturated fats are 15 gms, while the saturated fats in peanuts are only 6 gms. They also have a high content of Omega 6 fatty acids – 15 gms / 100 gms.This makes it a valuable ‘good fat source’ in vegetarian diets.
Peanuts are also known to prevent cancer, help in weight control in moderate amounts and also have very valuable anti oxidants which have the heart health benefits and also prevent stroke. Regular consumption of peanuts also helps in preventing Alzheimer’s.
Peanuts are an inexpensive, ready to eat protein source, go ahead and enjoy it’s benefits.
Peanut chutney up close!