Showing posts with label GERD diet. Show all posts

Mar 9, 2015

Samai Pongal / Little Millet Pongal

Ven Pongal or Khara Pongal is a much loved breakfast food in South India. However, you can have it any time of the day. Ven Pongal works at the brunch or dinner table with equal ease.  With the millet wave sweeping the diets of all, I feel this is a good time to share a recipe with millets.

Samai rice/Little Millet replaces white rice in this preparation. Not only is it far healthier, the millet also cooks faster than rice. Isn’t that great news? Samai has 8 times more iron than white rice and 10 times more fibre. If that was not enough, it is higher in thiamin(vit. B1) , riboflavin(vit. B2) and folic acid content as well. Owing to their low glycemic index, millets are good grains to include in diets for weight management, diabetes, as well as in pregnancy. Since Pongal is usually cooked to a soft mush, this dish can be fed to weaning babies or toddlers also.

Pongal tastes best when served hot, so packing for school lunch may not be a great idea. However, you can pack for an office lunch if you can re-heat your food at work place. Now that I have shared enough reasons to switch to the millet from rice, let us proceed to the recipe, shall we?

Making Pongal is really simple. Cook a grain and a lentil together, fry some seasonings in a fry pan, mix the two with some salt and your dish is ready! Read on for the proportions and method here -

Samai Pongal with chutney

ALLERGY INFORMATION

  • Does not contain gluten, corn, soya, eggs, lactose, dairy.
  • Adding nuts is optional. Omit if you have nut allergy.

Preparation time –10 minutes, Cooking Time –15 minutes, Serves – 4-5.

You Need

Cookware – Pressure Cooker, fry pan, mortar and pestle

Ingredients

  1. 1 cup Samai rice
  2. 1/2 cup Moong Dal
  3. 4 cups water
  4. 1/2 tsp salt
  5. 1 tsp cooking oil
  6. 1 tsp ghee
  7. 10 whole cashew nuts (optional)
  8. 1/2 tsp Cumin seeds
  9. 1 tsp black pepper
  10. 1 tsp ginger juliennes
  11. 7-8 curry leaves, torn up
  12. 2 green chilli, slit (optional)

 Method -

  1. There are two methods to cook this pongal. You can choose between – 1. Pressure cook the Samai rice and Moong dal together in the pressure cooker. For this, rinse the grains together, cover with 3 times the volume of  water and pressure cook for 2 whistles. Or, 2. Pressure cook the dal alone, and the Samai rice on the stove top. For this, cover dal with double volume of water and cover the millet with double the volume of water and cook for about 3-4 minutes. Mix both in a serving bowl.
  2. Coarsely pound the black pepper and cumin in a mortar and pestle.
  3. To a fry pan, add in the oil + ghee, fry the cashew nuts (if using) to a golden brown.
  4. Tip in the pounded pepper +cumin, curry leaves, ginger juliennes, and green chilli.
  5. Add salt to the cooked mixture, pour in the seasonings and mix well. You may add 1/2 cup of hot boiling water to the mixture if it looks very hard. We want a soft mushy texture to the pongal.
  6. Serve steaming hot pongal with a spicy chutney, or sambar or even the traditional gothsu! Here I have served it with a tangy raw mango chutney.

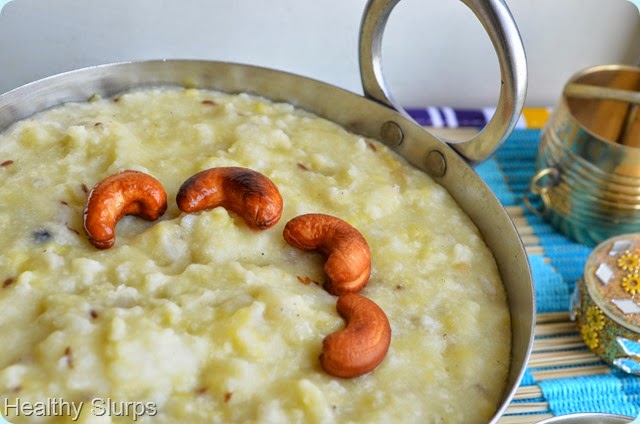
Perfect weekend breakfast or brunch

Enjoy your power packed meal!

Nov 4, 2014

Mung Dal with Ash gourd

Often the food we crave for is simple, nourishing, soul satisfying food which we grew up with. Steamed rice and tempered dal is high on most people’s comfort food list. Especially when we are far away from home. Or returning to normal life after an illness. Or trying to renew the jaded palette. Or seeking a respite from a frenzied social life. Or even if we have no energy to cook and much less to venture out to eat!

Whatever may be your reason, there can be nothing easier to rustle up than a typical dal-chawal meal.(Steamed Rice+ seasoned Lentils) A meal that can be put together in as less than 30 minutes with just a handful of ingredients. If this meal also nourishes, is curative, soothing to the tummy, and alleviates gastric discomfort as well, then we do have a winner at hand, right?

Bowl of wholesome comfort

Allow me to introduce you to the humble Ash Gourd. Also known as Winter Melon, White Gourd, Wax Gourd. Quite underestimated, un-glamorous, under used vegetable in most cuisines. It is a creeper, grows easily, available at low cost through the year, cooks quickly, has a bunch of health benefits, and yet not included enough in daily meals.

In clinical studies, Ash Gourd is proven to soothe hyper acidity, heal stomach ulcers. It is used as a diuretic as well. Besides, this humble vegetable contributes plenty of easily digestible fibre, moisture. It also helps regulate blood sugar levels, so useful in treatment of diabetes and obesity. It packs less than 20 calories per 100gms. So it is a weight watcher’s delight. Do we really need any more reasons to add more of this unpretentious vegetable in our meal?

If you are a single person, cook this in bulk and freeze in single use portions for simple weeknight dinners. Or halve to serve 2-3 people. Works well with phulkas, brown rice or use some pita bread to mop it up too.

Simple meal in 30 minutes

ALLERGY INFORMATION

  • Does NOT contain gluten, soya, egg, corn, lactose, nuts.
  • Suitable for gluten intolerance or lactose intolerant people or for people with nut allergy.

Preparation Time – 5 minutes, Cooking Time – 30 minutes, Serves – 4

You Need

Cookware – Pressure Cooker of minimum 3 litre capacity, Small Saucepan, Knife, cutting board

Ingredients

  1. 1 cup diced ash gourd
  2. 3/4 cup Mung Dal
  3. Pinch of turmeric powder
  4. 1 tsp Cooking Oil
  5. 1/2 tsp Cumin seeds
  6. 1/4 cup finely diced Onions
  7. 1 Green chilli (optional)
  8. 1/2 tsp Salt

To Assemble

  1. Rinse the ash gourd, peel skin, remove seeds, dice into even sized pieces. 
  2. Rinse the Mung dal in 3-4 changes of water, place the dal and ash gourd  in a suitable container, add the pinch of turmeric, fill water up to cover contents. Pressure cook on high flame until first whistle, and for 5 minutes after that over a small flame. Switch off and let cool. Open the pressure cooker only after all the pressure has released. This should take about10 minutes. (In this interim, you could rinse your rice for the meal, and set it to cook over another burner. The rice will be done by the time you have tempered the dal.)
  3. Peel onion and dice them really fine. Slit the green chilli lengthwise.
  4. Add salt to dal and set to simmer.
  5. Add oil to a small saucepan, heat it, add cumin seeds. When they crackle, add slit chilli, onions and fry over high flame until just beginning to brown.
  6. Pour the fragrant seasonings over the dal. Switch off, cover and let flavours blend for a few minutes. You may remove the green chilli and then serve too. Or omit the chilli entirely.
  7. Serve with hot steamed rice and a salad.

Enjoy your comfort food

Mung dal with steamed rice and salad