Showing posts with label pudina. Show all posts

Apr 1, 2013

Minty Garlic Potatoes

This was a recipe I tried out on a whim ages ago. I did not think much of it then. That is, until my child requested for it again. Isn’t it is true that potatoes are so versatile and can work with any flavours, seasonings and is an all time favourite with kids?
Yummilicious Baby Potatoes
I am particularly fond of this recipe since the flavours taste very fresh if you follow this method of preparation. Of course, I have just made it up the way my family likes it. You could tweak, add, change ingredients to suit your favourite flavours too. After all, what is a dish without improvisations? Useful for last minute lunch prep or when guests land up at mealtimes and you need to rustle up more food. I have used baby potatoes because I had them and because they look cute. SmileOf course, normal potatoes boiled and cubed are fine too. Take it forward anyway you like. This could even be a salad with boiled potatoes, pomegranate, some diced tomatoes and use the pudina as a dressing. The results are sure going to be delicious.
What’s good about potatoes?
  • It is popular belief that potatoes are full of starch and fat and offer little else. Potatoes have complex carbohydrates, which are a good source of carbs as opposed to refined flours and refined sugars.
  • It may also be surprising to know potatoes are a good source of several minerals like Magnesium, Potassium, Zinc, Copper.
  • Potatoes are also fair sources of Iron, Vitamin B complex and Vitamin C. Despite losses during cooking potatoes can deliver 2- 5 % of daily requirement of Vitamin B and C.
  • Potatoes are fatty? No way – they are a zero cholesterol food! The total fat in 100 gm. of potatoes is only 0.1 g and that is Omega 3 and Omega 6 fatty acids.
  • While the skin does not have any nutrients, it is the layer of potato just below the skin that has them. The best way to harness all these great vitamins and minerals is to cook/ boil them with skin on. This locks the nutrients in. When we peel potatoes after cooking, instead of before, we save a lot of the nutrients.
  • A lot of vitamins and minerals ‘leach into’ the cooking water. So it is a good practise to cook/boil in just enough water (instead of excess water) to optimise the maximum value of any vegetable, especially so in this recipe.
  • Adding a good bunch of fresh herbs like pudina (mint) and coriander to this recipe enhances it’s iron and fibre content.
I guess we need no more incentive to cook a lovely batch of minty potatoes. So here goes -
You need
  1. Baby potatoes – 500 gms
  2. Onion – 1 small, diced Fresh pudina leaves
  3. Mint leaves (Pudina leaves) – packed, 1 cup
  4. Coriander leaves – remove roots, clean, chop and measure 1/4 cup (optional)
  5. Garlic – 1 medium clove
  6. Juice of half a lemon
  7. Any vegetable oil – 2 tsp
  8. Saunf (fennel seeds) – 1/2 tsp
  9. Jeera – !/2 tsp
  10. Salt – 3/4 tsp
  11. Sugar – a pinch
To Assemble
  1. Immerse the baby potatoes in a water bath for half an hour if you have time. Else, leave in for 5 minutes and clean the skin well. You can boil the potatoes in enough water for 20 minutes or just pressure cook it till 1 whistle.
  2. Leave the boiled potatoes on the chopping board to cool naturally. Peel when sufficiently cool to handle.
    (Why not dunk in cold water? – Because that lets more minerals and vitamins dissolve into the ‘cooling water’ too.)
  3. Make a coarse paste of the following ingredients – half onion, pudina leaves, coriander leaves (if using), juice of half a lemon, sugar and the garlic clove. I used the ‘pulse’ button in my mixer to get the coarse texture. Coarse blend paste
  4. To a pan set on high heat, add the oil, sizzle saunf and jeera. Tip in the other half diced onion, fry until pink.
  5. Add the potatoes, salt and toss well. If you wish to get a nice ‘roasted feel’, let them simmer, scraping and tossing occasionally for 10 – 15 minutes. Salt the frying potatoes
  6. When the potatoes are done, add the coarse ground paste as a final step, toss the pan well to let the paste coat all the potatoes. Switch off flame immediately. Pudina paste - final step
  7. Cover and let flavours rest for 10 minutes. Serve warm with steamed rice and sambar or with hot phulkas.Minty Garlicky Potatoes
Notes
  • Add the crushed garlic to the hot oil instead of adding it to pudina paste if you detest the flavour of raw garlic.
  • Toss boiled potato with cherry tomatoes, (or regular tomato diced) and cucumber with the coarse ground pudina paste, chill and serve as salad.
Ready to dig in..

Apr 1, 2011

Power Pesarattu

Pesarattu is a much loved dish of Andhra or Telugu region of India. I have adapted the ingredients to suit my family’s taste. The use of sprouts and herbs in the batter create a unique power packed combination, easy and amazingly tasty.The herbs helped in masking a slight bitter flavour that sprouts develop. This dish works just right for breakfast in our home. I hope you find it great too! The measures used here serve 5-6 people.
Power Pesarattu
You need   
  1. Mung bean sprouts – 4 cups, heaped
  2. Raw rice – 1/2 cup, rinsed and soaked for 1/2 hour
  3. Ginger – 1 tbsp, chopped fine
  4. Green chillies – 2
  5. Coriander leaves – 1 cup, chopped
  6. Mint leaves – 1 cup, loosely packed
  7. Cumin seeds – 1 tsp
  8. Garlic – 1 pod (optional)
  9. Salt – 1 tbsp ( or more)
  10. Fresh water – 1 cup
  11. Vegetable oil / sesame oil  - 4-5 tbsp, for drizzling over dosas
mint, cumin, ginger, chillisprouts, rice, and coriander


To assemble
  1. Grind all ingredients mentioned under ‘You need’ except oil, to a real smooth batter. I used a mixer grinder. Using garlic gives a ‘kick’ to the final taste, but omitting it does not take away the pleasure either.
  2. Use water sparingly for grinding. The batter should be thinner than usual dosa batter but not too runny.smooth, frothy batter
  3. Hereon, writing the recipe is fairly simple, but creating a good dosa / pesarattu does need some practice!
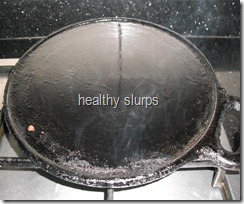
  4. Heat up a dosa griddle real hot. You can see the griddle all smoked up in this picture. Season the griddle with a tsp of oil.
  5. smokin hot
  6. Dribble a ladleful of batter around the griddle, fill up the centre with more batter, and spread very gently to form a circle. Drizzle 1/2 tsp of oil around the dosa, let it sizzle.Mummy look, a green dosa!
  7. Allow to cook through and brown around the sides, ease out the dosa carefully with a sharp spatula and flip over. flip over
  8. Cook this side over medium heat, ease out and remove to a plate when done.
  9. Check the dosa for salt and flavours before proceeding with the rest of the batter. To  salvage a runny batter or too much salt, you could add up to a couple of tbsp of rice flour to the batter. Rice flour will also help the Pesarattu become more ‘flippable’ and less clingy to the dosa griddle.
I did ruin a couple of dosas before I got it right. It helped to have the griddle smoking hot, waiting for the first side to really brown before attempting to loosen it and thereon, cooking over medium heat.
Pesarattu is traditionally served with ginger chutney. I usually serve with a peanut chutney which is a great favourite with my kids.
power pesarattu
Notes
  • Soak, drain, rinse whole mung bean and tie up in a muslin cloth, leave in a moist dark place for 10-12 hours, by which time the seeds would have sprouted and you have super healthy sprouts ready.
  • Mung bean sprouts have been used in Ayurvedic approach and Chinese cuisine for several centuries.
  • Consuming raw sprouts is not advised for toddlers, pregnant women, and in any gastrointestinal disturbance. The ideal way to consume for these people would be to use home  grown sprouts, rinse well, steam or lightly stir fry them.
Nutri notes
  • The sprouting process increases the beans’ enzyme content which means, complex carbs are converted to simpler starches, proteins to amino acids and fats to simpler lipids. As a result sprouts are more easily digested.
  • Sprouting increases sodium and Vitamin C content, both of which add to protein digestibility in the body.
  • Sprouts are 'live' food. They contain active RNA, DNA, in addition to being a veritable enzymes and antioxidants storehouse. They help cell regeneration and can rightly be called ‘fountain of youth’.
  • Dry beans do not have any vitamins or minerals, but we get almost magical amounts of Vitamins A, B, C, Calcium, Sodium, Potassium, Iron, Phosphorous, Manganese, from sprouts. Thus they are very handy in winters when fresh fruits or vegetables are in short supply. Sprouts can be eaten the whole year through too, for the whole host of amazing benefits.
  • Sprouts decrease the oligosacharides in the beans – this means, beans lose their gas producing quality.
  • Sprouting also increases fibre and water content of the beans, thus helping in avoiding or easing constipation.
  • For benefits of pudina and coriander, please do read up my earlier posts.

Oct 12, 2010

Pudina chutney

I was looking for a zesty pick me up to brighten up a usual rice-dal routine.As I rummaged though the fridge,this bright dark green bunch of pudina invited me with it's lovely aroma-this was exactly what could fit my need!I could not wait to convert it into this chutney below; once you have separated leaves from stalks, go ahead and make this quick, delicious pick me up!

You need
  1. Pudina leaves-1 1/2 cups packed
  2. Green chillies-3-4 big
  3. Root ginger-2 tsp chopped
  4. Garlic-7-8 cloves,peeled
  5. Fresh coconut-grated-1/4cup or chopped-1/2 cup
  6. Juice of 1 lemon (can add more if you feel the need for a super tangy taste)
  7. Salt-1/4 tsp
  8. Vegetable oil-1/4 tsp
To assemble
  1. Remove stalks,clean and wash pudina leaves under several changes of water,drain and keep aside.
  2. Take a flat bottomed pan,heat oil in it.
  3. Add chopped green chillies, ginger, garlic to the pan, swirl the pan and let sizzle.
  4. After a minute you can add the washed pudina leaves, toss in the oil for a quick coating.Do not fry for more than a minute-you will lose the flavor and colour if you do.
  5. Take a fresh coconut halved, and grate or chop out the white flesh (use quantity, as given in ingredient list)
  6. After the fried ingredients have cooled, place these and the coconut in a mixer grinder, add the salt and grind to a smooth paste.Use the lemon juice instead of water,midway through the grinding.You can add another tsp or two of water after adding the juice,(if required).
  7. Your tangy bursting-with -good-health-pudina- chutney is ready!
Notes
  • This chutney can be stored in the fridge for a couple of days,and upto 10 days in a freezer box in the freezer;thaw only as much as you would use up each time.
  • The chutney works great to perk up a meal,as a sandwich spread,or a tangy spread for rotis-fill up with salad veggies,roll and eat!
  • You can use fresh raw mango in season instead of lemon juice-it adds body to the chutney too.
  • Can avoid ginger and garlic and use only green chillies for a slight change in flavour.
  • Can make the same chutney using fresh coriander (cilantro) leaves too,use 1 1/2 cup of chopped leaves to substitute for every cup of pudina leaves.
  • Take care-Do not  fry the leaves for more than a minute.
Now for the nutri notes
  • Ginger, garlic and pudina are known to be excellent digestive aids, they relieve gas, distension, and improve digestion.
  • At a good 15mg of iron per100g of pudina leaves, mint packs in good punch!
  • Combining lemon juice or raw mango in the chutney makes Vitamin C readily available.Vitamin C improves iron absorption in the body.
  • Pudina also adds to the fibre content of the meal.
  • With virtually no sodium, it is a good choice for both hypertensive (blood pressure) and some renal patients, who need to control sodium intake.Of course, adding salt to the dish increases the sodium content.You can use low sodium salt insted of regular table salt in case of sodium restriction.
Here follows the visuals


    frying ingredients
    toss pudina leaves in oil

     fresh coconut
    pudina chutney