Showing posts with label side dish. Show all posts

Mar 28, 2015

Recipe: Sweet and Sour Pumpkin Curry

Sweet pumpkin is also known as Kaddu, Manjal Pooshanikkai, Gummadikayi in different Indian languages. Often considered as a lowly, humble vegetable, pumpkin actually packs a great punch in terms of nutrients. It is a weight watcher’s delight.

Sweet pumpkin has less calories and more nutrients. To explain this better, it has four times lesser calories than sweet potato, 50 times lesser Sodium but 3 times more Vitamin C, double the folic acid, and similar Calcium, Magnesium, Phosphorus, Iron content. This means that you can eat more of sweet pumpkin than sweet potato (up to 4 times more) and still benefit from its rich nutrients without the calorie overload. More health for lesser calories, now is that not a winner?

Sweet pumpkin seems to be this gentle, powerful giant among vegetables. It looks elegant despite its rotund form, swathed in deep green or mustard yellow skin revealing a firm sweet golden flesh when cut. Lends a quiet dignified presence to a dish, knows to be at home in sweet or savoury recipes with equal ease. Delicious whether cooked with skin or without. Pumpkin often comes to my rescue when I have to cook in a hurry.

Every family has their favourite pumpkin recipe. This is ours. I hope you have as much fun cooking it and enjoying as we do.

Pumpkin in a bowl

Preparation Time – 20 minutes, Cooking Time – 10-15 minutes, Serves – 4-6.

ALLERGY INFORMATION

  • Does NOT contain egg, gluten, soya, lactose, yeast, corn, nuts.
  • Suitable for gluten, lactose intolerance or nut allergy.

YOU NEED -

COOKWARE – Knife, Cutting board, Fry pan

INGREDIENTS -

  1. 2 cups chopped sweet yellow pumpkin (with* or without skin)
  2. 1/2 cup finely diced onion
  3. 1 cup chopped tomato
  4. 1 scant tsp salt
  5. 1/2 tsp turmeric
  6. 2 tsp jaggery powder
  7. 1 tsp garam masala powder
  8. 1 tsp sambhar powder
  9. 2 tsp cooking oil
  10. 1/2 tsp mustard seeds
  11. 1/2 tsp cumin seeds
  12. 2 tbsp coriander leaves for garnish

*Sweet pumpkin takes longer to cook with skin and lesser time without skin.

            METHOD -

            1. Clean, peel and chop all vegetables. Set aside separately.
            2. Heat oil in a fry pan, add mustard and cumin.
            3. When they sizzle and crackle, add in onions, fry on high flame for 3-4 minutes until they turn pink-brown.
            4. Next to go in is the chopped pumpkin. Saute on high heat for a minute, sprinkle water and cover and cook for a further 2 minutes.
            5. Finally add the tomatoes. Keep tossing over high heat until tomatoes mush up.
            6. Add salt, turmeric powder, jaggery, garam masala and sambhar powder. Mix everything well. Cover and simmer for 2-3 minutes more.
            7. Garnish with fresh chopped coriander leaves and serve hot with steamed rice.

            Pumpkin Sweet and sour curry

            Notes -

            • Sweet pumpkin cooks very quickly. Cook lesser if you want to retain the shape of the vegetables. Cook longer if you like a mushy texture.
            • Keep stirring while on high heat to avoid scorching.
            • Add the powders after the vegetables are mostly done. This helps to retain flavours better.

            Life's simple pleasures

            Feb 10, 2015

            Nellikkai Thair Pachadi / Amla Raita

            Do you know that Amla or the Indian Gooseberry has the highest Vitamin C content among all vegetables and fruits? That it has mention in ancient Sanskrit texts, is used extensively in Ayurvedic medicine, and is considered a miracle fruit. Amla can be used to treat eye disorders, increase calcium absorption in the bones, help build strong bones, cure skin ailments, strengthen and nourish hair, promote hair growth, actually just about do anything healthy and nourishing for our bodies.

            The Indian Gooseberry (Amla) also has known anti oxidant properties. Amla has been found to offer a full range of benefits from free radical scavenging, anti inflammatory properties, beneficial effect on diabetes.   It is also widely used for its ability to dissolve plaques in arteries, reducing serum cholesterol levels.

            Studies have also shown that even preserving in brine or pickling does not reduce the availability of vitamins, especially Vitamin C. Readers may be aware that vitamins B and C are easily destroyed when food is exposed to sunlight or heat, or excess water during cooking. So excessively cooked foods or preserved foods lose their vitamin content over time. Not so with Amla. This miracle fruit continues to dole out its health benefits even when cooked or preserved.

            Despite having such a wonder fruit growing in our midst, I feel people in India do not make full use of it. We are in search of that elusive magic potion sourced from deep in the Amazon forests or some wonder drug that is shipped from a Scandinavian country. While those drugs/potions/foods may be good in them selves, I ask myself and everyone reading this – Is it wise to ignore the wealth in your backyard and seek something from far away? Are the money, effort, rising fuel costs, justified?

            I, for one, am going to include more of this wonder fruit ‘Amla’ in my family’s meals. I am sure all of you have recipes from different cuisines with Amla as the main ingredient. Do share your favourite recipes with Amla in the comment section below.

            Here is one simple, really quick, tongue tickling recipe with Amla. Perks up any meal and loads you up with its nutrients. Go on. Try it out.

            Luminous Amla

            ALLERGY INFORMATION

            • Does NOT contain gluten, lactose, nuts, corn, soya.
            • Suitable for people with gluten or lactose intolerance, or nut allergy.

            Preparation Time – 10 minutes, Cooking Time – 5 minutes, Serves – 4-6

            You Need -

            Cookware – Small wok, Mixer grinder

            Ingredients -

            1. 4-5 Amla fruits
            2. 2 tbsp fresh grated coconut
            3. 3-4 green chillies
            4. 1/2 cup skim milk curd
            5. 1/4 tsp salt

            For Seasoning -

            1. 1/4 tsp oil
            2. a pinch mustard seeds
            3. a pinch fenugreek seeds
            4. a pinch asafoetida
            5. 3 curry leaves
            6. 1/2 red chilli (optional)

            Method -

            1. Rinse the Amla well. Cut incisions along the segments. Pull out the flesh and discard the seeds.
            2. Grind along with coconut, green chilli, and part of the curd to make a paste. Grind more than a coarse paste but stop short of a fine paste.  Add the rest of the measured curd and whip along with the paste.
            3. Heat oil in a small wok/kadai/fry pan.
            4. Add ingredients for seasoning in order. When mustard crackles, pour in the ground mixture, and add salt. Simmer until the liquid foams up.  Do not boil this mixture. Keep stirring over medium heat for it to cook lightly.
            5. Remove to serving bowl and enjoy with hot phulkas,  or steamed rice, a dal and some stir fried vegetables.

            Quick Amla Raita


            Nov 25, 2014

            Cabbage and Carrot Thoran

            Cabbage does grow all year round, but acquires its best flavours only in winter. Since cabbage is quite sweet and less pungent in these months, it is easy to include it in several dishes. I often make a cabbage soup in this chilly weather too. It actually tastes much better than we would imagine. None of the bitter, sulphurous, menacing notes to it – just some crisp sweetness and heart warming honesty. Well about the soup, later. About cabbage first.

            Cabbage has most of the vitamins and minerals we need daily. It has a high content of vitamin B and C. Besides, it is also high in fibre, potassium as well as low in sodium. It is also a fair source of Omega 6 fatty acids. These point to it being an excellent vegetable for people with high blood pressure, or are pregnant, or suffering from constipation too. Cabbage has small amounts of an ‘anti nutrient’ called as ‘protease inhibitor’. This prevents proteins from being digested well in the body. Hence it is better to cook cabbage lightly and then eat. Cooking deactivates the inhibitors and improves digestion of the vegetable and the entire meal.

            Stir frying cabbage is the best way to cook it. The vegetable is stripped of its anti nutrients through minimal cooking, yet, the vitamins lost by heating are reduced too. Adding carrots to this recipe is optional. I’ve just added them for extra colour.

            Select cabbage that has a compact oblong head vs a flat-ish round shape. Also, if a smaller cabbage weighs more than a larger one, then you can be sure the smaller dense cabbage will taste better.


            Cabbage Thoran


            Now I’ll walk you through one traditional Kerala recipe. It is as simple as it gets. Thinly shredded cabbage is tossed in a seasoning of oil, mustard and curry leaves. It is salted, stir fried and finished off with fragrant coconut and green chillies. A worthy accompaniment to tangy spicy sambar or kadhi/ moar kuzhambu and steamed rice. Can be tweaked a little to work as side dish to bhakri or phulkas too.


            Dal and Cabbage stir fry vying for attention

            ALLERGY INFORMATION

            • Does not contain egg, gluten, soya, corn, nuts, lactose or dairy.
            • Suitable for people with lactose intolerance or gluten sensitivity, or nut allergy.

            Preparation Time – 15 minutes, Cooking Time – 15 minutes, Serves – 4.

            You Need

            Cookware – Knife, Cutting Board, Wok/Fry pan of about 4 litre capacity, metal spatula, mixer grinder,

            Ingredients

            1. 1 whole cabbage weighing 800-1000gms
            2. 1/4 kg Orange/Red Carrots (optional)
            3. 2 tsp cooking oil
            4. 1 tsp salt
            5. 1/2 tsp mustard seeds
            6. 1/2 tsp urad dal
            7. 10-12 curry leaves torn up
            8. 1/4 cup grated fresh coconut
            9. 2-4 green chillies depending on heat preference
            10. 1/4 tsp cumin seeds
            11. 1-2 cloves garlic(optional)

            To Assemble

            1. Remove outer bruised leaves of cabbage, if any, and shred/chop finely.
            2. Peel carrots and grate on the large hole of grater.
            3. Heat up oil in a wok. Season oil with mustard seeds and urad dal. Add curry leaves when the mustard crackles, and tip in the chopped vegetables.
            4. Stir fry over high heat for a couple of minutes. Sprinkle a few tablespoons of water, cover and let cook for 3-4 minutes. Open lid and mix well a couple of times in between for uniform cooking.
            5. Meanwhile, whizz the grated coconut with chillies, cumin, and garlic (if using) in a mixer to a coarse mixture. Do not add any water while grinding this.
            6. After 3-4 minutes, when the cabbage feels cooked through, yet retaining some crispness, add salt and then add the coconut mixture and fold through the stir fry well. Keep stirring over high heat, especially if using garlic, to eliminate raw odour. Remove from flame. Cover and let flavours mingle for 5-10 minutes.
            7. Serve warm with steamed rice, and tomato dal, or sambar, or kadhi. I served it with a ‘Basella greens’ and tomato dal and steamed rice.

            The red chilli in the dal does not taste as sinister as it looks!

            A complete meal

            Nov 17, 2014

            Roasted Brinjal Raita / Eggplant Raita / Roasted Eggplant Dip

            The best meals are often the simplest ones. Those which can be rustled up with really few ingredients, in minimum time, and deliver high on nutrition, as well as satisfaction. Quick cooking=happy eating=content tummies.

            This raita is one such recipe. Besides, the dish is versatile in that it can be used in many ways. The day I made it at home, we used it as raita, dip, as well as a substitute for mayo in sandwiches! So does it taste like baba ghanoush? Well, not quite. Tzatziki? well, maybe. Punjabi Baingan Bharta? mmm, not that either.

            Why don’t we  just delve in and find out? Shall we?

            Chilled bowl of smoky raita

            The secret to an amazing brinjal raita lies in how it is smoked. While purists will tell you to rub some oil on the skin and roast on all sides over an open flame patiently turning it over and watching lest it char beyond recognition, i am going to let you in on a secret!

            Just rinse the brinjal, wipe dry, slit into four long pieces, place in a microwave safe glass bowl and cook on the highest power for 6-7 minutes. Now take each piece and roast them individually over an open flame for just a minute per piece.  Dunk them in a bowl of cold water, peel the charred skin and reserve the pulp. This whole process takes less than 15 minutes. This gives the right amount of smokiness to the pulp without being overpowering. It also frees you up to attend to the rest of the meal while it cooks in the microwave. No need to tend to it constantly. Plus a total reduction in cooking time.

            Now that I have simplified it for you, go ahead and make yourself some fragrant raita/dip/sandwich filling/meal by itself.

            Come and eat me!

            ALLERGY INFORMATION

            • Does NOT contain gluten, nuts, corn, soya, eggs.
            • Has dairy in the form of skim milk curd (yoghurt). Usually tolerated by people with lactose intolerance.

            Preparation Time – 15 minutes, Cooking time – 15 minutes, Serves – 4

            You Need

            Cookware – Knife, Cutting Board, Small Sauce pan / Tadka pan,  Bowl of 1 litre capacity.

            Ingredients

            1. 1 Big Violet Brinjal/Eggplant weighing approximately 500gms
            2. 1 cup Fresh curd
            3. 1/2 tsp salt
            4. A pinch sugar
            5. 1/4 tsp mustard seeds
            6. 1 small green chilli
            7. 1/4 tsp cooking oil
            8. a pinch of asafoetida powder
            9. a few curry leaves and coriander leaves for garnish – optional

            To Assemble

            1. Prepare the brinjal/ aubergine/eggplant as described earlier. To repeat – wash, wipe dry, slit along length of brinjal into 3 pieces. cook for 6-7 minutes in microwave safe glass bowl at highest power. You may add 2-3 tbsp water to the bowl to help cook without shrinking. I find this method works best for me.
            2. After this, place each piece individually over an open small flame and char the skin. Dunk all of them into a bowl of cold water. When cool enough to handle, peel the skin off and reserve the pulp.
            3. Mash the pulp with potato masher/fork.
            4. Whip curd with sugar and salt. Add the mashed brinjal, and stir in well to combine. Raita just needs seasoning now.
            5. Prepare the seasoning by heating oil in a small sauce pan/tadka pan. Add mustard seeds, when they crackle, add slit green chilli, asafoetida powder. Switch off flame. Pour over the raita. Add the curry leaves and coriander leaves, if using, stir in and let it rest for few minutes.

            Your delicious fragrant raita is ready! Serve with hot phulkas, paratha, bisi bele bhath, biryani, filling for sandwich, dip for crudites, wraps. Don’t want to make anything else? Just have it chilled. A bowlful. As it is.

            Get me a bowl of this,quick!

            Notes -

            • This method of cooking first and smoking next allows for a good desirable smokiness. Even agnostics of smoky flavours will find it appealing.
            • Do not omit the seasoning. It is crucial in bringing all the flavours together.
            • Some chilling will really help in elevating this simple creation. However, if you are in a hurry, don’t worry. Just dig in.

            Jun 3, 2014

            Peerkangai chutney


            I seem to be on a spree to cook with un-glamorous, un-restaurant-y, humble vegetables. Well, why not? Gourds are very easy on the wallet and the waist line, mostly neutral in flavour, lend body to various dishes, have varied nutritional benefits but are ignored despite all these.

            Pic Courtesy - Sankalpfarms.com

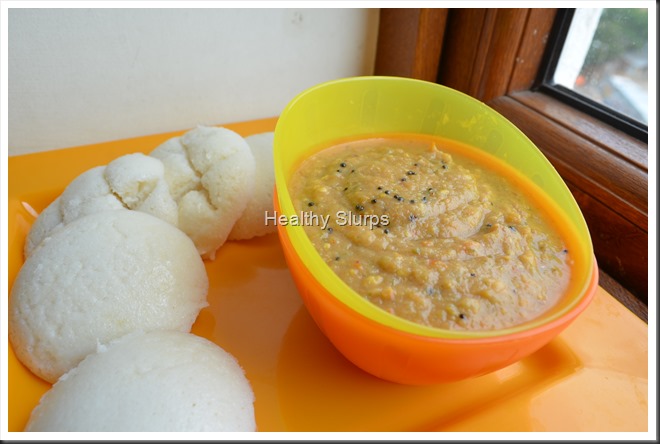
            No South Indian breakfast is complete without chutney. That inevitably means use of fresh coconut. On days when you do not have stock of fresh/frozen coconut, or want to limit it’s use in daily meals, you need some saviour to rescue the day’s chutney. Enter the star of today’s chutney - ridge gourd. I have used it in this recipe to benefit from the nutrients it offers, as much as a coconut-substitute.

            • Ridge gourd is high in moisture and crude fibre (good news for those with chronic constipation).
            • It is a very low calorie vegetable, so great to include in a weight loss diet. It adds plenty of bulk to a meal without adding significant calories! This means, you can eat a whole cupful of ridge gourd and add less than 20 calories to the meal!
            • Ridge Gourd has negligible Sodium and a fair source of Potassium. Hence it is useful for people with high blood pressure or certain kidney ailments where sodium is severely restricted.

            Here is how I made the chutney. We used it to complement soft idlis for breakfast. It was spicy, tangy and declared ‘good’ by my family. Do try it out and let me know how you liked it. The quantity here serves 5-6. Halve to serve 2-3.The chutney can be refrigerated and used within 2 days.

            Preparation Time – 15 minutes ; Cooking Time – 5-6 minutes ; Serves – 5 – 6

            Allergy Information – Does NOT contain gluten, egg, soya, peanuts, corn, lactose.

            You Need

             Cookware  -  A frying pan, mixer grinder or food processor

            Ingredients

            1. Red Onion – 1 medium, or measure 1/2 cup after chopping
            2. Roma Tomatoes – 2 medium, or measure 3/4 cup chopped
            3. Ridge Gourd / Peerkangai – 1 big, or measure 1+1/2 cups sliced
            4. Green chilli – 4-5 cut into halves
            5. Chana dal – 2 tbsp
            6. Tamarind – 1/4 tsp*
            7. Salt – 1/2 tsp
            8. Oil – 1/2 tsp
            9. Coriander leaves – 6-7 stalks with leaves (optional)

            For Seasoning -

            1. Oil - 1/4 tsp
            2. Mustard seeds – /4 tsp
            3. Hing Powder – a pinch

            * Use Tamarind if tomatoes are not tart enough, or add a couple of extra tomatoes and avoid tamarind. You can even omit tamarind entirely if you do not prefer a sour-ish chutney

            To Assemble

            1. Prepare the vegetables for frying. To begin,  wash, peel and chop onions. Next, wash peel and chop tomatoes and green chilli. Rinse the ridge gourd well, peel part of the rough skin at the ridges, while leaving some skin on the vegetable. Cut into thick slices.Fry all vegetables for chutney
            2. Heat a small wok / frying pan. Add the half tsp oil, let it heat up. Add the chana dal, fry over medium heat until golden brown. Add all the prepared vegetables, chilli, tamarind and salt. Toss well, (do not add any water), cover and simmer for 2–3 minutes or until you find the tomato skin has shrunk a little bit and the gourd seems to go slightly limp. If you are using  coriander leaves, add at this point, and switch off flame.
            3. Let it cool. Grind to a coarse paste. You will not need any water for grinding. After removing to a bowl, rinse out the mixer jug with a 1/4 cup of water and add to the chutney if you wish to dilute it. Chutney with Seasoning
            4. Heat oil for seasoning. Crackle mustard seeds, add hing powder and pour over the chutney.
            5. Serve as accompaniment to idli, dosa, or over plain steamed rice, as a sandwich spread or as dip for crudites too!

            Soft Idlis with Spicy Chutney

            Fresh breakfast for two!

            May 22, 2014

            Keerai Masyial

             
            Few dishes can beat the simplicity of Keerai Masiyal. However, as a child, this was not my favoured dish. I have pretended every ailment to escape eating this ‘ green paste’. Now I am better able to appreciate it’s subtlety of flavour, the health benefits, ease of preparation, and the brilliant hue of this humble dish. When the summer heat is making cooking a painful chore, I urge you to try this out. Can be put together in under 15 minutes, needs very few ingredients, and supremely healthy, what’s not to like?
            Steaming Keerai Masiyal
            I have used Palak in this dish, but Amaranth, Arai Keerai, Siru Keerai, can also be used. In fact, using different greens in rotation brings each one’s unique health benefits to the table.
            • Agathi Keerai has more than 12 times the Calcium found in Palak and more than 3 times that found in Methi leaves.
            • Radish Leaves, Siru Keerai, Arai Keerai, Manathakkali Keerai and Paruppu Keerai are all very rich in Iron. They have more than 3 times the Iron found in Agathi Keerai or Palak .
            • Amaranth and Agathi Keerai lead in Vitamin C while Palak, Mint and Amaranth lead in Folic Acid content.
            • Paruppu Keerai and Palak have a low Sodium and high Potassium combination which makes it ideal for people with high BP or kidney ailments or gout.
            In a survey conducted by the National Nutrition Monitoring Bureau (NNMB), Indians were found to consume far lesser (average - 48gm/day) than the recommended 300 gm vegetables per day.Of this RDA of 300 gm, The National Institute of Nutrition, recommends at least 100 gm greens per person per day.
            Here is the Food Pyramid picture as released by the National Institute of Nutrition, 2011. It helps to form a visual idea of what should be on our plate everyday!
             
            Pic Courtesy - Dietary Guidelines for Indians, NIN
            Finally to the recipe of the day -
            You Need-
            1. Palak or any other greens – 4 packed cups of leaves.
            2. Salt – 1/2  tsp to 3/4 tsp ( use as needed)
            For seasoning -
            1. Oil – 2 tsp
            2. Mustard seeds – 1/2 tsp
            3. Urad Dal – 2 tbsp
            4. Red Chilli – 2, broken into halves
            5. Grated fresh coconut – 1/2 tsp (optional)
            To Assemble -
            1. Pick leaves and tender stems. Discard stems that are thick. Measure 4 packed cups.
            2. Wash well in a colander in several batches. Or fill water in the kitchen sink and submerge the greens in the sink tub. This is a great way to wash quickly and effectively.
            3. Drain well. Chop roughly. Any size and shape will do. It needs to be blended anyway.
            4. Place a large wok on heat, add the greens and let it cook in it’s own juices. If it looks like it is sticking to the bottom of the pan, add half a cup of water. stir through a couple of times so that the greens get cooked uniformly. After 5-7 minutes, the greens should be just cooked enough. Cool and grind to smooth paste with any water that may be left over in the pan.
            5. Return the puree to the wok, place wok over fire, rinse the blender jar with 1/4 cup water, add that too to the wok. Add salt, mix well, taste and add more as/if needed.
            6. To a small seasoning pan, add oil, place over heat, add mustard seeds, urad dal, red chillies. When you hear happy crackles, enjoy the sizzle and the aroma, pour it into the Masiyal before it chars! Smile If using grated coconut, add it to the seasoning pan last, stir around until the coconut turns a golden hue and pour over the Masiyal.
            7. Enjoy hot with steamed rice, sambar and a cucumber carrot salad with lemon dressing.  Vitamin C in the lemon juice helps in better iron absorption.
            NOTES -
            • For local and botanical names of all the Greens mentioned in this post, please refer to Glossary of Ingredients Page.
            • To retain nutrients in greens cook in just enough water until just cooked. Do not discard the water, use it up in the recipe.
            • To retain the colour of greens, add half a tsp sugar while cooking, leave pan uncovered, cook quickly over high heat instead of low flame for a longer time.
            • Add a sliced onion and couple of crushed garlic cloves to the seasoning for a twist in flavour.
            Enjoy Masiyal with Steamed Rice
             

            Mar 29, 2014

            Hesaru Kalu and Sabsige Soppu Palya


            A Happy Ugadi to all readers. Wishing plenty of good health, happiness and laughter in all your homes. All who celebrate must be busy with the shopping and cooking of the special Ugadi feast. Ugadi, Yugadi, Gudi Padwa are different names to the New Year Celebrations across Karnataka, Andhra and Maharashtra. As part of festivities, I bring to you an extremely flavourful and healthy dish from the North Karnataka region.
            If the name of the dish sounds tongue twisting to non-Kannadigas,  I apologise. Do not let the long name fool you. It just means ‘a curry with mung bean and dill leaves’.The dish itself is quite easy to put together. A North Karnataka special recipe, I was introduced to this super aromatic and healthy dish at my dear friend Deepa’s place. Deepa’s enthusiasm for life and generous nature is so infectious. I do have a feeling that she is so high on life because she makes and shares dishes like these, which are so nutritious and lip-smacking tasty at the same time.
            Dill leaves are used in several cuisines around the world. What’s good about dill leaves? This amazing aromatic green is very low in Saturated Fat and Cholesterol. It is also a good source of 1.Dietary Fiber, and a very good source of 2. Vitamins - Vitamin A, Vitamin C, Riboflavin, Vitamin B6, Folate, Niacin as well as 3. Minerals - Phosphorus, Zinc and Copper, Calcium, Iron, Magnesium, Potassium and Manganese.
            To those not familiar with the flavour, it does take some time to accept. To be honest with you, my family was not so welcoming of the dill flavour when I made it first. At the next attempt, I reduced the quantity of dill leaves to half that of the mung beans. This then, found appreciation among my ‘testers and tasters’ - (read family).
            Dill leaves and Mung bean
            You Need
            1. Mung Bean – uncooked, 1 cup
            2. Dill leaves – pick leaves, discard thick stem and measure 1/2 cup packed
            3. Onion – diced, 1/4 cup
            4. Oil – 1 tbsp
            5. Mustard seeds – 1/2 tsp
            6. Green chilli – 4-5 chopped fine
            7. Salt – 1 level tsp or less
            To Assemble
            1. Rinse the mung beans well, pressure cook them in just enough water for only 2 whistles or till just cooked but not mushy.
            2. Was the picked dill leaves under several changes of water, chop fine and set aside.
            3. Heat oil in a pan, add mustard to crackle, pour in the chopped green chilli and diced onion. Toss well till light brown. Saute onion in oil
            4. Add the dill leaves, sauté on high heat, stirring briskly. Add chopped dill leaves
            5. When the leaves have been tossing for a couple of minutes, add the cooked mung beans, add salt to taste. If there is extra water from the cooked beans, add only if required to the pan at this point. The curry should be moist but not ‘gravy–ish’. Add cooked mung bean
            6. Stir on high heat for 2 more minutes, switch off flame, cover and set aside for flavours to blend well. Ready to serve after half an hour with Steamed rice or Jowar Roti.
            Palya ready! Don't you like the red hot chili?
            Hesaru kalu sabsige soppu palya - Happy Ugadi