Jul 31, 2017

Poha Alu Tikki

Finding myself with a big bowl of leftover Kanda Poha, I was wondering what to upcycle it as. It seemed such a shame to throw away such precious organic red poha. Thus was born Poha Alu tikki. Since rice flakes (Poha) is so quick to soak, and because the tikki is easy to put together with readily available ingredients, I am sure you will enjoy making and savoring this simple Poha Alu Tikki as much as we did.

You can use either Red or White Poha for this Poha Alu Tikki. Or you can use up leftover Aval upma/Kanda Poha like me! Just add a boiled potato for binding, some herbs and seasonings, and the Poha Alu Tikki is ready to be pan fried and gorged upon.

Here is how I made Poha Alu Tikki.

Tikki platter

ALLERGY INFORMATION

  • Does NOT contain lactose, nuts, soya, corn, egg.
  • Suitable for people with gluten allergy or lactose intolerance,

Preparation Time -  15-20 minutes, Cooking Time –  25–30 minutes, Makes – 12 –14 medium size tikkis. 

YOU NEED

COOKWARE – colander, 5 litre mixing bowl, chopping board, knife, potato masher, non-stick tawa/griddle

INGREDIENTS

  1. 1 heaped cup Red/ White rice flakes ( poha). I used *Red Poha. OR 1 heaped bowl leftover aval upma/Kanda Poha
  2. 1 medium potato boiled, or half cup boiled mashed potato
  3. 1/4 cup finely minced red onion
  4. 2 green chillies, finely minced
  5. a handful of fresh coriander leaves,finely minced
  6. 1/2 teaspoon salt
  7. 1/2 teaspoon amchur powder
  8. 1/2 teaspoon garam masala powder

METHOD

  1. If using fresh rice flakes(Poha), cover with fresh water, soak for 5 minutes. Then place in a colander and rinse under running water. Set to drain.
  2. Clean and mince finely onion, green chilly, and coriander leaves.
  3. Add the above to the drained poha, mashed potato, salt, amchur and garam masala in a mixing bowl. Mash them together using a potato masher. Mix well to a homogenous mixture.
  4. Make big lemon size balls, flatten slightly, and shallow fry on a heated non-stick tawa. Drizzle as little oil as possible while shallow frying. Flip to other side, and cook till browned. Take care to brown both sides evenly.
  5. Remove to serving plate. Serve with onion rings and mint chutney.

Tikki close upTikki close up 2


Apr 26, 2017

Eggless Whole Wheat Banana Pancakes

Pancakes make a tasty and quick breakfast food. Most children seem to love them. Pancakes are very versatile and can be made interesting with different toppings. I realised that it is time to give pancakes the Healthy Slurps twist. Since pancakes are usually made with all purpose flour, I do not rate them high on nutritive value. Instead, here is a recipe for whole wheat pancakes. What’s more, these Eggless Whole wheat Banana Pancakes taste very delicious even without any toppings.
This recipe is especially for those who do not eat eggs, and despair at the non-availability of eggless pancakes, or recipes for it. Look no further. I am really delighted to share this winner recipe with all. I have used organic whole wheat flour and organic jaggery powder to make these delicious eggless whole wheat banana pancakes. You could substitute these with normal whole wheat flour and jaggery/brown sugar too. I have not used any baking soda either. The banana takes care of it all.
Here is how you can enjoy these soft, fluffy eggless whole wheat banana pancakes at your homes too.
Banana pancakes topped with butter
ALLERGY INFORMATION
  • Contains wheat gluten. NOT suitable for people with gluten allergy.
  • Does NOT contain nuts, lactose, soya, corn, eggs. Suitable for people with nut allergy or lactose intolerance. People with lactose intolerance can use any cooking oil instead of butter.
Preparation Time – 15-20 minutes, Cooking Time – 30 minutes, Makes -
YOU NEED
COOKWARE – Non-stick skillet, spatula,wire whisk, ladle, mixing bowl, fine sieve
INGREDIENTS -
  1. 1 +1/2 cup organic whole wheat flour
  2. 1 cup organic jaggery powder / 1 cup brown sugar powdered
  3. 1 Banana, mashed up with a fork (I used Dole)
  4. 1 cup drinking water plus few teaspoons of water or milk if needed
  5. 1/4 cup unsalted melted butter (Or use any odourless cooking oil in place of butter)
METHOD -
  1. Dissolve the jaggery/brown sugar in water. Stir briskly with wire whisk to blend. You can also warm up the water to speed it up.
  2. Once the jaggery has dissolved, (Takes about 5 minutes,) filter the liquid through a mesh sieve to remove grit.
  3. To the filtered liquid, add the whole wheat flour in a slow drizzle. Keep stirring briskly with wire whisk to avoid lumps.
  4. Once the flour is blended in, add the mashed banana and bring the whole batter together by mixing thoroughly. Batter should be of thick pouring consistency. it should thickly coat the back of a ladle. Add a few teaspoons of water/milk to your batter, only if needed.
  5. Heat up a non-stick skillet. Drizzle a few drops of butter on the pan. When you see a few fumes, the skillet is hot enough.
  6. Lower the heat, pour a ladleful of batter on the centre of pan. Tilt it gently to let batter spread. Do NOT swirl the pan too much. A gentle tilt will do. Keep skillet on medium flame. Drizzle a few drops of butter around the sides of the pancake.
  7. When the underside looks brown, flip the pancake over with a spatula. Cook over a low flame for a few minutes. Remove to serving platter when done.
  8. Repeat with rest of batter.
  9. I like to make mini pancakes by dropping teaspoonfuls of batter all around the skillet and patiently turning over each one.
  10. Serve hot, warm, cold. Serve plain, with some fruits, or with honey drizzled over. Once fully cold, these can be packed in school lunches too. They stick together when warm. You could use butter paper between pancakes while packing too. Great for picnics, road trips, school or office lunches, after school snacks.
Soft spongy banana pancakes

Feb 21, 2017

Mirch ka Salan with Mishti Pulao

Mirch ka Salan is a famous Hyderabadi dish. The dish is said to have originated in the kitchens of the Nizams. I would believe that, as the dish uses tamarind as souring agent, a practise mostly used in South India. Also peanuts (local produce) and sesame are used instead of other nuts and dry fruits(more prevalent in Awadhi cuisine). Whatever be its origin, Mirch ka Salan always elevates the meal from a common to an exotic one. It finds a definite place in wedding feasts and other important festive meals.

At our home, Mirch ka Salan is a holiday favourite. The star of a luxurious, happy meal. The main dish when important guests come over. Almost always, Mirch ka Salan is paired with the most fragrant Mishti Pulao, a sweet, fragrant Bengali dish, also a festive treat. One Hyderbadi, one Bengali..but the pairing is made in heaven. A happy marriage which we relish down to the last morsel. The tango of the sweet and aromatic Mishti Pulao with the tart, hot, spicy Salan has to be experienced to be understood.

I was introduced to this very fragrant Mishti Pulao by my dear friend Deepasri Deb. I have followed her recipe to the T. It never fails to make the most perfect, heavenly, fit-for-Gods Mishti Pulao. Check out her treasure trove of recipes at www.hamareerasoi.com 

Here are the recipes for both the dishes.

Mirchi ka Salan

MIRCH KA SALAN

I have adapted Sanjeev Kapoor’s recipe for this. Changes to his recipe include chopping of the fat Bhavnagari Chilli into inch long batons, deseeding them, and not using any extra chillies in the recipe. This helps to scale down the heat in the Mirch ka Salan. I have also made a few changes in the preparation method. Here is how I made Mirchi ka Salan.

ALLERGY INFORMATION

  • Contains peanuts. NOT SUITABLE for people with nut allergy.
  • Does NOT contain gluten, lactose, corn, soya, egg. Suitable for people with gluten intolerance or lactose intolerance.

Preparation Time – 15-20 minutes, Cooking Time – 30 minutes, Serves – 4 as main course or 6 as side dish if used with other accompaniments in the meal.

YOU NEED

COOKWARE – Sharp knife, cutting board, 3-4 litre wok, long flat ladle, small bowl, Mixer-grinder

INGREDIENTS -

  1. 250 gms or 15-18 fat Bhavnagari chillies (bajji mirchi)
  2. A small lemon sized ball of Tamarind
  3. 1/4 heaped cup raw peanuts with skin
  4. 1/4 level cup white sesame seeds
  5. 1/4 level cup fresh grated coconut
  6. 1 tablespoon coriander seeds
  7. 1/2 teaspoon cumin seeds
  8. 3-4 cloves garlic
  9. A thumb size knob of fresh ginger root
  10. 1 medium red onion, finely chopped (1/4 cup finely chopped red onion)
  11. 1/2 teaspoon black mustard seeds
  12. a few curry leaves
  13. 2 tablespoons cooking oil
  14. a pinch turmeric powder (add upto 1 teaspoon if you want a yellow coloured Salan)
  15. 1 heaped teaspoon salt

METHOD

  1. Wash and wipe down the fat chillies. Remove the stem, cut into inch long thick batons, and scrape out the seeds from within.
  2. Soak tamarind in half cup warm water. Squeeze out tamarind juice from it. Repeat with some more warm water. Set tamarind extract aside.
  3. Heat the wok over medium flame. Dry roast the peanuts first. As they begin to brown, tip in sesame. Roast until the sesame begins to crackle. Add the coriander and cumin seeds and roast until aromatic. Do not burn. Keep stirring. Remove to mixer grinder jar.
  4. Return wok to heat, add a drizzle of oil. Fry the ginger and garlic for a minute. Remove this to mixer jar too.
  5. Add the fresh grated coconut to the mixer jar, add some water and grind to smooth paste. Set aside.
  6. Add the rest of the oil to the wok, temper with mustard seeds and curry leaves. When this crackles, add the finely chopped onions and keep stirring over medium flame. When onions turn pink and shiny, add the chopped chilli batons. Saute over high heat for 5 minutes. Keep stirring to avoid charring.
  7. Pour tamarind juice into the wok, add salt, turmeric, cover and cook for 5-7 minutes over medium flame, until the chilli just softens.
  8. Pour in the ground mixture, add half a cup of water, and simmer covered for another 15 minutes.
  9. Switch off flame. Rest for half an hour for flavours to develop. Serve warm or hot with fragrant, sweet, Mishti Pulao.
Royal Feast - Mirch ka Salan with Mishti Pulao

MISHTI PULAO

ALLERGY INFORMATION

  • Contains Cashew nut. People with nut allergy can avoid adding cashew nuts to the recipe.
  • Does NOT contain gluten, corn, soya, egg, or lactose. Suitable for people with gluten or lactose intolerance.

Preparation time – 15 minutes, Cooking Time – 30-35 minutes, Serves – 4 as main course

YOU NEED-

COOKWARE – 3-4 litre wok with fitting lid, ladle, colander

INGREDIENTS -

  1. 1 heaped cup Gobindobhog rice, or Jeera rice, or Basmati rice
  2. 1/4 cup fresh/frozen green peas
  3. 1 teaspoon turmeric powder
  4. 2 tablespoon ghee
  5. 1/2 teaspoon salt
  6. a fistful each of broken cashews and raisins
  7. 1’' piece of cinnamon bark broken into two
  8. 2 bay leaves
  9. 3-4 cloves
  10. 2 green cardamom
  11. 2 black cardamom
  12. 1 mace flower
  13. 5-6 black peppercorns
  14. 3 tablespoon sugar
  15. 2 cups drinking water

METHOD -

  1. Rinse the rice well under running water. Set to drain in colander. Rub in the turmeric powder into the rice and spread the rice in the colander to drain well.
  2. Heat ghee in the wok, add cashews and raisins. Fry over medium flame until golden brown and raisins plump up.
  3. Add spices – cinnamon, bay leaves, mace, peppercorns, cloves, green and black cardamom.
  4. When the spices release aroma (about a minute or two over medium flame) add the rice and sugar. Stir well continuously over medium heat. Add the green peas midway and continue stirring until rice gets a sheen from the ghee. (About 7-10minutes)
  5. Add salt, 2 cups water. Increase flame to highest and bring water to boil.
  6. After water has come to a boil, set wok on your smallest burner, turn down heat to minimum, cover and cook for 10-12 minutes. Switch off flame.
  7. Let it rest for 5-10 minutes. Then, open wok, fluff up rice.
  8. Serve along with tangy, spicy Mirch ka Salan.
Fit for Gods - Mishti Pulao

Apr 18, 2016

Jiyo Natural - Healthy Meal Review

Quite often, we yearn for a simple home cooked meal. Especially when we are working long hours or live away from home or unable to cook our own meals for any reason. Would it not be wonderful to find a reliable meal delivery option?
Jiyo Natural does just that. Not only do they make healthy meals designed by a nutritionist but also customise meals for specific health conditions like diabetes, high cholesterol, or high blood pressure.
When asked to review their lunch delivery meals, I agreed happily. As a nutritionist myself, I was curious too. Here is what I found.
Since their website offers all information, I will restrict my post to my experience and opinion.

The Jiyo Health Meal
I received a call from the nutritionist of Jiyo Natural enquiring about any health conditions, allergies, and such. The lunch menu of the day was explained to me and delivery time agreed upon. This was followed by an email which gave me detailed nutrition information about the meal I was going to receive.
To my happy surprise, the lunch arrived on time. Neatly packed, warm (not hot), no spillage. Packed neatly in two steel tiffin carriers. (I wonder if this is a regular feature, especially after the plastic ban enforced in Bangalore)
This is how it was delivered to me

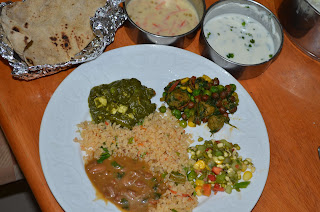
Rotis - Two multigrain, came wrapped in foil. Brown rice Tawa Pulao - Fragrant, cooked just right. Difficult to achieve with brown rice, but I was very happy to see they did. Burrani raita delivered the necessary garlic kick to the pulao. The side dishes were all cooked just right without being overcooked, or spiced heavily either. I especially liked the green peas and soya chunks sabzi for its simple fresh flavours. Special mention must be made of the sprout salad. Crisp, colourful but not soggy or wilted at all. Quite a feat, I would say. A happy ending to the meal was the carrot pudding. Sweetened with jaggery instead of sugar, mildly sweet, satisfying.

Jiyo Health Meal unraveled for you

crisp, colourful salad
 
Jiyo Health Meal on a platter
At 600+ calories, the meal packs in maximum nutrients, so we get quality mindful calories in each mouthful. I found the meal to be quite filling and more than I would consume in a normal lunch. Since a big portion of the meal had protein, my stomach stayed full for longer. I felt better energized through the day. I am sure people with more hearty appetites will appreciate and enjoy the meal.

The Jiyo Manage Meal

This is how the meal came to me

Tightly sealed lunch box

Home-style cooked healthy lunch from Jiyo Manage

This is a customized meal designed after a health analysis carried out by a qualified nutritionist. The Jiyo Manage meal offers hope for working people who have special diet requirements.
As with the Jiyo Health Meal, I received a call from the nutritionist who ran me through her health check questionnaire. My preferences, allergies, and calorie requirements were all considered. She then suggested a suitable meal for me.
The Jiyo Manage Meal had two multigrain phulkas, millet khichdi, chole, mixed vegetable sabzi, raita, and a cucumber carrot salad. While several people may be skeptical about millets in a meal, I found the dish well cooked, mildly flavoured and soul satisfying. The vegetable sabzi was so good, I would have loved a larger serving of it. Salad was fresh and crunchy, as in the Jiyo Health Meal.

What do I think?
Jiyo Natural has taken a vital step in designing and delivering amazingly healthy meals. I am yet to come across an online food delivery option which is focussed on healthy meals. If their claims of using chemical free produce, healthy cooking methods, and natural sweeteners are all true, then we need to look no further for lunch or dinner delivery options. The comfort in knowing that the best practices are followed while cooking our meal and delivering at our doorstep will surely make us want to order from Jiyo Natural.
Price -
Rs. 130/- for Jiyo Health Meal.
Rs. 150/- for Jiyo Manage Meal.
Delivery Areas - Koramangala, HSR Layout, Electronic City, Bellandur.

It would be great if they cover all of Bangalore city in their delivery area.

Mar 15, 2016

Road to Baluchistan–Review of Food Festival @ Baluchi

What happens when star chefs from five properties gather to create a food festival at one location? That too, in our city, Bangalore? You can expect plenty! A few foodies and bloggers were invited to a preview of the ‘Road to Baluchistan’, a food festival currently running at Lalit Ashok Hotel, Bangalore.

Conceived by Chef Suvaranjan and Chef Bharat Kapoor of Baluchi, Bangalore, the Food Festival brings signature dishes of the participating star chefs of each Baluchi restaurant, a few forgotten dishes, and then some modern interpretations of Indian cuisine.

 The Star Chefs of Baluchi

Chef Mumtaz from Baluchi Mumbai, set the mood for the evening with an elegantly plated Subz Gullar Kabab. The kabab, unusually shaped like a samosa was silken smooth on the tongue. Its richness grew on the palate before unleashing the spice and heat within! Perfectly balanced in texture and flavour, this amuse bouche certainly had us all looking forward to the next course.

Amuse bouche I next chose a vegetarian platter of starters while the other diners were offered vegetarian or non-vegetarian platters according to their choice. Sheer morsels of delight, the Mushroom ki Galouti and Malai Artichoke (by Chef Satyabir, New Delhi) were absolutely brilliant! The galouti was unbelievably velvetty on the tongue. The Malai Artichoke had me eyes closed and savouring the lush cream offset by the saltiness of the fleshy artichoke. The Rajwada Paneer Tikka (by Chef Zainul Abedin, Jaipur) scored well on flavour, however the paneer was a tad chewy. Palak ki Nazakat (by Chef Bharat Kapoor, Bangalore) went down reasonably well. I enjoyed the tomato relish on this kabab better than the kabab itself. Plated with pomegranate molasses, balsamic reduction, and pineapple relish,  the presentation and the taste had everyone nodding happily in approval. The surprise churan powder and gold dusted green olive on the platter had all of us in ‘oooohhs’ and ‘aaaahs’.

Note the elegant plating, don’t miss the gold olive either!

Elegantly plated starters

The Baluchi, Bangalore has introduced a Naanery coupled with unique chutneys and paired with an interesting wine list. On offer that evening were Baqarkhani (a Kashmiri roti fragrant with saffron), Besan ki roti (crisp and spiked with ajwain), Pheni Paratha (flaky, rich, crisp, and topped with sesame seeds), and Gilafi Kulcha (stuffed with cheese and peppers), teamed with interesting chutneys such as Raw Papaya chutney, Carrot chutney, Radish chutney and a sweet-spicy Tomato chutney. The wine list includes whites from Vina Esmaralda, a Sauvignon Blanc from Honig, and reds from Brancaia TRE 2012 and KRSMA 2014.

This Naan-wine pairing is sure to pique the interest of discerning gourmets in this city.

From the NaaneryChutneys galore

The main course, aptly named ‘Dawat-e-Lazeez’ arrived soon after. As a vegetarian, I chose to go along with suitable menu options. The Bhindi Singhada, a smart stir fry of fresh Bhindi with crisp water chestnuts tossed with fresh spices won my heart for it’s uniqueness and real-fresh spice flavours. I enjoyed the Paneer parcha mutter, prepared by stuffing a ground green pea mixture inside parcels of soft paneer and simmered in an onion-tomato gravy. This gravy had an interesting texture and gutsy flavours. The Dal Baluchi was superlative in aroma. Silken-creamy on the tongue, smoky aroma, each spoonful was eaten joyfully. The Jodhpuri Gatta Subzi had a hearty, spicy gravy to its advantage, while the Gatta could have been improved by soaking for longer in the gravy. My search for the perfect Rajasthani Gatte ki Subzi continues.

The Vegetarian entreesSome more rotis and naans

Served with more hot Naans, rotis, and assorted breads, and an excellent array of pickles, namely, Kathal ka Achar, Aam ka Achar, Hara Seb ka Achar(outstanding), the main course left me heaving under its array.

A refreshing Pineapple Jeera Granita was welcome as a palate cleanser. A good thing too, for we were presented with a superbly aromatic, unusual ‘Paan Biryani’. Delicately flavoured with Paan leaves, cooked on Dum, and served with Burrani Raita, do not miss this!

Do not miss Paan Biryani

All good things come to an end. We came to a sweet ending of this mighty repast with bowls of Gulab ki Kheer, Malai Kulfi, and hot Gulkhand ke Gulab Jamun! If Gulab (Rose flavour) dominated the dessert options, I did not complain! Of the three, I feel partial to the succulent Gulkhand stuffed Gulab Jamun. Depsite not being a fan of Gulkhand, I could not resist polishing off this hot Jamun.

Sweet endings

If you are a fan of North-Indian food, if you enjoy a carefully curated menu in a soothing ambience by courteous and attentive staff, if you do not want to miss the offering of the some of the best chefs in the country, you should reserve your table at Baluchi, Lalit Ashok, Bangalore. The festival is on till the 20th of March. Open for lunch and dinner with a la carte menu offered. Costs approximately Rs.3000 for two.

A view of interiors

The Open Kitchen

Mar 11, 2016

Apple Berry Milkshake

It feels wonderful to be back after a long break. How have all of you been?
Before we knew it, winter turned to summer in Bangalore. With exams on, and summer heat in full force, we are constantly searching for chilling, refreshing drinks. Surely, staying cool and hydrated has to include delicious and inviting options, correct?
This apple berry milkshake has been the answer to such heated discussions about the best drink in summer. The sudden jump in season from winter to summer made plenty of winter produce like apples and strawberries still available in the market. So, we are making the best use of it.
Made with only 3-4 ingredients, this milkshake can be blended in no time, but tastes best when chilled. So make sure you stock up on chilled milk in your fridge! We are exploring many more liquid deliciousness at our home. Stay tuned for more such chilling posts!Winking smile
Healthy delicious Apple Berry Shake
ALLERGY INFORMATION
  • Contains lactose. People with lactose intolerance can substitute coconut milk or almond milk in place of dairy milk.
  • Does NOT contain gluten, yeast, soya, nuts, corn, eggs.
Preparation time – 10 minutes, Cooking time – nil. Chilling time – 2 hours, Serves - 2
YOU NEED
COOKWARE – Blender, peeler, knife, glasses to serve
INGREDIENTS -
  1. 1 Red Delicious or Fuji apple
  2. 4-5 strawberries
  3. 400 ml chilled skim milk
  4. 1 drop vanilla extract
  5. 1-2 teaspoons sugar (optional)
METHOD
  1. Rinse the fruits thoroughly. Peel and core the apple. Hull the strawberries. Chop the fruits up roughly.
  2. Add the chopped fruits to a blender, pour in half the chilled milk, vanilla extract and blend to super smooth and frothy milk shake. Top up with rest of milk and blend in too.
  3. Taste and add sugar only if needed. Blend for another minute if you are using sugar.
  4. Serve in tall glasses. Top with ice cubes if you wish to.
Cool shakes to beat the heat
Apple Berry Milkshake

Dec 10, 2015

Sai Protein for Chennai Floods

All these days, I have been watching the news with unspeakable pain and sorrow. The Chennai floods, that swept away precious life, left us all shocked and dazed. If the torrential monsoon rains were not enough, the city’s overflowing reservoirs too added to the mayhem. Coupled with indiscriminate real estate development, with no thought given to civic infrastructure, the people of Chennai are paying a very heavy price for the greed of their leaders. 

The terrible times also brought forth unprecedented help from different parts. Normal people turned heroes, and pretend heroes turned zeroes. Homes have been thrown open to complete strangers, people are offering their time and services for free, and heroic tales of survival and rescue are now flooding the social media. It is so heartening to see the generous help that people are offering each other.

While it looks like the rain gods have finally relented, a massive job still lies ahead in the flood-hit areas. Cleaning out the debris, preventing and fighting any water-borne diseases, rebuilding homes,… the task list goes on. In this context, I would like to share a recipe for kanji powder that can be made in bulk and distributed to those affected by the floods. All those want to contribute in some form for Chennai Flood Relief, please do try to make this powder and help those affected. The combination of grains used in this recipe is unique. Designed to be a complete food, 3 tablespoons of the powder dissolved in water or milk (if available), can replace an entire meal. It can be had by people of all ages, toddlers to old people. However, may not be suitable for weaning infants.

In a time when the immunity of a population is at risk, when people do not have access to normal cooking methods, when nutritious food is vital to health, this powder is a God-send. Beats instant noodles or biscuits by several miles in nourishment.

YOU NEED

INGREDIENTS

  1. 6 kilos Whole wheat (wheat pearls)
  2. 1.5 kilos parboiled rice
  3. 1.5 kilos Ragi (finger millet)
  4. 1.5 kilos Green Chickpeas
  5. 1.5 kilos Green Mung Beans
  6. 1.5 kilos Roasted Chana Dal ( Chutney dal)
  7. 0.5 kilo Soya beans
  8. 0.5 kilo Peanuts
  9. 0.5 kilo Jowar grains (sorghum/white millet)
  10. 100 grams Sago (sabudana)
  11. 30 grams cardamom
  12. 10 kilos sugar

METHOD

  1. Dry roast all ingredients from 1 to 10. Roast individually to a golden brown.
  2. Do not roast cardamom and sugar.
  3. Add the cardamom and sugar to the roasted grains. Powder in a flour mill.
  4. This recipe makes about 25 kilos of kanji powder.
  5. To make kanji, dissolve 3 tablespoons of the powder in hot water or hot milk. Stir briskly and serve. 

Please share this recipe/blog post freely. Please make in bulk for your homes or send to those affected by the floods. Either way, you are doing yourself a good turn.