Showing posts with label jaggery. Show all posts

Sep 30, 2015

Chocolate Marbled Energy Bars

Breakfast is the most neglected meal of the day. On busy weekday mornings, most people are in a great rush to reach workplaces, schools, just about anywhere. No wonder then, that, people do not spare time for breakfast. Yet, starting a day without breakfast just works against what we set out to achieve. We are more likely to be zapped of energy and enthusiasm early into the workday. To help us perform better at our tasks, a healthy breakfast is vital. If so, would it not be wonderful if we could have breakfast on the go? Enter granola bars, energy bars, muesli bars. Call them by any name. They are just as convenient, delicious and perfect snacks or meal on the go.

Energy bars can be made ahead, store well, and can be packed as breakfast on the go, or anytime snacks, or on road trips, picnic munchies. They are great for a pre workout or a post workout snack too.

I came across these chocolate marbled energy bars first in ‘Chocolate’ by Delia Smith. The book is filled with decadent chocolate based recipes. However, these energy bars were the ones that caught my eyes first. I tweaked around the ingredients and proportions to suit my requirement. I have substituted the condensed milk with brown sugar/jaggery syrup. You could add both the condensed milk and jaggery syrup to increase the richness of the energy bar too. If using condensed milk, keep the total liquid at the same volume as mentioned in this recipes. I have added popped amaranth seeds to add a good protein to the bar. The only part I have left unchanged is the beautiful marbled chocolate topping! I had to work on the recipe a few times to get a proportion that works best. One that gave just the right hint of sweetness, and had just enough liquid to solid ratio to bake well. I also made sure that the baked energy bars could be cut into neat squares!

Healthy Chocolate marbled Energy Bars

I am sure you are eager to get to the recipe and make some for yourself too. So here goes…

ALLERGY INFORMATION

  • Has gluten from oats. NOT SUITABLE for people with gluten intolerance. Substitute oats with total 5 cups rice flakes to make it gluten free. 
  • This recipe does NOT contain lactose. Suitable for people with lactose intolerance. However, adding condensed milk will bring lactose into the recipe.
  • Does NOT contain corn, soya, eggs.
  • Contains nuts. Omit nuts if you have nut allergy.

Preparation Time – 20 minutes, Cooking Time – 30 minutes, Makes 9 squares

YOU NEED

COOKWARE – Convection oven, 8 inch square baking tray, baking paper to line tray, deep mixing bowl, rubber spatula, sauce pan, 2 glass bowls, steel fine mesh filter, sharp knife

INGREDIENTS

  1. 4 cups quick cooking oats
  2. 1 cup popped amaranth seeds
  3. 1 cup thin rice flakes (poha, aval, attukulu, avalakki)
  4. 1 cup deseeded, chopped sweet dates
  5. 1/2 cup dried cranberries/strawberries/blueberries (optional)
  6. 1/4 cup chopped walnuts/almonds
  7. 1 cup powdered jaggery/brown sugar
  8. 1/2 cup drinking water
  9. 1/2 cup dark cooking chocolate
  10. 1/2 cup white cooking chocolate

METHOD

  1. Bring the water to boil in a saucepan, add the jaggery, mix and let it rest for a few minutes for the jaggery to dissolve. When the jaggery has dissolved completely, strain through the mesh filter to remove impurities. Collect the jaggery solution in the deep mixing bowl.
  2. To the bowl add the oats, popped amaranth, rice flakes, dates, dried berries (if using), and nuts. Mix all the ingredients together until the liquid has coated all dry ingredients.
  3. Preheat oven to 180 C.
  4. Line the baking tray with paper leaving an overhang.
  5. Pat the mixture into the tray, pressing down firmly with a rubber spatula. Make sure there are no dry bits of ingredients on the surface. If needed, sprinkle a few drops of water on top to moisten, and pat down again.
  6. Bake in preheated oven for 20-23 minutes.
  7. Remove and cool the tray on a cooling rack. Do not remove granola from tray. Cool for 20-30 minutes.
  8. Chop the dark and white cooking chocolate into different glass bowls. Microwave in bursts of 20-30 seconds until just beginning to melt. Do not overheat the chocolate, stop heating when there a few bits of chocolate left to melt. Keep stirring with a metal spoon, to get a smooth melted chocolate.
  9. Spoon both the dark and white melted chocolate alternately in a wave pattern over the baked granola. Drag wavy lines using a fork tip or toothpick to create marbled patterns while chocolate is still wet. Tap the tray sharply on the counter top a few times for chocolate to even out.
  10. Place the tray in the fridge to set quickly.
  11. After half an hour, remove from fridge and set on counter top. Wait for the chocolate layer to warm up to room temperature a bit. I left it on the countertop for 10 minutes. Room temperature at my home is around 23C-25C. Cut into 9 squares with a sharp knife. If the chocolate layer seems to crack rather than cut up, wait for some more time and then cut up. The marbled energy bars are ready.
  12. Store in air-tight box. Stays good for at least 1 week, maybe more. I never got a chance to find out! Pack in baking paper for road trips or any place out of home. These marbled energy bars are great for breakfast on the go, for school snack boxes, for pre or post workout snacks, as well as a healthy snack option.

Guilt free healthy snacks

Notes -

  • Diabetics may/may not be able to eat these energy bars. Remember although the recipe uses jaggery, there is more sugar in the dates as well as chocolate. Omitting the chocolate could bring the sugar content of the energy bars lower.
  • The energy bars cut up neatly if baked through well. Also wait patiently for the top chocolate layer to set before cutting into squares.
  • Do not over heat the chocolate. Stop heating when three fourths of the chocolate is melted. Keep stirring in a circular motion, in the same direction for a smooth glossy chocolate.

Sep 20, 2014

Stir fried Bitter Gourd–Nothing Bitter About It

Is it really possible? Can bitter gourd turn sweet? Bitter gourd cannot become sweet, but with this recipe, you will convert the haters into lovers. If you are a lover of the vegetable already, then this recipe is sure to seal your love affair with it for life.

Stir Fried Bitter Gourd

The first step to a successful stir fry is selecting the best produce. If you are a hater, but are going to try this vegetable for the first time, then choose bitter gourd with light green skin. Alternatively, you can select the tiny bitter gourd also called ‘kantola’.

So what is special about this recipe? It can be put together with minimum ingredients. Tastes like a star dish on the table. You can earn brownie points for feeding your family as healthy a vegetable as bitter gourd. Would you like to try it out too? Read on to find how we make it.

Allergy Information

  • Does not contain eggs, soya, dairy, corn, peanuts, any nut.
  • Suitable for gluten intolerant and lactose intolerant people.
  • Suitable for people with nut allergy also.

Preparation time – 20 minutes, Cooking time – 20 minutes, Serves –4-5.

You Need

Cookware – Knife, Cutting board, Deep fry Pan with tight fitting lid

Ingredients

  1. 3/4 cup finely chopped red onions
  2. 1 cup finely chopped vine tomatoes
  3. 1 cup finely chopped bitter gourd
  4. 1/2  tsp turmeric powder
  5. 1 heaped tsp salt
  6. 2 tbsp jaggery powder (optional)
  7. 1 heaped tsp of the most fragrant sambar powder you can find
  8. 2 tsp oil
  9. 1/2 tsp mustard seeds
  10. 1 tsp Urad dal
  11. few curry leaves

Method

  1. Chop all vegetables.
  2. Heat a fry pan, pour oil in. Add mustard seeds, Urad Dal, and curry leaves in that order.
  3. When mustard seeds sizzle, add chopped onions, stir well over high flame. When the onions turn light brown, add tomatoes and fry till mushy.
  4. Crank up the heat, and toss in the bitter gourd, stir real quick over high flame. After 2 minutes of action on high heat, add turmeric powder, salt, jaggery powder (if using) and half of the sambar powder.
  5. Mix in the seasonings well, and cover with a tight lid. Lower the heat, and allow to simmer for 5-7 minutes.
  6. You can sprinkle a few teaspoons of water once, if the contents become too dry. Stir a couple of times in between the cook.
  7. The stir fry is done when it tastes soft but not mushy. Add the other half of the sambar powder and mix in well.
  8. You could finish it off with some chopped coriander leaves too.
  9. Do remember to scrape off the delicious burnt bits from the bottom of the pan, add them to your serving bowl. Those caramelised onions and tomatoes take the stir fry to blissful levels.
  10. Enjoy with a bowl of hot steamed rice or just by itself too.

Nothing bitter about it

Come pick me up and enjoy.

Apr 15, 2013

Raw Mango Pachadi


A very Happy Ugadi, Tamizh Puthandu nal vazhthukkal , Happy Baisakhi, Happy Pohela Boishakh, and Wish you Happy Vishu to all readers!

New Year – Several names for the same event, many customs, happy celebrations, delicacies, it sure is happiness all around.

It is summer in several parts of India already. Our city is going through mid – summer too. The best part of summer is the arrival of mangoes in India. Raw, ripe, fragrant, in all sizes, mangoes are consumed in so many forms through summer. Apart from eating mangoes just so, they are also cooked into several delicious dishes. Each region of India has their own varietals of mangoes and several delicacies prepared with them too.

Raw Mango Pachadi is one such – hot, sweet, tangy, spicy, slurpy, all flavours in one dish. I never tire of making this simple pachadi during summer. Any variety of mango which has a small seed and plenty of flesh is good for the recipe. I normally use ‘Totapuri’ mango.The pachadi becomes part of lunch menus as well as festive menu at our home during this season. So I would love to share this much loved recipe with all readers on this Happy New year’s Day. Try it out and enjoy as much as we do.

Raw Mango Pachadi

You Need

  1. Raw mango, 1 medium – Peel skin, shave out pulp, discard seed. Measure 1 cup heaped of pulp shavings. Taste a wee bit of the cut mango. That will decide how much jaggery is needed.Mango pulp
  2. Jaggery -  If mango is super – sour, use equal volume of jaggery and mango. Else use up to 3/4 cup jaggery per cup of mango.
  3. Salt – 1 heaped tsp (again, depends on how sour the mango is)
  4. Turmeric powder – a pinch
  5. Fresh drinking water – 1 cup

For seasoning

  1. Any vegetable oil – 1 tbsp
  2. Fenugreek seeds ( methi seeds) – 1/2 tsp
  3. Mustard seeds – 1/2 tsp
  4. Red chillies – 6-8, broken into 3 bits each
  5. Curry  leaves – 5

To Assemble

  1. Take the mango pulp shavings and water in a slightly thick bottomed pan, set on boil. Once the water boils, cover and simmer  for 5 minutes. Stir once in between, check for water. Add more if needed. The mango should have cooked through by the end of 5 minutes. Skin, shave mango pulp
  2. Heat oil in a pan. Add fenugreek seeds, mustard, broken red chillies, curry leaves. Let sizzle.Add Seasonings to hot oil
  3. Add mango pulp, the measured jaggery, salt and turmeric powder. If your jaggery is big and lumpy, pound it to smaller chunks and then add. Allow the jaggery to melt and blend in with the mangoes.  Add salt, jaggery, simmer
  4. Give a quick mix, cover and keep for flavours to infuse.
  5. Serve with festive lunch of steamed rice, sambar, other curries. Raw Mango Pachadi
  6. Or just use as dipping sauce for samosas, smear onto chapatti and roll it up, or as dip for crudités. When using as a dip, squeeze out the red chillies, discard the curry leaves and then use.

Jun 2, 2012

Sweet Potato Halwa


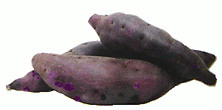
Sweet potato is a very healthy tuber and can be used in several dishes.I have found dishes made from this wonder tuber in several cuisines across the world. The many health benefits associated with sweet potato made me want to use it at my home too.To my delight, my old neighbour Renuka had a simple recipe using this vegetable.  I learnt this unbelievably simple-to-prepare-yet-very-tasty halwa from her.  After jazzing it up with some fragrant cardamom powder, no one could guess the base of the halwa. Do try it out for it’s ease of preparation and for the whole world of benefits this wonder tuber has to offer.

What’s good about sweet potato?

  • Topping the list of benefits is the high Vitamin A content of sweet potato – 25 times more than that of carrots!
  • One serving  (200gm,= 1 cup) of sweet potato cooked, takes care of a quarter of fibre needed for a day, Staying away from refined, sweet foods and still getting a ‘healthy sweet dessert’ was never so easy and rewarding !
  • Sweet potato is a great source of Vitamins B and C too - Again 10 times more Vitamin B and C available than in carrots.  It scores high on minerals such as Magnesium, Manganese, Potassium and Calcium too. This unique combination makes it worthwhile to include the tuber in diets of teenagers (rapid growth), sports people (essential minerals). Good for people with high blood pressure too since it is naturally low in sodium.
  • The purple-flesh varieties are outstanding sources of anthocyanins, especially peonidins and cyanidins –very powerful natural anti –oxidants. This group of flavonoid compounds also help in maintaining strength of blood vessels and capillaries, reduces inflammation at the tissue levels and inhibits formation of LDL cholesterols.

Interested in including sweet potato in your diet? Read on for a simple recipe…

warm halwa


You needSweet potato

  1. Sweet Potatoes – 750 gms
  2. Jaggery – 300- 400 gms, depending on your sweet tooth
  3. Fresh grated coconut – 100 gms ( desiccated coconut will do just fine too)
  4. Ghee – 1+1/2 tbsp.
  5. Fresh water – 1 cup
  6. Green cardamom powder – 1/2 tsp.

To assemble

Wash, peel and chop sweet potatoes into 1” squares, any even size will work.

chunks of sweet potato

Pressure cook the sweet potatoes with 1 cup water for 2 whistles. I used a pressure handi and pressure cooked, and stirred up the halwa in the same pot.

pressure cooked

Mash the cooked tubers into a coarse mush.

Mushed up glory

Pound the jaggery into small chunks (if you had a huge chunk to begin with). Measure out 300 gms with a kitchen scale or you could use 2 level cupful. Add it to the mushed up sweet potatoes, add 1/2 cup water if the mixture looks very dry, and stir up over medium heat. Once the mixture begins to bubble, add the ghee and blend it in too.

Blend in jaggery and ghee

Your halwa should be ready in 10 minutes of stirring over medium heat. Look for a glaze, sheen to the halwa to check it’s done-ness. Mix in the grated coconut, sprinkle green cardamom powder and you are ready to go! Serve warm, garnished with extra grated coconut if you wish.

dressed halwa ready for hungry kids


Plated and presented by - Raja

Jan 14, 2011

Red rice pongal

It is my privilege to wish all readers a very Happy Sankranti / Pongal. In keeping with my wish to share tasty and healthy recipes, I have assembled a healthy version of sweet pongal. Here’s to happy, healthy eating.
Red rice pongal
red rice
You need
  1. Red Rice - 1 1/2 cups 
  2. Jaggery - 2 1/2 to 3 cups (I used the round ball kind)
  3. Cashew nuts – halved, a generous handful
  4. Ghee – melted, 1 cupful
To assemble
  1. Wash the red rice at least in three changes of water. Soak the washed rice for half an hour prior to cooking.This helps the rice to cook to a soft texture.
  2. Pressure cook the rice with 3 times volume of water.I used 4 1/2 cups of water for 1 1/2 cups of rice.I pressure cooked it up to 1 whistle on high flame and then simmered flame and cooked for a further 10 minutes.I had  a nicely cooked soft rice at the end of this.soft cooked red rice
  3. Break the jaggery you are using into large pebble sized pieces.Take the measured jaggery in a heavy bottomed pan, pour enough  water to cover the jaggery ( I needed 1 1/4 cups of water), and bring the solution to a boil. Stir lightly. When the water just starts boiling switch off flame. Wait for allDissolving jaggery in water jaggery to dissolve. Use a large fine sieve / colander to filter the impurities in the jaggery solution.
  4. Mix in the jaggery water and cooked rice, cook on high flame stirring briskly. bubbling pongal in progressOnce they are mixed well, reduce flame and keep stirring continuously, mashing with the back of the ladle as you go along.
  5. Add a couple of tablespoons of ghee as the pongal bubbles away.The pongal is done when it looks like a homogenous,semi-solid,  glossy mass.
  6. Fry the halved cashews in the rest of the ghee, pour with love over the pongal. Your delicious, healthy, fit-for-the-Gods pongal is now ready!
 Pongal fit for the Gods!
Notes
  • It is very important to cook rice to a soft mush for the pongal. Once the jaggery and cooked rice are combined, the rice will not cook any further and you could end up with a chewy or a ‘biting hard grainy’ texture.
Nutri notes
  • In India, the term red rice is used loosely to denote brown rice, unpolished rice, or hand pounded raw rice. So it  means rice where the grain is dehusked but bran is retained to a full or partial degree.
  • The benefits of rice bran are several. The bran is very rich in fibre –
  • Hence it is recommended to avoid conditions such as high cholesterol, high blood sugar, or heart disease.
  • For diabetics, and for patients of coronary heart disease, too, eating red / brown rice is recommended . It helps bring blood sugar levels down and prevents cholesterol formation in arteries.
  • Fibre helps easy normal bowel movements, so regular eating of red rice guards against constipation, piles, prevents diverticulosis, and several studies show results that  a regular high fibre diet guars against colon cancer too.
  • Besides fibre, rice bran is rich in iron, manganese, selenium, and most of the B complex vitamins. We stand to lose all these in white polished rice.
  • Apart from red rice, this recipe contains jaggery, another ‘unpolished’ food. Jaggery has higher levels of iron and trace minerals than refined sugar. Jaggery is also sweeter, hence you can use lesser quantity in a recipe. Due to this jaggery is a safe sugar substitute for people with borderline diabetes (within allowed daily limits).
  • Ghee added to this recipe does add to the fat content and to the richness of the dish – which reminds us to indulge in moderation!