Showing posts with label dessert. Show all posts

Sep 6, 2015

Aval Payasam

Wishing all readers a happy Janmashtami. Praying for more love, peace and happiness in all your homes.

“Pathram Pushpam Phalam Toyam Yo Me Bhaktya Prayachati Tad Aham Bhaktyupahritam Ashnami Prayatatmanaha.” “If one offers to me with Love and devotion, a leaf, a flower, a fruit or water, I will accept it.” Bhagwad Gita, 9.26.

The humble aval, poha, beaten rice has a legendary status in Lord Krishna’s life. His childhood friend, Sudama, redeemed himself by offering a handful of beaten rice when they met after several years. It is said that Lord Krishna relished this offering of Love and Surrender so much that Sudama’s poverty stricken home was turned into a palace of riches, after the Lord accepted this offering.

Here is a recipe for Aval Payasam for Janmashtami. Let us try to make it and offer it to the Lord with single-minded devotion and Love. For He is most fond of a devotee’s Love.

Payasam fit for the Gods 

ALLERGY INFORMATION

  • Contains milk (lactose). Not suitable for lactose intolerant people.
  • Does not contain gluten, soya, corn.

Preparation time – 10 minutes, Cooking time – 30 minutes,  Serves - 4

YOU NEED

COOKWARE – Heavy bottomed sauce pan, ladle

INGREDIENTS

  1. 1/4 cup red aval/poha/beaten rice*
  2. 1 litre whole milk
  3. 1 cup sugar
  4. 1/4 teaspoon ghee

METHOD

  1. *Aval can be thick or medium aval. Do not use thin flat aval. If using thick aval, rinse under running water and soak for 10 minutes. If using medium aval, rinse under running water and add directly to boiling milk.
  2. Bring the whole milk to boil in a heavy bottomed sauce pan. Once the milk is on a rolling boil, drain water from the soaking aval, and add the soaked/rinsed aval to the milk. Keep stirring over low to medium flame to avoid charring at the bottom of the pan. Keep mashing the aval as you stir. This lends a creamy texture to the payasam.
  3. When the milk is reduced to half its volume, switch off flame and add sugar. Stir in the sugar gently until fully dissolved.
  4. Return milk to flame, keep stirring over medium to high flame for 4-5 minutes more.
  5. Switch off flame and cover with a tight lid.
  6. Add 1/4 teaspoon of ghee before offering this to God.
  7. Creamy aval payasam tastes good hot or at room temperature.

Red Aval Payasam

Mar 2, 2015

Eggless Thandai Mousse – Holi Special

King Hiranyakashipu hated his son, Prince Prahlada for being a great devotee of Lord Vishnu. The father wanted his son killed because he refused to worship his father as God, instead. Hiranyakashipu was a self-proclaimed Lord of all three worlds – Heaven, Earth and Hell. His ego did not permit worship of any other being. So the king tried heinous methods to finish his own son’s life! The king inflicted several cruelties like poisoning the child’s food, ordering rogue elephants to trample on the tiny child, throwing the young five year old over a precipice, and many more. Surprisingly none of these even hurt as much as a hair on the child-devotee’s head.

At his wit’s end, the evil king asked his sister Holika to sit with the child on her lap inside a raging fire. Holika had a special boon by which she would not be burnt by fire. However, the boon did not work when she sat with the evil intent of killing some one. The child sat through the raging fire on Holika’s lap with the Lord’s name on his lips and emerged safe. Holika was burnt to death instead.

Holi is the festival celebrated in memory of this great devotee’s escape from fire. A huge bonfire is lit and ‘Holika’ the demoness is symbolically burnt. The victory of true devotion and unwavering faith is celebrated by lighting the bonfire and playing with colours.

Whew, that was a long story, was it not?

If you are still with me on this page, allow me to explain why I am narrating mythology here – I am a sucker for ‘victory of good over evil’ stories. I can listen to them any number of times. They give me new enthusiasm to tackle life headlong. With Holi festival around the corner, what better time than now to dwell on this legend and the faith and hope the story brings!

I tried this Thandai Mousse as a variant from the usual Holi Thandai drink, because I wanted the flavours of Holi in a new avatar. I have adapted the basic thandai formula from Tarla Dalal’s website. Unlike my previous desserts, this one is neither low calorie nor low fat. It is indulgent, creamy, and exquisite. But then, it is so rich and flavourful that a small serving will satisfy you! Every spoonful takes you through a rhapsody of aromas, surprises you with the sharpness of pepper and engulfs you with the soothing notes of cardamom. Being eggless, this recipe can easily fit into your festive menu too.

A note on the ingredients for a better thandai. Do not substitute black for white pepper corns. White pepper has a slight difference in the sharpness from the black ones. The black colour also ruins the appearance of thandai. Use only Lucknow saunf – this is different from regular saunf. You can recognise it by the greener, thinner appearance. The aroma of Lucknow saunf is also more intense than regular saunf and more suitable for using in sweet preparations. Lastly, use real good quality saffron, if you want the colour. The aroma of saffron in thandai is unbeatable. You could omit it for a variation in thandai flavours too. *The food colouring does not add any value to the mousse other than tingeing.

Do yourself a good turn and try out this mousse this Holi.

Eggless Thandai Mousse - Happy Holi!

ALLERGY INFORMATION

  • Contains milk. NOT suitable for lactose intolerance.
  • Contains almonds. NOT suitable for nut allergy.
  • Contains soya as soy lecithin.
  • Does NOT contain egg, yeast, corn.

Preparation Time –30 minutes + 8 hours chilling time, Cooking Time – 10 minutes, Makes about 10 servings.

You Need -

Cookware –Hand-held electric whisk, Mixer grinder, bowls, thick bottomed sauce pan, stirring spoon/ladle, refrigerator,

Ingredients -

For the thandai paste -

  1. 1/3 cup whole almonds
  2. 15 white pepper corns
  3. 2 tablespoon poppy seeds
  4. 2 tablespoon Lucknow saunf
  5. 3/4 teaspoon fresh ground cardamom powder
  6. A few teaspoons water
  7. a few strands of saffron (optional) OR* a tiny pinch orange food colouring (optional)

For the mousse -

  1. **200 ml Tropolite (OR any non dairy whip topping) OR 200 ml fresh cream, preferably heavy cream
  2. 200 ml whole milk
  3. 1/2 cup sugar (taste and add more if needed)

Method -

  1. **Chill whatever whipping cream you are using for the recipe well ahead of preparation.
  2. Soak the poppy seeds in boiling hot water for half an hour. Soak the almonds in boiling water separately for 10 minutes. Peel skin after 10 minutes of soaking.
  3. Drain water from poppy seeds, and grind with the skinned almonds, white pepper corns, and Lucknow saunf in a coffee grinder/small jar of mixer grinder to a very smooth paste. Add just enough water to help grinding.
  4. Heat milk in a thick bottomed saucepan. When milk comes to a boil, switch off flame. Add 3 tablespoons of the ground thandai mixture, stir in the sugar. Dissolve well and return the saucepan to flame. Stir over medium heat until the mixture thickens slightly. You may need to boil for about 4-5 minutes. Cool to room temperature, pass through a sieve if it looks grainy, and chill in refrigerator at least for an hour.
  5. Whisk the chilled whipping cream you are using in a deep bowl until it forms stiff peaks. Whisk in the chilled ‘thandai milk mixture’ also.
  6. Ladle out about 3-4 tablespoons into each dessert bowl for individual portions, top with rose petals or saffron strands and chill for at least 4 hours before serving.

Happy Holi everybody! Wishing for good to triumph over evil in your lives as well.

Thandai Mousse garnished with rose petals

Dessert for two

Sep 4, 2014

Happy Onam with Nendra Pazham Nurukku

Traditional Onam Flower Carpet Decoration
Wishing all Keralites across the globe a very happy Onam. The very mention of the festival sends happy shivers down the spine. The excitement of meeting relatives, the rustle of new clothes, the joy of decorating the house with flowers, fills everyone with gleeful anticipation. Cooking the special Onam Sadya, the house smelling festive with the heady combination of curry leaves, coconut milk, simmering vegetables, with the inviting aroma of Payasam, with the fragrance of Nendra Pazham that lovingly follows you to every nook of the house.
That brings me to my much loved fruit – Nendra Pazham. A variety of banana grown extensively in Kerala and Tamil Nadu, it is longer than the usual Robusta or Dole variety and has a different unique flavour. It takes pride of place in Malayalee cuisine.
Ask any one from Kerala, and Nendra Pazham will count as one of their favourite fruits. Ask anyone from outside Kerala, the answer may not be the same. it could take some time to get used to. Fortunately, everyone in my family likes this special banana.
At our home, we wait patiently for it to ripen just so. It could then get plonked into the microwave for a quick steam bath, or into the sauna of a fry pan with jaggery to sweeten the deal, or if in a ‘lavish mood’ get batter fried for that crisp outside, soft, sweet, melting inside Pazham Pori. Each of these methods of enjoying the Nendra Pazham merits its own post. For now, I’ll confine my gushing to the jaggery sweetened, gooey, syrupy golden blobs called Nendra Pazham Nurukku. This is often served as part of the festive Onam breakfast menu.
Whether you celebrate Onam or not, this is a good chance to indulge in this simple sublime dessert. It fits the bill for a quick healthy snack, a solution for any time hunger pangs as much as part of an elaborate festive meal or as dessert after a spicy meal.
Don't they look smashing?
Here is how I go about making it.
Allergy Information
  • Does NOT contain gluten, egg, soya, corn, peanuts, tree nuts.
  • Suitable for gluten intolerant or lactose intolerant people.
Preparation Time – 10 minutes, Cooking Time – 15 minutes, Serves – 5-6
You Need
Knife, Kadai / Frying pan.
Ingredients
  1. 1 kg (usually 4-5 bananas) Just ripe Nendran banana
  2. 1/2 cup Jaggery OR Brown Sugar. Can take 3/4 cup if you prefer more sweetness.
  3. 1/4 cup water
  4. 1/2 tsp ghee (clarified butter) – optional
Method
  1. Rinse the bananas, peel and slice into 2 inch chunks.
  2. Combine the bananas, jaggery and water together in a kadai and set it over flame.
  3. Keep stirring once it comes to a boil. Lower flame if you find the corners browning.
  4. The bananas are done when they get a glaze and look translucent. This should come about in 7-10 minutes depending on flame and quantity cooked.
  5. Top with 1/2 tsp ghee if using, mix well and remove from fire.
  6. Serve when warm.
Golden chunks of Pazham Nurukku


Jul 25, 2014

Plum and Elaneer Terrine

(Elaneer–Tender Coconut Water)

Ok, so it has been raining plums all over the country and beyond too! Wonder not at the surfeit of interest that all bloggers seem to have in plums. The reason is the contest announced jointly by KitchenAid India and the Indian Food Bloggers Meet. Here is my last attempt at all things ‘plummy’.

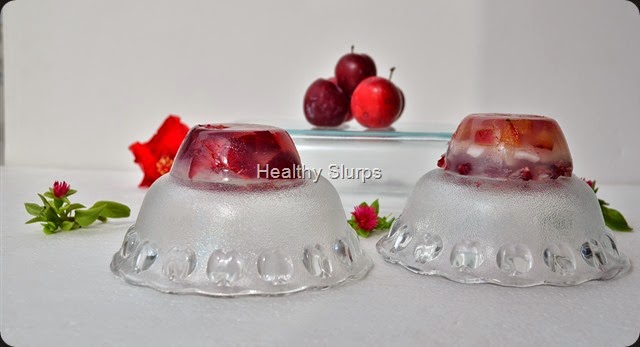
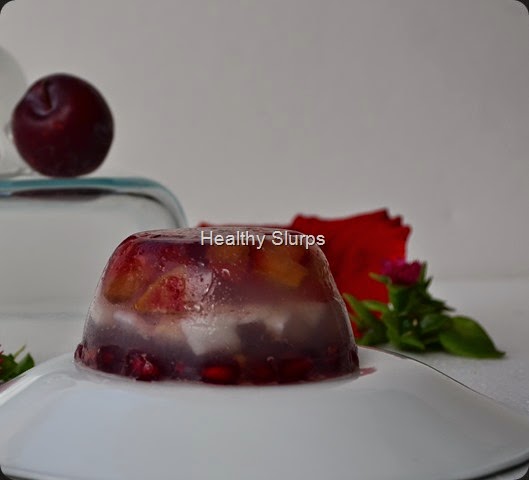
A simple, visually stunning dessert that has been born of the desire to create a new, uncomplicated, breath taking dish. Of marrying French sensibilities with Indian flavours. Of paying tribute to my home state, Kerala. What can capture the essence of Kerala better than it’s famous coconuts? The Elaneer or tender coconut water is an excellent base for this refreshing fruit terrine. Juicy plum bits suspended in a clear, delicately flavoured tender coconut jelly and shining like a jewel! Have a look at this.

Jewel in a bowl - Plum Terrine

This plum terrine, with it’s gorgeous appearance has to be the least sinful and most healthy of desserts. With zero fat and very minimal calories from added sugar, the terrine is a great option for dieters of every hue. Besides, it’s glamorous appearance will surely earn you plenty of applause at a potluck or from dinner guests. The best part is it takes very little time to assemble, but the final outcome belies that (We are not going to let our guests know that, are we?)

Triple layered Plum Terrine

A few tips to keep in mind are to select tender coconut which is slightly sweeter. Retain the tender meat from inside the coconut too. Select ripe but firm plums that are just short of over ripe or squishy.

Without further ado, here goes..

Preparation time – 45 minutes+1 hour setting time, Cooking Time – 15 minutes, Serves - 6

Allergy Information

Does not contain egg, soya, wheat, dairy, nuts.

Ingredients

  1. Firm ripe plums – 8-10
  2. Tender coconut water – 2 cups (I got it from 2 tender coconuts)
  3. Flesh from the tender coconuts, chopped
  4. Agar agar – 2 gms
  5. Fresh water – 1 cup +1/2 cup if needed
  6. Sugar – 3 heaped tbsp (or less if the coconut water is sweet enough)
  7. Pomegranate pearls – 1/4 cup (optional)
  8. Flavourless vegetable oil like sunflower or canola oil – a few drops to grease

Chilled no-guilt dessert

Method

  1. Wash the plums, pat dry and stone the fruit by cutting from all four sides close to the seed, and then from top and bottom! Dice the pulp into an even small size taking care not to squish the flesh. Set aside.
  2. Chop the agar agar into small pieces, soak in 1 cup water in a small sauce pan, bring to boil, stirring continuously for 4-5 minutes, until the strands dissolve through. Strain the liquid through a metal sieve into a clean bowl. Return the remaining strands to the same sauce pan, add 1/4 – 1/2 cup water, and boil again while stirring all the time. Strain again into the same bowl, discard any leftover agar agar bits.
  3. Warm up the tender coconut water very gently for a minute, (do not boil). Remove from flame and add in a thin stream to the warm agar agar liquid, whisk well. Taste and add as much sugar as needed. Keep stirring until sugar has dissolved. Keep the agar agar sauce pan over flame. When sugar has dissolved, and the liquid looks clear and transparent, remove from flame.
  4. Grease a 8” by 4” loaf tin or several small ramekins/bowls/katoris (about 5-6, each of 120 ml capacity).
  5. Place the chopped plums in a single layer at the bottom of the prepared tin/bowls. Gently pour the tender coconut liquid over the fruit until the fruit pieces are drenched and submerged in the clear liquid. Tap sharply on the counter and rest on the counter for 15 minutes. (no need to refrigerate)
  6. After 15 minutes, check if the top of the liquid layer has set. If yes, proceed to add the chopped coconut pieces, again in a single layer. If not set, wait for 5 minutes, check and then layer the coconut. Repeat the gentle pouring of the agar agar liquid over the coconut. If this liquid has begun setting, warm it up gently until clear liquid and then pour. Tap over counter again and leave to set for 15 minutes.
  7. Once this layer too has set, scatter a few pomegranate pearls over if using. Else you could use up the rest of the diced plums too. Finish off by pouring the coconut water+agar agar liquid over the fruit. Tap the container sharply again (to avoid air pockets) and set in refrigerator for an hour.
  8. To unmould, dip a knife in hot water, wipe and run carefully around the set terrine. Loosen the sides alone and invert onto serving plate. Cut into slices if set in loaf tin using a serrated knife. Serve chilled as is, or accompanied with whipped cream or ice cream.
  9. Sit back and enjoy this absolutely guilt free dessert and bask in appreciative applause!

Terrine loaf

Terrine from the top!

Jul 23, 2014

Luscious Plum Panna cotta–A plum assignment!


The countdown to the first ever Indian Food Bloggers’ Meet has begun. The organisers are busy on their toes looking into every detail. The participants? They are busy as well, cooking up storms in their kitchens and all over the internet! Oh yes, I am going to the event too. After racking my recalcitrant grey cells for several days, and after trying out several recipes in my head, some actually in the kitchen, I’ve finally gathered courage to pitch for the lovely prize announced by KitchenAid, India.

Plums, glorious plums!

‘Cook with plums and blog about it, it’s that easy’, coaxed the organisers. Is it really? When you are setting yourself up against some of the most talented, creative cooks in the country, even an easy task can seem daunting. Still, I can always try, can’t I?

Succulent, lush plums, cooked with aromatic star anise, turned wicked and hot with a generous dash of chilli, caressed and enfolded into a milk-cream mixture and patiently allowed to set into a panna cotta. As if this was not sublime enough, a rich, buttery, crisp, orange lace cookie that holds the silky smooth, gently quivering panna cotta in its fold. This marriage of the crisp and the soft brought together with a drizzle of plum compote! What would you say?

Here is what you need to make this heavenly dessert.

For the plum compote

Ingredients

  1. Ripe plums – 250 gms, weighed after deseeding
  2. Sugar – 125 gms
  3. Star anise – 2 arms of a star anise pod
  4. Kashmiri chilli powder – 1 level tsp

Method

  1. Wash, pat dry and stone the plums. For this, cut into half close to the seed on either side of the seed and remove seed. Retain skin+pulp.
  2. Place them in a heavy bottomed saucepan, add the sugar and star anise, set to a medium flame and keep stirring. After  4-5 minutes, when the plums get cooked and the skins peel off, keep removing as much skin as possible with a fork. Continue stirring the mixture to avoid charring.
  3. When the pulp looks well cooked (about 8 minutes), add the chilli powder, mix in well and remove from fire. Once cooled,remove the star anise, run the pulp in a blender, sieve through a metal sieve and reserve the smooth compote.

For the Panna cotta

Ingredients

  1. Milk – 1 cup
  2. Fresh cream – 1/2 cup (I used Amul)
  3. Sugar – 1/4 cup + 2 tbsp extra if needed
  4. Agar agar – 8 gms
  5. Fresh water – 1cup +1/2 cup if needed
  6. Plum compote – 1/2 cup (Reserve the rest of prepared compote)

Method

  1. Boil the milk in a saucepan, dissolve sugar in it and keep warm.
  2. Chop up the agar-agar strands, place in 1 cup water in a small saucepan, and bring to boil over low flame. Keep stirring continuously. When most of the strands have dissolved, pour through a metal sieve into the saucepan with milk. Return the un-dissolved strands of agar agar to the small saucepan add 1/4 cup extra water and boil again over low flame. Repeat the sieving into the milk once it is dissolved. Discard any leftover strands after this step.
  3. Warm the cream carefully, stirring all the time. When bubbles appear around the corners, pour the cream into the milk mixture, bring the milk saucepan to boil. Stir, stir, until the liquid is homogenous.
  4. Switch off flame, blend in 1/2 cup of prepared plum compote. Use a whisk if needed, make sure the compote and the milk are fully blended.
  5. Grease 4-5 molds (each approx. 120 ml), with a light flavourless oil. Pour the prepared panna cotta into these molds, tap the molds sharply to avoid air bubbles and set in refrigerator for at least 2 hours. I set them overnight.

Orange lace cookies embracing the smooth panna cotta

For the Orange Lace Cookie (Recipe adapted from Pastry Pal)

Ingredients

  1. APF – 85 gms
  2. Granulated Sugar – 225 gms
  3. Orange Juice – 120 ml
  4. Melted butter – 100 ml

Method

  1. Powder the sugar in a mixer to a fine powder. Once it is fine, add the measured flour to the mixer jar and run both together so that they blend well.
  2. Remove to a mixing bowl. Add the orange juice and whisk thoroughly until well combined.
  3. Now add the melted butter and keep whisking till you get a smooth batter. Leave in the refrigerator overnight.
  4. The next day, when you are ready to bake, preheat the oven to 180 C.
  5. Line a baking try with Silpat. If you do not have a Silpat mat, grease the baking tray ‘very generously’ with butter. You can make these cookies in batches, so use any size tray you have.
  6. Drop ‘only’ half teaspoonfuls of batter onto the tray leaving large gaps between each cookie batter. Bake for 5 minutes at 180 C, then reduce temperature to 170 C and bake again for 5 minutes. Watch out in the last 2 minutes. The edges should get golden and the middle should look orange-gold in hue.
  7. Remove tray from oven, let the cookie cool for a minute. Then ease it out gently with a metal spatula, drape over a rolling pin or katori if you want a bent shape. Else, remove to a platter to cool in a single layer. Store in an air tight box until needed.

Don't we look pretty?

To Assemble the Dessert

  1. When you are ready to serve, pour the reserved plum compote into a small saucepan, add 2 tbsp fresh water, bring to boil. Mix well and remove from fire.
  2. Place 1 or 2 orange lace cookies in a serving plate.
  3. Dip a knife in hot water. Wipe and run through the edges of the set panna cotta bowl. Loosen only the edges carefully. Invert over the waiting cookie.
  4. Drizzle the plum compote over the panna cotta and serve immediately. The delicate lacy crisp cookie embraces the smooth panna cotta resulting in gustatory ecstasy! Some desserts are best experienced to be believed!

Hot Plum Panna cotta served with Orange Lace cookie and plum compote

A marriage made in dessert heaven! Enjoy.

Jun 11, 2014

No Guilt No Bake Mango Cheesecake


In an Indian summer, mangoes enter our lives in a big way. At our home, we never tire of eating mangoes, of any variety, shape or ripeness. Any mangoes that escape being devoured, find it’s way into special dishes.

If it were possible to make this fragrant fruit any more delicious, it has to be in the avatar of  this cheesecake! But wait, how about the guilt from the extra calories? The extra sugar, cream, and so on? Well, what if you could indulge in a ‘cheesecake’ without any cream or cheese or extra sugar? What if I told you this dessert is richer in protein and vitamins than fat or carbs? What if we have just discovered the best guilt-free dessert for quite some time to come? If you are interested, read on….

Without much ado, I want to share with all you lovely people, this simple, guilt free, low sugar, low fat, no bake, gelatine-free, mango cheesecake! An indulgence that is easy on your girth as well as on your wallet. Can be made with mango pulp when fresh in season or using canned mango pulp or home-frozen mango pulp when these divine fruits are not in season too. Totally invoking the spirit of summer, come and fall in love with mangoes all over again this season!

Summer Exotica

Preparation Time – 30 minutes+8 hours setting time; Cooking Time – 10 minutes; Serves – 4

Allergy Information – Does NOT contain egg, soya, peanuts, corn. Contains gluten. May have traces of lactose.

You Need

Cookware – Mixer/Food Processor, Cheese cloth, String to tie, a vessel of approx. 1 litre capacity, Shot glasses/Glass Dessert bowls – 4-5, Sauce pans –2, Heat proof strainer – 1.

Ingredients

  1. Marie biscuits – 10-12
  2. Melted Butter – 20 gms (And the recipe said low fat! So Butter? Do read Notes Smile)
  3. Any ripe mango – 1 large or 2 small
  4. Skim milk yoghurt – 400 gms OR Skim milk Greek yoghurt – 250 gms
  5. Agar Agar strands – 10 gms
  6. Sugar – 2 tbsp (Optional)

No Bake No Gelatine Mango Cheesecake!

To Assemble

  1. Tie the cheesecloth around the mouth (use elastic band or string to secure) of the 1 litre vessel, pour the skim milk curd into the cloth, and leave the whole assembly inside the fridge* undisturbed for 4 hours. The whey water will drip from the yoghurt into the vessel, leaving thick cheesy curd in the cloth. Drink the whey water separately.
  2. Crush the biscuits in a mixer to a sandy  coarse powder. Drizzle the butter in,(easier in a food processor) pulse the mixer again until you find the mixture looking like wet sand.
  3. Rinse and wipe dry the shot glasses you will be using. Layer the biscuit base at the bottom  of the glass. Divide the mixture equally between the glasses and press with back of spoon to level this ‘cheesecake base’. Leave the glasses in the fridge until needed.
  4. To 1/2 cup of warm water, add agar agar and leave to soak in a sauce pan.
  5. Peel the mango, remove pulp and puree in the mixer. Place the pulp in a sauce pan over a medium flame, stir briskly until just hot.           
  6. Return the sauce pan with soaked agar –agar to heat, keep stirring briskly over a medium flame until it is fully dissolved. Add some water, a tbsp at a time if needed to dissolve the agar-agar well. Strain this hot liquid into the simmering mango puree, combine well, and switch off the flame.
  7. Mix 3/4th of the above mango liquid, with the cheesy curd and whip well in the mixer. Divide this mixture into the prepared shot glasses. Tap on countertop to level and leave in fridge to set for half an hour.
  8. After half an hour, warm up the 1/4th leftover mango puree+agar-agar mixture gently to loosen it, pour over as topping over the set curd, leave to set undisturbed in the fridge for at least 4 hours. Overnight would be a better idea!
  9. Enjoy chilled after a long, hot day!

Enjoy your guilt-free dessert

Notes

  • At 4-5 gms butter per serving, this dessert allows for an ‘acceptable’ fat content, within the RDA range for most people.
  • Using skim milk curd in this recipe ensures you consume less than 3 gms of fat, vs 25 gms if you were to use cream cheese! ( Read 8 minutes vs 1 hour of treadmill). Now is that good or what?
  • *Set the curd ‘to hang’ inside the fridge to avoid it getting sour.

Mar 16, 2014

Thandai Panna cotta


Wishing all readers a very colourful and happy Holi. The season is filled with fun, happiness, spring and a riot of colours. I find all food sites, blogs filled with recipes for the special festival menu. Mawa gujiya, samosa, kachori, and several other delicacies.

Festive Dessert Platter

My dessert is inspired by the flavours of the festival too. I had tried out a Thandai mousse last year. Somehow, I’m surprised it has not found it’s way to the blog. So it had to be panna cotta this time. I have kept the cream to milk ratio at 1/2:1, thereby reducing on the fat content. I plan to try it out with skim milk alone the next time.

Initially, I was quite worried about getting the consistency, flavour and proportions right. After making a mental map of the procedure, and after discussing the recipe with two of my great friends, Deepa and Sreelatha, I decided to go ahead and test it out. Quite happy with the outcome, even if I say it myself. But then, unless you try it out and fill me in, I wouldn't know for sure.

For the main flavouring, I followed Tarla Dalal's recipe to make the thandai paste. For the Panna cotta, here is what you need -

  1. Home made or store bought Thandai paste – 2 level tbsp
  2. Skim milk – 1 cup
  3. Fresh cream – 1/2 cup ( I used Amul )
  4. Sugar – 5 tsp
  5. Agar agar – 7 gm
  6. Water – 1/2 cup
  7. Butter or vegetable oil – 1/4 tsp, for greasing

Optional – 2 tbsp Khus Syrup as a top layer for the panna cotta. I used store bought syrup.

Scooped out deliciousness!

To Assemble

  1. Combine the skim milk, fresh cream, sugar in a heavy bottomed saucepan, and set on heat. Keep over medium flame and stir constantly.
  2. In a separate smaller saucepan, heat the 1/2 cup water, and stir in the agar agar. Set this over a low flame too and keep stirring to mix well and to avoid burning. If you cannot manage to stir both at the same time, get the milk mixture boiled first and then proceed with the agar agar.
  3. When  the milk mixture reaches a boil, add the thandai paste and simmer for a minute, and keep stirring again. After a minute, set aside. Be alert to the milk mixture, it can boil over quite suddenly. Strain through a mesh sieve into a suitable bowl.
  4. If you have not started on the agar agar + water boiling as yet, go ahead with it now. You may need to simmer it for 5-7 minutes over low flame until it has blended into a homogenous jelly like texture. Pour through a sieve or tea filter directly into the milk mixture. Mix well, and return the milk to heat. Simmer again for a minute, remove from heat and cool to room temperature.
  5. Grease 6 dessert bowls / katoris / cups with the butter/oil. Divide the mixture into the bowls. Cover with cling film / lids and refrigerate for an hour or two.
  6. To unmould, run a wet sharp knife through the sides of the panna cotta and invert into serving plate. You may serve directly from the bowls too.
  7. Optional toppings include some khus syrup drizzled,  or few strands of saffron, or some cardamom powder sprinkled, or rose petals for garnish!
  8. Happy Holi and enjoy your wonderful Panna cotta.

Happy Holi with Thandai Panna cotta

Jun 2, 2012

Sweet Potato Halwa


Sweet potato is a very healthy tuber and can be used in several dishes.I have found dishes made from this wonder tuber in several cuisines across the world. The many health benefits associated with sweet potato made me want to use it at my home too.To my delight, my old neighbour Renuka had a simple recipe using this vegetable.  I learnt this unbelievably simple-to-prepare-yet-very-tasty halwa from her.  After jazzing it up with some fragrant cardamom powder, no one could guess the base of the halwa. Do try it out for it’s ease of preparation and for the whole world of benefits this wonder tuber has to offer.

What’s good about sweet potato?

  • Topping the list of benefits is the high Vitamin A content of sweet potato – 25 times more than that of carrots!
  • One serving  (200gm,= 1 cup) of sweet potato cooked, takes care of a quarter of fibre needed for a day, Staying away from refined, sweet foods and still getting a ‘healthy sweet dessert’ was never so easy and rewarding !
  • Sweet potato is a great source of Vitamins B and C too - Again 10 times more Vitamin B and C available than in carrots.  It scores high on minerals such as Magnesium, Manganese, Potassium and Calcium too. This unique combination makes it worthwhile to include the tuber in diets of teenagers (rapid growth), sports people (essential minerals). Good for people with high blood pressure too since it is naturally low in sodium.
  • The purple-flesh varieties are outstanding sources of anthocyanins, especially peonidins and cyanidins –very powerful natural anti –oxidants. This group of flavonoid compounds also help in maintaining strength of blood vessels and capillaries, reduces inflammation at the tissue levels and inhibits formation of LDL cholesterols.

Interested in including sweet potato in your diet? Read on for a simple recipe…

warm halwa


You needSweet potato

  1. Sweet Potatoes – 750 gms
  2. Jaggery – 300- 400 gms, depending on your sweet tooth
  3. Fresh grated coconut – 100 gms ( desiccated coconut will do just fine too)
  4. Ghee – 1+1/2 tbsp.
  5. Fresh water – 1 cup
  6. Green cardamom powder – 1/2 tsp.

To assemble

Wash, peel and chop sweet potatoes into 1” squares, any even size will work.

chunks of sweet potato

Pressure cook the sweet potatoes with 1 cup water for 2 whistles. I used a pressure handi and pressure cooked, and stirred up the halwa in the same pot.

pressure cooked

Mash the cooked tubers into a coarse mush.

Mushed up glory

Pound the jaggery into small chunks (if you had a huge chunk to begin with). Measure out 300 gms with a kitchen scale or you could use 2 level cupful. Add it to the mushed up sweet potatoes, add 1/2 cup water if the mixture looks very dry, and stir up over medium heat. Once the mixture begins to bubble, add the ghee and blend it in too.

Blend in jaggery and ghee

Your halwa should be ready in 10 minutes of stirring over medium heat. Look for a glaze, sheen to the halwa to check it’s done-ness. Mix in the grated coconut, sprinkle green cardamom powder and you are ready to go! Serve warm, garnished with extra grated coconut if you wish.

dressed halwa ready for hungry kids


Plated and presented by - Raja

Jan 4, 2011

Almond and dates halwa

‘A Very Happy And healthy New Year ‘ to all readers from Healthy Slurps. What better way to start a New year than with a sweet dish! If the sweet can also pack in a healthy punch - well, I can’t ask for more. Here is a super simple, yummy recipe for an un – put – downable halwa. Go ahead, start the new year with a BANG!! with this melt in the mouth creation….I must thank my dear sis-in-law, Deepa for giving me this recipe.
Almond and dates halwa
You need
  1. Whole almonds with skin – 1 cup
 whole almonds     chopped dates    skim milk    melted butter 
  1. Seedless soft dates – chopped fine, 1 cup ( I used Lion seedless dates)
  2. Skim milk, boiled – 1 cup ( I used 3% milk)
  3. White cooking butter, melted – 1 cup
  4. Sugar – 2 cups
To assemble
  1. Warm the almonds lightly in a microwave, this helps quick powdering. Use the pulse button in your mixer, and pulse grind the almonds to a soft powder along with the skin. The powder should look like this-
powdered almonds
  1. Take a heavy bottomed sauce pan or use a non-stick pot.
  2. Pour in all five ingredients together into the pot.ready to be halwaed!
  3. Stir the contents over fire. You can start off with a high flame, and then reduce flame to medium once the ingredients are incorporated well together and begin to bubble.
  4. It took me 15 minutes of stirring continuously over medium flame to complete cooking the halwa.
  5. The halwa is done when it starts frothing around the sides of the pot and begins to leave the sides.Remove to a storage bowl immediately.
  6. This does not need any garnishing, and can be served spooned warm. Perfect for cold wintry weekend treats!
Creamy, frothy slurrpy halwa
Notes
  • Take care to pulse grind almond powder – avoid extracting almond oil !
  • Chop dates as fine as possible.
  • Keep stirring over flame to avoid burning at the bottom of the pan.
  • Do not overcook – else it will turn out to be a brittle texture, instead of a moist one. If in doubt, you can remove from fire and can cool a spoon of halwa, check if it is done and then return to fire if it is still liquidy.
Nutri notes
  • Almonds are a great source of protein, fat, fibre, of vitamins-thiamine, riboflavin, niacin, vitamin E; and of minerals- iron, copper, zinc. This unique combination makes it wonderful for growing children.The fat is mostly of monounsaturated kind which is helpful in building HDL cholesterol, and reducing LDL cholesterol.For more information on health benefits of almonds look here.
  • Dates are energy packed, bursting with iron, zinc. Also a good source of potassium which is very necessary for smooth working of heart muscles and an efficient nervous system.Foods high on potassium also help in regulating sodium in the body, hence control blood pressure.
  • Dates contain no fat. The high fibre content in dates makes sure the body escapes constipation, colon cancer.
  • Dates also pack in several B complex vitamins such as niacin, pantothenic acid, folic acid.This makes it a handy snack for pregnant and lactating women as well as children in growth phase, especially if they are active in sports.
  • This recipe combines the two wonder ingredients almonds and dates and combines milk and butter to it as a bonus!The use of butter does make it a high calorie dish – however it is good to remember healthy, active children need no calorie restriction and you may just be able to get a reluctant child to eat this delicious form of dates or almond.As for the others, moderation is the key word to remember! Do indulge in this ‘healthy sin’ in moderation and remember to work out a little extra to deserve this lovely treat!
    Sending this dish to The Veggie Hut as my entry to ongoing event ' Winter warmers'