Showing posts with label dal. Show all posts

Nov 4, 2014

Mung Dal with Ash gourd

Often the food we crave for is simple, nourishing, soul satisfying food which we grew up with. Steamed rice and tempered dal is high on most people’s comfort food list. Especially when we are far away from home. Or returning to normal life after an illness. Or trying to renew the jaded palette. Or seeking a respite from a frenzied social life. Or even if we have no energy to cook and much less to venture out to eat!

Whatever may be your reason, there can be nothing easier to rustle up than a typical dal-chawal meal.(Steamed Rice+ seasoned Lentils) A meal that can be put together in as less than 30 minutes with just a handful of ingredients. If this meal also nourishes, is curative, soothing to the tummy, and alleviates gastric discomfort as well, then we do have a winner at hand, right?

Bowl of wholesome comfort

Allow me to introduce you to the humble Ash Gourd. Also known as Winter Melon, White Gourd, Wax Gourd. Quite underestimated, un-glamorous, under used vegetable in most cuisines. It is a creeper, grows easily, available at low cost through the year, cooks quickly, has a bunch of health benefits, and yet not included enough in daily meals.

In clinical studies, Ash Gourd is proven to soothe hyper acidity, heal stomach ulcers. It is used as a diuretic as well. Besides, this humble vegetable contributes plenty of easily digestible fibre, moisture. It also helps regulate blood sugar levels, so useful in treatment of diabetes and obesity. It packs less than 20 calories per 100gms. So it is a weight watcher’s delight. Do we really need any more reasons to add more of this unpretentious vegetable in our meal?

If you are a single person, cook this in bulk and freeze in single use portions for simple weeknight dinners. Or halve to serve 2-3 people. Works well with phulkas, brown rice or use some pita bread to mop it up too.

Simple meal in 30 minutes

ALLERGY INFORMATION

  • Does NOT contain gluten, soya, egg, corn, lactose, nuts.
  • Suitable for gluten intolerance or lactose intolerant people or for people with nut allergy.

Preparation Time – 5 minutes, Cooking Time – 30 minutes, Serves – 4

You Need

Cookware – Pressure Cooker of minimum 3 litre capacity, Small Saucepan, Knife, cutting board

Ingredients

  1. 1 cup diced ash gourd
  2. 3/4 cup Mung Dal
  3. Pinch of turmeric powder
  4. 1 tsp Cooking Oil
  5. 1/2 tsp Cumin seeds
  6. 1/4 cup finely diced Onions
  7. 1 Green chilli (optional)
  8. 1/2 tsp Salt

To Assemble

  1. Rinse the ash gourd, peel skin, remove seeds, dice into even sized pieces. 
  2. Rinse the Mung dal in 3-4 changes of water, place the dal and ash gourd  in a suitable container, add the pinch of turmeric, fill water up to cover contents. Pressure cook on high flame until first whistle, and for 5 minutes after that over a small flame. Switch off and let cool. Open the pressure cooker only after all the pressure has released. This should take about10 minutes. (In this interim, you could rinse your rice for the meal, and set it to cook over another burner. The rice will be done by the time you have tempered the dal.)
  3. Peel onion and dice them really fine. Slit the green chilli lengthwise.
  4. Add salt to dal and set to simmer.
  5. Add oil to a small saucepan, heat it, add cumin seeds. When they crackle, add slit chilli, onions and fry over high flame until just beginning to brown.
  6. Pour the fragrant seasonings over the dal. Switch off, cover and let flavours blend for a few minutes. You may remove the green chilli and then serve too. Or omit the chilli entirely.
  7. Serve with hot steamed rice and a salad.

Enjoy your comfort food

Mung dal with steamed rice and salad

Apr 8, 2014

Little Millet Khichdi


Weight loss is the most important reason people visit a dietician or nutritionist. People want to lose weight for many reasons. Some of them could include - to look good, be able to carry off several outfits, to feel more energetic and several other reasons too. It is not advisable, however, to attempt weight loss in an unhealthy, unscientific or haphazard manner. Many people adopt extreme measures to lose weight. We would have heard of several restrictive diets such as all fluid diets, cabbage diet, only fruit diet, only vegetable diet, only milk diet, and several other ‘only diets’. Pause for a moment and think: are these really nourishing, sustaining, or even feasible in the long term?

The big goal and focus should be on achieving good health and fitness. Weight loss should only be a part of the journey to fitness and better health. Weight loss and weight management should also be approached with common sense, moderation and with a long term goal in mind.  Changes in diet should be made gradually and systematically. Including healthy grains, increasing fluid and fruit intake, keeping an eye on what one eats/drinks through the day are all important points to be kept in mind when attempting weight loss.

Pack of the Organic Millet I bought

In a study published by the American Journal of Clinical Nutrition on Glycemic Index and Obesity, scientists found a strong correlation between the type of grains consumed, its glycemic index and the ability to lose weight and keep it off too. This means, by choosing grains intelligently, it is possible to feed the body maximum nutrition while keeping weight in check too. Millets are a valuable group of grains which most of us in India have forgotten in the last century or so. Millets pack complex carbohydrates,(hence low glycemic index), more fibre than polished rice/wheat, are high in several minerals like Calcium, Iron, Magnesium. They are easy to cook too and flavours are quite mild and palatable. It is time we undo this damage of ignoring such nutrient powerhouses and allow ourselves their benefits.

This recipe is part of my effort to include millets in my family’s meals in delicious and acceptable ways. Little millet, also called Saama rice, Saame, Koda, is slightly bigger than semolina in size. It cooks very quickly, has an unobtrusive flavour and lends itself to several dishes easily. I cooked up this delicious khichdi several times in the past few months altering the spices and vegetables used each time. It is now a family favourite.  Do use the recipe below as a broad guideline and feel free to make your own favourite version.

Bowls of goodness

You Need

  1. Saama millet – 1 heaped cup
  2. Mung dal – scant 3/4 cup
  3. Potato – diced, 1/4 cup
  4. Carrot – diced, 1 cup
  5. Fresh green peas – 1/4 cup
  6. Bay leaf – 1 large
  7. Cinnamon – 2 thin sticks
  8. Cloves – 3
  9. Black pepper corns – 1  tsp
  10. Cumin seeds ( Jeera) – 1 heaped tsp
  11. Butter – 1 tbsp + Cooking oil – 1 tbsp
  12. Salt – 1 heaped tsp + 1/2 tsp
  13. Fresh water – 4 1/2 cups

To Assemble

  1. Rinse the millet and mung dal together.Place them in a suitable large vessel along with the potato, carrot, green peas and bay leaf. Add measured water,( read notes) place inside pressure cooker and pressure cook as you would normally cook rice. I reduce the flame after the first whistle and let it simmer for 5 minutes before switching off and letting it cool naturally.
  2. To a small frying pan, add the butter + oil, heat and add all the other spices mentioned in ingredients. Do not burn the spices, let them sizzle gently until it just releases its aroma.
  3. Pour over the khichdi when aromatic, add salt, mix well.
  4. Serve steaming hot with plain curd and a salad or kadhi and salad.

Creamy millet khichdi

Notes

  • Water - Add 3 times the volume of grain+dal if you want a creamy mushy khichdi, or add lesser for a less gooey version. I prefer the former for ease of spooning and swallowing!
  • Add spices such as cardamom, saunf( fennel seeds) or omit bay leaf if you feel so.
  • Any combination of vegetables can be used. Or you can make it with no vegetables at all too.

Sending this recipe to the following event started by Pari and co-hosted by Shruti. I am so excited to participate in such a useful event where all can use the archives for several healthy recipes. Do check out the spaces of both these awesome bloggers.

Only Grains

Also linking dish to event run by Nupur of UK Rasoi and Priya’s Versatile Recipes.

Jan 9, 2014

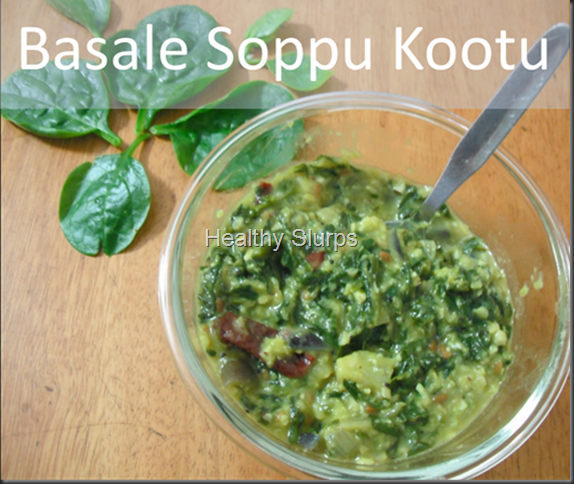
Basalle soppu Kootu


kootu pic


Basella alba or Basale soppu as it is known in Kannada, is a very nutritious green leafy vegetable. It grows up to a height of even 10 metres! This green leafy vegetable has amazing uses.

Health Benefits of Basella alba
  1. Topical anti inflammatory, anti fungal – helps to reduce freckles, treat acne, heal skin ulcers and reduce skin inflammation. Leaf juice mixed with butter used to heal burns, wounds.
  2. Decoction of leaves used as mild laxative, cooked roots used to control diarhoea
  3. Used to treat Pelvic inflammatory disease, sterility, threatened abortion, false labour
  4. In Africa, roots and leaves used for reducing stomach pain after childbirth, and to increase mother’s milk.
  5. The mucus from leaves if applied as a pack on forehead removes headaches and improves sleep, so used in Ayurveda for insomnia.
  6. To treat Vitamin A deficiency and iron deficiency anaemia
  7. The leaf has anti-oxidants - Beta Carotene, Xea Xanthin. This helps in free radical scavenging, hence has benefit on ageing or cancer cure.

It lends itself to a delicious stir fry or ‘bhaji’, or tambli in Marathi cuisine,or to basale soppu saaru in Kannada cuisine. Here is my attempt to make a Tamil style kootu with these very healthy greens. You Need
  1. Baselle Soppu – trimmed leaves, 4 heaped cups
  2. Red Onion – 3 medium or 2 big, peel and chop fine
  3. Tuvar dal – 3/4 cup, pressure cooked until soft
  4. Turmeric powder – 1/2 tsp
  5. Grated fresh coconut – 1 tbsp
  6. Green chilli – 1 or 2 depending on heat preference
  7. Salt – 2 heaped tsp
  8. Sugar – 2 big pinches
  9. Fresh water – 1/2 cup
For seasoning
  1. Any vegetable oil – 2 tbsp
  2. Mustard seeds – 1 tsp
  3. Urad Dal – 2 tbsp
  4. Dry red chilli – 1 –2 torn into halves
To Assemble
  1. Wash the greens in several  changes of water until no trace of grits, sand or mud remains! I dunk the trimmed greens into my kitchen sink. This way, I can wash them very quickly. Drain for 10 minutes in a large colander. Chop them coarse. We do not want a slimy paste while chopping them fine.
  2. Pressure cook the tuvar dal with turmeric powder until soft and mushy.
  3. Whiz the fresh coconut with the trimmed green chilli to a coarse mixture. Do not add any water while blending, just dry whiz.
  4. Heat oil in a wok / kadhai / fry pan.
  5. Sizzle the mustard and urad dal; when dal browns, add the torn red chilli.Add seasonings to oil
  6. Tip in the diced onions, fry well for several minutes over high flame, keep stirring to avoid burning. Foggy Onions!Fry them onions well
  7. When the onions have changed from pink to translucent and light brown, toss in the chopped greens. Toss the pan well to incorporate the seasoning oil into the greens. After you see some wilt, add  sugar, half a cup of water and cook uncovered.Onions + soppu                Soppu under a haze
  8. The greens are usually done in 7-10 minutes depending on flame and quantity. Now add the cooked dal, coconut mixture, and salt. Mix well over medium flame to blend all components together.
  9. Best served with steamed rice and a spicy sambar or tangy rasam.
Kootu ready!


Dec 2, 2010

Dalia khichdi

We returned tired and hungry after an exciting round of Diwali shopping. With just more than half an hour at hand, I had to rustle up a reviving meal for my family. This is what I made. Quick and easy to put together, no exotic ingredients, and healthy comfort food at it's best! Do try it out and let me know how you liked it.

You need
  1. Cracked wheat-1 cup (200 gm)
  2. Mung dal-1 cup (200gm)
  3. Carrot-2 small, chopped-(1/2 cup)
  4. Capsicum-1 medium, chopped (1/4 cup)
  5. Potato-1 big, chopped (1/4 cup)
  6. Large violet brinjal- 1/2 chopped (1 cup)
  7. Tomatoes-3/4 kg
  8. Asafoetida powder-a pinch
  9. Turmeric powder-3/4 tsp
  10. Salt-2 tsp
  11. Coriander leaves-3 tbsp chopped
For seasoning
  1. Oil + ghee-2 tbsp
  2. Jeera-1 tsp
  3. Whole black pepper- 1tsp
  4. Cloves- 7-8
  5. Cinnamon-5-7 small sticks
  6. green cardamom-3-4
To assemble
  1. Choose ripe red tomatoes, wash well and puree in mixer.You could also blanch them, peel skin and then puree.Retaining the skin or peeling it off is personal choice, I have not seen flavour change with either.
  2. Wash all other vegetables, dice into even sized pieces.
  3. Wash dalia and mung dal together, add three times the volume of water (that makes it 6 cups of water for this recipe), and pressure cook for 4 whistles.
  4. Meanwhile, heat oil, ghee mixture in a broad kadai/ saucepan.
  5. Add in order given, all the ingredients for seasoning.
  6. When jeera crackles, and you get a pleasant aroma of spices, it ts time to add hing powder, turmeric powder.
  7. Add chopped vegetables toss well and fry for 3 minutes.
  8. Add tomato puree and salt.Allow to simmer for atleast 10 minutes until raw smell of tomatoes are gone.
  9. When the pressure has released, add the simmering vegetables to the cooked dalia,  mix thoroughly and simmer for another 2-3 minutes.
  10. Finally add chopped coriander blend in and serve hot.
  11. Serve with any raita / salad and papad.
Notes
  • You can fry washed wheat + dal in a tsp of ghee for a nice aroma.
  • You can add more vegetables like knol khol, peas, sweet potato, onion.
  • You can omit tomatoes entirely if you do not prefer the tang, or mix in juice of 1 lemon at the end.
  • You can serve this hot topped with a tsp of ghee to kids and omit for those with calorie restrictions.
  • Microwaved masala papad is a good accompaniment too.
  • Can add more water after mixing the vegetables and cooked dalia.
Now for  the nutri notes
  • This is a great one pot meal - combining cereal, pulse, vegetables and dairy allowance if served with raita.
  • Eating a cereal and a pulse in the same meal ensures that the amino acids missing in one is complemented by those in the other. This is great for vegetarians since they derive maximum benefit from plant protein by eating in combination like in this recipe.
  • Tomatoes, rich in lycopene take pride of place in this dish. Apart from fibre, vitamin A and vitamin C, that you get in tomatoes, the lycopene in tomatoes also is an anti carcinogenic agent.
  • Using cracked wheat ensures that the benefits of bran and germ are derived fully. Hence, a high protein content (12gm/100gm), not to mention high fibre as well (1.2-1.4g/100gm).What would interest everyone is also the high niacin and folate levels in cracked wheat makes it an ideal grain for pregnant women, athletes, teenagers and elderly too.
  • Carrots used here add to the beta carotene, you get half your daily allowance of Vitamin A by adding 1/4 cup of chopped carrots per person.
Here are the visuals 

chopped vegetables

frying whole spices
simmering vegetables
Mix cooked dalia with vegetables

Serve with raita

Oct 11, 2010

Palak dal

What could be healthy, filling, have a protein and veggies combined in a single dish and get cooked in less than half an hour? Well, this greens dal fits the bill just right! Of course, pressure cooking the rice along with the dal saved me cooking time and I had this soul food ready in under 40 minutes-quite a treat for hungry kids when served with homemade ghee! 


You need
  1. Tur dal (red gram dal) -150ml
  2. Paruppu keerai (called kari cheera,pappu koora) /palak - chopped, 3 cups
  3. Onions-2 medium, finely chopped
  4. Tomatoes-2 medium, diced
  5. Green chillies-3 big, finely chopped
  6. Fresh root ginger-1 tsp chopped
  7. Curry leaves-1 tbsp, finely chopped
  8. Turmeric powder-3/4 tsp
  9. Salt-1 tsp (adjust to taste)
For seasoning
  1. Vegetable oil-2 tsp
  2. Mustard seeds-1 tsp
  3. Jeera (cumin seeds)-1 tsp
  4. Saunf (aniseed)-1 tsp(optional)
To assemble
  1. Wash the dal well.
  2. Add double the volume of water and pressure cook to a soft consistency.
  3. Wash the greens you are using well under several changes of water.
  4. Chop up medium fine.
  5. Place the chopped greens in a microwavable bowl, add some water and cook on high for 4-5 minutes.
  6. Heat oil in a deep pan.
  7. Add ingredients for seasonings in order.
  8. When they splutter, add green chillies, ginger ,curry leaves.
  9. Next to go in is the onions, followed by diced tomatoes.
  10. Toss in the turmeric and salt.
  11. Mix it well and let the veggies mush up a bit.
  12. Add the cooked greens, give a good mix, add about 100 ml of water, simmer for 2 minutes.
  13. Now is time to add cooked dal, mash with the back of ladle, simmer for 3-4 minutes, add more water if needed to avoid burning.
  14. Your lovely nutrient-packed greens dal is now ready!
  15. Serve with steamed rice, pudina chutney and carrot sticks.
Here follows the nutri notes-
  • Combining a cereal and a pulse in a meal is the best way to get all amino acids.
  • The greens dal combines in itself the protein and vegetables needed in a meal.
  • The mint chutney packs-
More of green leafy vegetable allowance.
Adds zing,spice and hence improves satiety of a meal.
Adding lime juice to the chutney provides vitamin C needed for better iron absorption(from the greens and pudina) in the body.
  • Serving with carrot sticks adds to the beta carotene in the meal(greens have them too).
  • Carrots also amp up the fibre quotient.
  • Preportioning the meal (as in the pic) allows you to eat sufficiently.
  • This helps weight watchers to prevent from reaching out mindlessly for extra servings.

Here are the visuals-


diced tomatoes


chopped ingredients


chopped greens
cooked dal

microwaved greens

bubbling greens dal