Jul 31, 2017

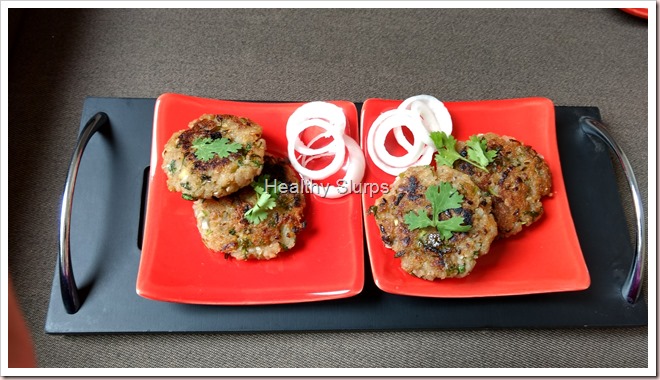
Poha Alu Tikki

Finding myself with a big bowl of leftover Kanda Poha, I was wondering what to upcycle it as. It seemed such a shame to throw away such precious organic red poha. Thus was born Poha Alu tikki. Since rice flakes (Poha) is so quick to soak, and because the tikki is easy to put together with readily available ingredients, I am sure you will enjoy making and savoring this simple Poha Alu Tikki as much as we did.

You can use either Red or White Poha for this Poha Alu Tikki. Or you can use up leftover Aval upma/Kanda Poha like me! Just add a boiled potato for binding, some herbs and seasonings, and the Poha Alu Tikki is ready to be pan fried and gorged upon.

Here is how I made Poha Alu Tikki.

Tikki platter

ALLERGY INFORMATION

  • Does NOT contain lactose, nuts, soya, corn, egg.
  • Suitable for people with gluten allergy or lactose intolerance,

Preparation Time -  15-20 minutes, Cooking Time –  25–30 minutes, Makes – 12 –14 medium size tikkis. 

YOU NEED

COOKWARE – colander, 5 litre mixing bowl, chopping board, knife, potato masher, non-stick tawa/griddle

INGREDIENTS

  1. 1 heaped cup Red/ White rice flakes ( poha). I used *Red Poha. OR 1 heaped bowl leftover aval upma/Kanda Poha
  2. 1 medium potato boiled, or half cup boiled mashed potato
  3. 1/4 cup finely minced red onion
  4. 2 green chillies, finely minced
  5. a handful of fresh coriander leaves,finely minced
  6. 1/2 teaspoon salt
  7. 1/2 teaspoon amchur powder
  8. 1/2 teaspoon garam masala powder

METHOD

  1. If using fresh rice flakes(Poha), cover with fresh water, soak for 5 minutes. Then place in a colander and rinse under running water. Set to drain.
  2. Clean and mince finely onion, green chilly, and coriander leaves.
  3. Add the above to the drained poha, mashed potato, salt, amchur and garam masala in a mixing bowl. Mash them together using a potato masher. Mix well to a homogenous mixture.
  4. Make big lemon size balls, flatten slightly, and shallow fry on a heated non-stick tawa. Drizzle as little oil as possible while shallow frying. Flip to other side, and cook till browned. Take care to brown both sides evenly.
  5. Remove to serving plate. Serve with onion rings and mint chutney.

Tikki close upTikki close up 2


Apr 26, 2017

Eggless Whole Wheat Banana Pancakes

Pancakes make a tasty and quick breakfast food. Most children seem to love them. Pancakes are very versatile and can be made interesting with different toppings. I realised that it is time to give pancakes the Healthy Slurps twist. Since pancakes are usually made with all purpose flour, I do not rate them high on nutritive value. Instead, here is a recipe for whole wheat pancakes. What’s more, these Eggless Whole wheat Banana Pancakes taste very delicious even without any toppings.
This recipe is especially for those who do not eat eggs, and despair at the non-availability of eggless pancakes, or recipes for it. Look no further. I am really delighted to share this winner recipe with all. I have used organic whole wheat flour and organic jaggery powder to make these delicious eggless whole wheat banana pancakes. You could substitute these with normal whole wheat flour and jaggery/brown sugar too. I have not used any baking soda either. The banana takes care of it all.
Here is how you can enjoy these soft, fluffy eggless whole wheat banana pancakes at your homes too.
Banana pancakes topped with butter
ALLERGY INFORMATION
  • Contains wheat gluten. NOT suitable for people with gluten allergy.
  • Does NOT contain nuts, lactose, soya, corn, eggs. Suitable for people with nut allergy or lactose intolerance. People with lactose intolerance can use any cooking oil instead of butter.
Preparation Time – 15-20 minutes, Cooking Time – 30 minutes, Makes -
YOU NEED
COOKWARE – Non-stick skillet, spatula,wire whisk, ladle, mixing bowl, fine sieve
INGREDIENTS -
  1. 1 +1/2 cup organic whole wheat flour
  2. 1 cup organic jaggery powder / 1 cup brown sugar powdered
  3. 1 Banana, mashed up with a fork (I used Dole)
  4. 1 cup drinking water plus few teaspoons of water or milk if needed
  5. 1/4 cup unsalted melted butter (Or use any odourless cooking oil in place of butter)
METHOD -
  1. Dissolve the jaggery/brown sugar in water. Stir briskly with wire whisk to blend. You can also warm up the water to speed it up.
  2. Once the jaggery has dissolved, (Takes about 5 minutes,) filter the liquid through a mesh sieve to remove grit.
  3. To the filtered liquid, add the whole wheat flour in a slow drizzle. Keep stirring briskly with wire whisk to avoid lumps.
  4. Once the flour is blended in, add the mashed banana and bring the whole batter together by mixing thoroughly. Batter should be of thick pouring consistency. it should thickly coat the back of a ladle. Add a few teaspoons of water/milk to your batter, only if needed.
  5. Heat up a non-stick skillet. Drizzle a few drops of butter on the pan. When you see a few fumes, the skillet is hot enough.
  6. Lower the heat, pour a ladleful of batter on the centre of pan. Tilt it gently to let batter spread. Do NOT swirl the pan too much. A gentle tilt will do. Keep skillet on medium flame. Drizzle a few drops of butter around the sides of the pancake.
  7. When the underside looks brown, flip the pancake over with a spatula. Cook over a low flame for a few minutes. Remove to serving platter when done.
  8. Repeat with rest of batter.
  9. I like to make mini pancakes by dropping teaspoonfuls of batter all around the skillet and patiently turning over each one.
  10. Serve hot, warm, cold. Serve plain, with some fruits, or with honey drizzled over. Once fully cold, these can be packed in school lunches too. They stick together when warm. You could use butter paper between pancakes while packing too. Great for picnics, road trips, school or office lunches, after school snacks.
Soft spongy banana pancakes

Feb 21, 2017

Mirch ka Salan with Mishti Pulao

Mirch ka Salan is a famous Hyderabadi dish. The dish is said to have originated in the kitchens of the Nizams. I would believe that, as the dish uses tamarind as souring agent, a practise mostly used in South India. Also peanuts (local produce) and sesame are used instead of other nuts and dry fruits(more prevalent in Awadhi cuisine). Whatever be its origin, Mirch ka Salan always elevates the meal from a common to an exotic one. It finds a definite place in wedding feasts and other important festive meals.

At our home, Mirch ka Salan is a holiday favourite. The star of a luxurious, happy meal. The main dish when important guests come over. Almost always, Mirch ka Salan is paired with the most fragrant Mishti Pulao, a sweet, fragrant Bengali dish, also a festive treat. One Hyderbadi, one Bengali..but the pairing is made in heaven. A happy marriage which we relish down to the last morsel. The tango of the sweet and aromatic Mishti Pulao with the tart, hot, spicy Salan has to be experienced to be understood.

I was introduced to this very fragrant Mishti Pulao by my dear friend Deepasri Deb. I have followed her recipe to the T. It never fails to make the most perfect, heavenly, fit-for-Gods Mishti Pulao. Check out her treasure trove of recipes at www.hamareerasoi.com 

Here are the recipes for both the dishes.

Mirchi ka Salan

MIRCH KA SALAN

I have adapted Sanjeev Kapoor’s recipe for this. Changes to his recipe include chopping of the fat Bhavnagari Chilli into inch long batons, deseeding them, and not using any extra chillies in the recipe. This helps to scale down the heat in the Mirch ka Salan. I have also made a few changes in the preparation method. Here is how I made Mirchi ka Salan.

ALLERGY INFORMATION

  • Contains peanuts. NOT SUITABLE for people with nut allergy.
  • Does NOT contain gluten, lactose, corn, soya, egg. Suitable for people with gluten intolerance or lactose intolerance.

Preparation Time – 15-20 minutes, Cooking Time – 30 minutes, Serves – 4 as main course or 6 as side dish if used with other accompaniments in the meal.

YOU NEED

COOKWARE – Sharp knife, cutting board, 3-4 litre wok, long flat ladle, small bowl, Mixer-grinder

INGREDIENTS -

  1. 250 gms or 15-18 fat Bhavnagari chillies (bajji mirchi)
  2. A small lemon sized ball of Tamarind
  3. 1/4 heaped cup raw peanuts with skin
  4. 1/4 level cup white sesame seeds
  5. 1/4 level cup fresh grated coconut
  6. 1 tablespoon coriander seeds
  7. 1/2 teaspoon cumin seeds
  8. 3-4 cloves garlic
  9. A thumb size knob of fresh ginger root
  10. 1 medium red onion, finely chopped (1/4 cup finely chopped red onion)
  11. 1/2 teaspoon black mustard seeds
  12. a few curry leaves
  13. 2 tablespoons cooking oil
  14. a pinch turmeric powder (add upto 1 teaspoon if you want a yellow coloured Salan)
  15. 1 heaped teaspoon salt

METHOD

  1. Wash and wipe down the fat chillies. Remove the stem, cut into inch long thick batons, and scrape out the seeds from within.
  2. Soak tamarind in half cup warm water. Squeeze out tamarind juice from it. Repeat with some more warm water. Set tamarind extract aside.
  3. Heat the wok over medium flame. Dry roast the peanuts first. As they begin to brown, tip in sesame. Roast until the sesame begins to crackle. Add the coriander and cumin seeds and roast until aromatic. Do not burn. Keep stirring. Remove to mixer grinder jar.
  4. Return wok to heat, add a drizzle of oil. Fry the ginger and garlic for a minute. Remove this to mixer jar too.
  5. Add the fresh grated coconut to the mixer jar, add some water and grind to smooth paste. Set aside.
  6. Add the rest of the oil to the wok, temper with mustard seeds and curry leaves. When this crackles, add the finely chopped onions and keep stirring over medium flame. When onions turn pink and shiny, add the chopped chilli batons. Saute over high heat for 5 minutes. Keep stirring to avoid charring.
  7. Pour tamarind juice into the wok, add salt, turmeric, cover and cook for 5-7 minutes over medium flame, until the chilli just softens.
  8. Pour in the ground mixture, add half a cup of water, and simmer covered for another 15 minutes.
  9. Switch off flame. Rest for half an hour for flavours to develop. Serve warm or hot with fragrant, sweet, Mishti Pulao.
Royal Feast - Mirch ka Salan with Mishti Pulao

MISHTI PULAO

ALLERGY INFORMATION

  • Contains Cashew nut. People with nut allergy can avoid adding cashew nuts to the recipe.
  • Does NOT contain gluten, corn, soya, egg, or lactose. Suitable for people with gluten or lactose intolerance.

Preparation time – 15 minutes, Cooking Time – 30-35 minutes, Serves – 4 as main course

YOU NEED-

COOKWARE – 3-4 litre wok with fitting lid, ladle, colander

INGREDIENTS -

  1. 1 heaped cup Gobindobhog rice, or Jeera rice, or Basmati rice
  2. 1/4 cup fresh/frozen green peas
  3. 1 teaspoon turmeric powder
  4. 2 tablespoon ghee
  5. 1/2 teaspoon salt
  6. a fistful each of broken cashews and raisins
  7. 1’' piece of cinnamon bark broken into two
  8. 2 bay leaves
  9. 3-4 cloves
  10. 2 green cardamom
  11. 2 black cardamom
  12. 1 mace flower
  13. 5-6 black peppercorns
  14. 3 tablespoon sugar
  15. 2 cups drinking water

METHOD -

  1. Rinse the rice well under running water. Set to drain in colander. Rub in the turmeric powder into the rice and spread the rice in the colander to drain well.
  2. Heat ghee in the wok, add cashews and raisins. Fry over medium flame until golden brown and raisins plump up.
  3. Add spices – cinnamon, bay leaves, mace, peppercorns, cloves, green and black cardamom.
  4. When the spices release aroma (about a minute or two over medium flame) add the rice and sugar. Stir well continuously over medium heat. Add the green peas midway and continue stirring until rice gets a sheen from the ghee. (About 7-10minutes)
  5. Add salt, 2 cups water. Increase flame to highest and bring water to boil.
  6. After water has come to a boil, set wok on your smallest burner, turn down heat to minimum, cover and cook for 10-12 minutes. Switch off flame.
  7. Let it rest for 5-10 minutes. Then, open wok, fluff up rice.
  8. Serve along with tangy, spicy Mirch ka Salan.
Fit for Gods - Mishti Pulao

Apr 18, 2016

Jiyo Natural - Healthy Meal Review

Quite often, we yearn for a simple home cooked meal. Especially when we are working long hours or live away from home or unable to cook our own meals for any reason. Would it not be wonderful to find a reliable meal delivery option?
Jiyo Natural does just that. Not only do they make healthy meals designed by a nutritionist but also customise meals for specific health conditions like diabetes, high cholesterol, or high blood pressure.
When asked to review their lunch delivery meals, I agreed happily. As a nutritionist myself, I was curious too. Here is what I found.
Since their website offers all information, I will restrict my post to my experience and opinion.

The Jiyo Health Meal
I received a call from the nutritionist of Jiyo Natural enquiring about any health conditions, allergies, and such. The lunch menu of the day was explained to me and delivery time agreed upon. This was followed by an email which gave me detailed nutrition information about the meal I was going to receive.
To my happy surprise, the lunch arrived on time. Neatly packed, warm (not hot), no spillage. Packed neatly in two steel tiffin carriers. (I wonder if this is a regular feature, especially after the plastic ban enforced in Bangalore)
This is how it was delivered to me

Rotis - Two multigrain, came wrapped in foil. Brown rice Tawa Pulao - Fragrant, cooked just right. Difficult to achieve with brown rice, but I was very happy to see they did. Burrani raita delivered the necessary garlic kick to the pulao. The side dishes were all cooked just right without being overcooked, or spiced heavily either. I especially liked the green peas and soya chunks sabzi for its simple fresh flavours. Special mention must be made of the sprout salad. Crisp, colourful but not soggy or wilted at all. Quite a feat, I would say. A happy ending to the meal was the carrot pudding. Sweetened with jaggery instead of sugar, mildly sweet, satisfying.

Jiyo Health Meal unraveled for you

crisp, colourful salad
 
Jiyo Health Meal on a platter
At 600+ calories, the meal packs in maximum nutrients, so we get quality mindful calories in each mouthful. I found the meal to be quite filling and more than I would consume in a normal lunch. Since a big portion of the meal had protein, my stomach stayed full for longer. I felt better energized through the day. I am sure people with more hearty appetites will appreciate and enjoy the meal.

The Jiyo Manage Meal

This is how the meal came to me

Tightly sealed lunch box

Home-style cooked healthy lunch from Jiyo Manage

This is a customized meal designed after a health analysis carried out by a qualified nutritionist. The Jiyo Manage meal offers hope for working people who have special diet requirements.
As with the Jiyo Health Meal, I received a call from the nutritionist who ran me through her health check questionnaire. My preferences, allergies, and calorie requirements were all considered. She then suggested a suitable meal for me.
The Jiyo Manage Meal had two multigrain phulkas, millet khichdi, chole, mixed vegetable sabzi, raita, and a cucumber carrot salad. While several people may be skeptical about millets in a meal, I found the dish well cooked, mildly flavoured and soul satisfying. The vegetable sabzi was so good, I would have loved a larger serving of it. Salad was fresh and crunchy, as in the Jiyo Health Meal.

What do I think?
Jiyo Natural has taken a vital step in designing and delivering amazingly healthy meals. I am yet to come across an online food delivery option which is focussed on healthy meals. If their claims of using chemical free produce, healthy cooking methods, and natural sweeteners are all true, then we need to look no further for lunch or dinner delivery options. The comfort in knowing that the best practices are followed while cooking our meal and delivering at our doorstep will surely make us want to order from Jiyo Natural.
Price -
Rs. 130/- for Jiyo Health Meal.
Rs. 150/- for Jiyo Manage Meal.
Delivery Areas - Koramangala, HSR Layout, Electronic City, Bellandur.

It would be great if they cover all of Bangalore city in their delivery area.

Mar 15, 2016

Road to Baluchistan–Review of Food Festival @ Baluchi

What happens when star chefs from five properties gather to create a food festival at one location? That too, in our city, Bangalore? You can expect plenty! A few foodies and bloggers were invited to a preview of the ‘Road to Baluchistan’, a food festival currently running at Lalit Ashok Hotel, Bangalore.

Conceived by Chef Suvaranjan and Chef Bharat Kapoor of Baluchi, Bangalore, the Food Festival brings signature dishes of the participating star chefs of each Baluchi restaurant, a few forgotten dishes, and then some modern interpretations of Indian cuisine.

 The Star Chefs of Baluchi

Chef Mumtaz from Baluchi Mumbai, set the mood for the evening with an elegantly plated Subz Gullar Kabab. The kabab, unusually shaped like a samosa was silken smooth on the tongue. Its richness grew on the palate before unleashing the spice and heat within! Perfectly balanced in texture and flavour, this amuse bouche certainly had us all looking forward to the next course.

Amuse bouche I next chose a vegetarian platter of starters while the other diners were offered vegetarian or non-vegetarian platters according to their choice. Sheer morsels of delight, the Mushroom ki Galouti and Malai Artichoke (by Chef Satyabir, New Delhi) were absolutely brilliant! The galouti was unbelievably velvetty on the tongue. The Malai Artichoke had me eyes closed and savouring the lush cream offset by the saltiness of the fleshy artichoke. The Rajwada Paneer Tikka (by Chef Zainul Abedin, Jaipur) scored well on flavour, however the paneer was a tad chewy. Palak ki Nazakat (by Chef Bharat Kapoor, Bangalore) went down reasonably well. I enjoyed the tomato relish on this kabab better than the kabab itself. Plated with pomegranate molasses, balsamic reduction, and pineapple relish,  the presentation and the taste had everyone nodding happily in approval. The surprise churan powder and gold dusted green olive on the platter had all of us in ‘oooohhs’ and ‘aaaahs’.

Note the elegant plating, don’t miss the gold olive either!

Elegantly plated starters

The Baluchi, Bangalore has introduced a Naanery coupled with unique chutneys and paired with an interesting wine list. On offer that evening were Baqarkhani (a Kashmiri roti fragrant with saffron), Besan ki roti (crisp and spiked with ajwain), Pheni Paratha (flaky, rich, crisp, and topped with sesame seeds), and Gilafi Kulcha (stuffed with cheese and peppers), teamed with interesting chutneys such as Raw Papaya chutney, Carrot chutney, Radish chutney and a sweet-spicy Tomato chutney. The wine list includes whites from Vina Esmaralda, a Sauvignon Blanc from Honig, and reds from Brancaia TRE 2012 and KRSMA 2014.

This Naan-wine pairing is sure to pique the interest of discerning gourmets in this city.

From the NaaneryChutneys galore

The main course, aptly named ‘Dawat-e-Lazeez’ arrived soon after. As a vegetarian, I chose to go along with suitable menu options. The Bhindi Singhada, a smart stir fry of fresh Bhindi with crisp water chestnuts tossed with fresh spices won my heart for it’s uniqueness and real-fresh spice flavours. I enjoyed the Paneer parcha mutter, prepared by stuffing a ground green pea mixture inside parcels of soft paneer and simmered in an onion-tomato gravy. This gravy had an interesting texture and gutsy flavours. The Dal Baluchi was superlative in aroma. Silken-creamy on the tongue, smoky aroma, each spoonful was eaten joyfully. The Jodhpuri Gatta Subzi had a hearty, spicy gravy to its advantage, while the Gatta could have been improved by soaking for longer in the gravy. My search for the perfect Rajasthani Gatte ki Subzi continues.

The Vegetarian entreesSome more rotis and naans

Served with more hot Naans, rotis, and assorted breads, and an excellent array of pickles, namely, Kathal ka Achar, Aam ka Achar, Hara Seb ka Achar(outstanding), the main course left me heaving under its array.

A refreshing Pineapple Jeera Granita was welcome as a palate cleanser. A good thing too, for we were presented with a superbly aromatic, unusual ‘Paan Biryani’. Delicately flavoured with Paan leaves, cooked on Dum, and served with Burrani Raita, do not miss this!

Do not miss Paan Biryani

All good things come to an end. We came to a sweet ending of this mighty repast with bowls of Gulab ki Kheer, Malai Kulfi, and hot Gulkhand ke Gulab Jamun! If Gulab (Rose flavour) dominated the dessert options, I did not complain! Of the three, I feel partial to the succulent Gulkhand stuffed Gulab Jamun. Depsite not being a fan of Gulkhand, I could not resist polishing off this hot Jamun.

Sweet endings

If you are a fan of North-Indian food, if you enjoy a carefully curated menu in a soothing ambience by courteous and attentive staff, if you do not want to miss the offering of the some of the best chefs in the country, you should reserve your table at Baluchi, Lalit Ashok, Bangalore. The festival is on till the 20th of March. Open for lunch and dinner with a la carte menu offered. Costs approximately Rs.3000 for two.

A view of interiors

The Open Kitchen

Mar 11, 2016

Apple Berry Milkshake

It feels wonderful to be back after a long break. How have all of you been?
Before we knew it, winter turned to summer in Bangalore. With exams on, and summer heat in full force, we are constantly searching for chilling, refreshing drinks. Surely, staying cool and hydrated has to include delicious and inviting options, correct?
This apple berry milkshake has been the answer to such heated discussions about the best drink in summer. The sudden jump in season from winter to summer made plenty of winter produce like apples and strawberries still available in the market. So, we are making the best use of it.
Made with only 3-4 ingredients, this milkshake can be blended in no time, but tastes best when chilled. So make sure you stock up on chilled milk in your fridge! We are exploring many more liquid deliciousness at our home. Stay tuned for more such chilling posts!Winking smile
Healthy delicious Apple Berry Shake
ALLERGY INFORMATION
  • Contains lactose. People with lactose intolerance can substitute coconut milk or almond milk in place of dairy milk.
  • Does NOT contain gluten, yeast, soya, nuts, corn, eggs.
Preparation time – 10 minutes, Cooking time – nil. Chilling time – 2 hours, Serves - 2
YOU NEED
COOKWARE – Blender, peeler, knife, glasses to serve
INGREDIENTS -
  1. 1 Red Delicious or Fuji apple
  2. 4-5 strawberries
  3. 400 ml chilled skim milk
  4. 1 drop vanilla extract
  5. 1-2 teaspoons sugar (optional)
METHOD
  1. Rinse the fruits thoroughly. Peel and core the apple. Hull the strawberries. Chop the fruits up roughly.
  2. Add the chopped fruits to a blender, pour in half the chilled milk, vanilla extract and blend to super smooth and frothy milk shake. Top up with rest of milk and blend in too.
  3. Taste and add sugar only if needed. Blend for another minute if you are using sugar.
  4. Serve in tall glasses. Top with ice cubes if you wish to.
Cool shakes to beat the heat
Apple Berry Milkshake

Dec 10, 2015

Sai Protein for Chennai Floods

All these days, I have been watching the news with unspeakable pain and sorrow. The Chennai floods, that swept away precious life, left us all shocked and dazed. If the torrential monsoon rains were not enough, the city’s overflowing reservoirs too added to the mayhem. Coupled with indiscriminate real estate development, with no thought given to civic infrastructure, the people of Chennai are paying a very heavy price for the greed of their leaders. 

The terrible times also brought forth unprecedented help from different parts. Normal people turned heroes, and pretend heroes turned zeroes. Homes have been thrown open to complete strangers, people are offering their time and services for free, and heroic tales of survival and rescue are now flooding the social media. It is so heartening to see the generous help that people are offering each other.

While it looks like the rain gods have finally relented, a massive job still lies ahead in the flood-hit areas. Cleaning out the debris, preventing and fighting any water-borne diseases, rebuilding homes,… the task list goes on. In this context, I would like to share a recipe for kanji powder that can be made in bulk and distributed to those affected by the floods. All those want to contribute in some form for Chennai Flood Relief, please do try to make this powder and help those affected. The combination of grains used in this recipe is unique. Designed to be a complete food, 3 tablespoons of the powder dissolved in water or milk (if available), can replace an entire meal. It can be had by people of all ages, toddlers to old people. However, may not be suitable for weaning infants.

In a time when the immunity of a population is at risk, when people do not have access to normal cooking methods, when nutritious food is vital to health, this powder is a God-send. Beats instant noodles or biscuits by several miles in nourishment.

YOU NEED

INGREDIENTS

  1. 6 kilos Whole wheat (wheat pearls)
  2. 1.5 kilos parboiled rice
  3. 1.5 kilos Ragi (finger millet)
  4. 1.5 kilos Green Chickpeas
  5. 1.5 kilos Green Mung Beans
  6. 1.5 kilos Roasted Chana Dal ( Chutney dal)
  7. 0.5 kilo Soya beans
  8. 0.5 kilo Peanuts
  9. 0.5 kilo Jowar grains (sorghum/white millet)
  10. 100 grams Sago (sabudana)
  11. 30 grams cardamom
  12. 10 kilos sugar

METHOD

  1. Dry roast all ingredients from 1 to 10. Roast individually to a golden brown.
  2. Do not roast cardamom and sugar.
  3. Add the cardamom and sugar to the roasted grains. Powder in a flour mill.
  4. This recipe makes about 25 kilos of kanji powder.
  5. To make kanji, dissolve 3 tablespoons of the powder in hot water or hot milk. Stir briskly and serve. 

Please share this recipe/blog post freely. Please make in bulk for your homes or send to those affected by the floods. Either way, you are doing yourself a good turn.

Nov 6, 2015

Easy tips to stay fit this Diwali

There is a lot to be happy about during the festival season. Navaratri, Diwali, Christmas.. the list goes on. However, many of us fall way off our weight management goals during the festival season. Parties, sweets, and delicacies galore eat into our resolve, and before we know it, we have put on several extra kilos. Here are some easy tips gained from my experience as a consultant nutritionist, to help you manage your weight during Diwali and the festive season. Read on and let me know what worked for you.

  • Start your exercise schedule well ahead

The planning and shopping for Diwali typically begins several weeks ahead. So too, plan your exercise schedule ahead.  Add on to your existing routine at least 10 days before the festival. Add an extra 15 minutes of brisk walking daily or 4 extra sets of Surya Namaskar, if your choice of exercise is yoga. Even 10 minute sessions of deep breathing helps improve metabolism (read fat burning). If you have not yet begun any form of regular exercise, then it is vital to begin now. Just beginning with 30 minutes moderate walk daily will help to prevent extra weight gain from the rich food and sweets during the festive season.

  • Choose your meals wisely

Follow what I call the ‘24-hour check’. In a span of 24 hours, make sure you eat only one festive/heavy/party meal. If your lunch is a heavy one, have a light breakfast such as a fruit smoothie preceding that heavy lunch and follow up with a light dinner such as soup or fresh salad. But make sure to have a small protein snack just before setting out for your party meal, so that you do not overindulge out of hunger. So too, if your dinner has been heavy, precede it with a light salad lunch and a fruit rich breakfast the next day.

  • Plan your Diwali party menu

Be kind to yourself and to your guests by planning the party menu at your home wisely. Plan for one low fat/millet based/low sugar menu item in each course of the menu. Include cut vegetables (crudités) with a hung curd dip as part of starters, some millet based patties such as this one by Nandita. Dress your table with colourful salads such as these.  Add grilled vegetables on skewers or fruit skewers to liven up the party table colourfully without much effort or wasteful calories. Even desserts can include some smart options such as this fruit terrine.

  • Choose your party snacks smartly

While at a party, it may become tough to eat wisely. Pick a small plate to begin with. Keep an eagle eye on the portions you load on your plate. Do NOT go for second helpings. While selecting from the buffet table, choose baked over deep fried snacks, vinaigrette or lemon based dressings over mayonnaise for salads,  milk based sweets over deep fried sugar drenched sweets, tea cakes over cream-topped pastries. Mentally divide your plate into 5 parts. Fill 1 part with a carbohydrate such as roti/rice/pilaf/ pasta, 2 parts with protein such as tofu/paneer/fish/lean meat, and 3 parts with vegetables such as stir fried vegetables/salad. This will ensure you are eating sensibly even at a party.

  • Tank up on healthy fluids

Keep sipping water throughout the day. Other hydrating fluids include unsweetened fruit juices, lemon tea, green tea without added sweetener, dilute buttermilk. Aim for 4 glasses more than your usual fluid intake during the festive season. This will ensure that kidneys are not overloaded, yet, keep hunger pangs and binge-eating at bay. Good hydration also helps to eliminate toxins, aids digestion, keeps energy levels high at the festive times when you need it the most. Needless to say, drink alcohol (if you must) in moderation. No letting go of limits on this one. Dilute your drinks with plenty of unsweetened fruit juices, or water, and pace your drinks sensibly.

  • Form a support group

Diwali is a great time for social bonding. Use your friendships to help each other. Form a support group of like-minded friends who commit to exercising and eating sensibly during the festive season. Agree on a 4-5 point goal, and update the others at the end of the day. Motivate each other to not give up and keep at your goals together. It will be great fun and inspiring at the same time.

Lastly, festivities are not just about food or no-holds barred behaviours. Enjoy the colours, the sounds, soak in the ambience, the fun. Relax, let go of your tensions and come out of the Diwali week, lighter in both body and spirit!

Happy Diwali to all my readers. May there be light, love, peace and happiness in all your homes and lives.

Sep 30, 2015

Chocolate Marbled Energy Bars

Breakfast is the most neglected meal of the day. On busy weekday mornings, most people are in a great rush to reach workplaces, schools, just about anywhere. No wonder then, that, people do not spare time for breakfast. Yet, starting a day without breakfast just works against what we set out to achieve. We are more likely to be zapped of energy and enthusiasm early into the workday. To help us perform better at our tasks, a healthy breakfast is vital. If so, would it not be wonderful if we could have breakfast on the go? Enter granola bars, energy bars, muesli bars. Call them by any name. They are just as convenient, delicious and perfect snacks or meal on the go.

Energy bars can be made ahead, store well, and can be packed as breakfast on the go, or anytime snacks, or on road trips, picnic munchies. They are great for a pre workout or a post workout snack too.

I came across these chocolate marbled energy bars first in ‘Chocolate’ by Delia Smith. The book is filled with decadent chocolate based recipes. However, these energy bars were the ones that caught my eyes first. I tweaked around the ingredients and proportions to suit my requirement. I have substituted the condensed milk with brown sugar/jaggery syrup. You could add both the condensed milk and jaggery syrup to increase the richness of the energy bar too. If using condensed milk, keep the total liquid at the same volume as mentioned in this recipes. I have added popped amaranth seeds to add a good protein to the bar. The only part I have left unchanged is the beautiful marbled chocolate topping! I had to work on the recipe a few times to get a proportion that works best. One that gave just the right hint of sweetness, and had just enough liquid to solid ratio to bake well. I also made sure that the baked energy bars could be cut into neat squares!

Healthy Chocolate marbled Energy Bars

I am sure you are eager to get to the recipe and make some for yourself too. So here goes…

ALLERGY INFORMATION

  • Has gluten from oats. NOT SUITABLE for people with gluten intolerance. Substitute oats with total 5 cups rice flakes to make it gluten free. 
  • This recipe does NOT contain lactose. Suitable for people with lactose intolerance. However, adding condensed milk will bring lactose into the recipe.
  • Does NOT contain corn, soya, eggs.
  • Contains nuts. Omit nuts if you have nut allergy.

Preparation Time – 20 minutes, Cooking Time – 30 minutes, Makes 9 squares

YOU NEED

COOKWARE – Convection oven, 8 inch square baking tray, baking paper to line tray, deep mixing bowl, rubber spatula, sauce pan, 2 glass bowls, steel fine mesh filter, sharp knife

INGREDIENTS

  1. 4 cups quick cooking oats
  2. 1 cup popped amaranth seeds
  3. 1 cup thin rice flakes (poha, aval, attukulu, avalakki)
  4. 1 cup deseeded, chopped sweet dates
  5. 1/2 cup dried cranberries/strawberries/blueberries (optional)
  6. 1/4 cup chopped walnuts/almonds
  7. 1 cup powdered jaggery/brown sugar
  8. 1/2 cup drinking water
  9. 1/2 cup dark cooking chocolate
  10. 1/2 cup white cooking chocolate

METHOD

  1. Bring the water to boil in a saucepan, add the jaggery, mix and let it rest for a few minutes for the jaggery to dissolve. When the jaggery has dissolved completely, strain through the mesh filter to remove impurities. Collect the jaggery solution in the deep mixing bowl.
  2. To the bowl add the oats, popped amaranth, rice flakes, dates, dried berries (if using), and nuts. Mix all the ingredients together until the liquid has coated all dry ingredients.
  3. Preheat oven to 180 C.
  4. Line the baking tray with paper leaving an overhang.
  5. Pat the mixture into the tray, pressing down firmly with a rubber spatula. Make sure there are no dry bits of ingredients on the surface. If needed, sprinkle a few drops of water on top to moisten, and pat down again.
  6. Bake in preheated oven for 20-23 minutes.
  7. Remove and cool the tray on a cooling rack. Do not remove granola from tray. Cool for 20-30 minutes.
  8. Chop the dark and white cooking chocolate into different glass bowls. Microwave in bursts of 20-30 seconds until just beginning to melt. Do not overheat the chocolate, stop heating when there a few bits of chocolate left to melt. Keep stirring with a metal spoon, to get a smooth melted chocolate.
  9. Spoon both the dark and white melted chocolate alternately in a wave pattern over the baked granola. Drag wavy lines using a fork tip or toothpick to create marbled patterns while chocolate is still wet. Tap the tray sharply on the counter top a few times for chocolate to even out.
  10. Place the tray in the fridge to set quickly.
  11. After half an hour, remove from fridge and set on counter top. Wait for the chocolate layer to warm up to room temperature a bit. I left it on the countertop for 10 minutes. Room temperature at my home is around 23C-25C. Cut into 9 squares with a sharp knife. If the chocolate layer seems to crack rather than cut up, wait for some more time and then cut up. The marbled energy bars are ready.
  12. Store in air-tight box. Stays good for at least 1 week, maybe more. I never got a chance to find out! Pack in baking paper for road trips or any place out of home. These marbled energy bars are great for breakfast on the go, for school snack boxes, for pre or post workout snacks, as well as a healthy snack option.

Guilt free healthy snacks

Notes -

  • Diabetics may/may not be able to eat these energy bars. Remember although the recipe uses jaggery, there is more sugar in the dates as well as chocolate. Omitting the chocolate could bring the sugar content of the energy bars lower.
  • The energy bars cut up neatly if baked through well. Also wait patiently for the top chocolate layer to set before cutting into squares.
  • Do not over heat the chocolate. Stop heating when three fourths of the chocolate is melted. Keep stirring in a circular motion, in the same direction for a smooth glossy chocolate.

Sep 10, 2015

The Indian Culinary Route

Marriott Whitefield, Bangalore is hosting a week long Indian Food Festival. Giving you one more fabulous reason to visit them and indulge in specialty gastronomic adventures. Chefs have been flown in from different Marriott properties from across the country for this week alone. Thus, it is India on a platter for guests all through the week. A few food bloggers were invited to kick-start the ‘Indian Culinary Route Extravaganza.’

Visiting Marriott Chefs with Judge

Kick-start we did and how! Bloggers were divided into teams under different chefs. Each team had to prepare a regional delicacy. The twist in the tale came in the form of handcuffs! All chefs were handcuffed, were only allowed to instruct and guide, but cannot twirl pans, or cook. The vegetarians amongst us grouped ourselves into one team. Excited that the dish to be prepared was ‘Gatte ki Subzi’, we set off in all earnest.

Food Bloggers with Chefs in Cuffs

Dough mixed, vegetables chopped, the huge ‘lagan’ was set on stove top. Under Chef Ranjit Singh’s expert and patient guidance, we kept  throwing in ingredients into the lagan amidst the din and chaos of several teams hollering across to each other! Much friendly fire and competitive spirit between the teams, kept up the temperature as if the heat from the live kitchen was not enough. Soon enough our Gatte ki Subzi began to take shape. We kept gazing at our dish with ‘motherly pride’ for we had coaxed and nurtured the sabzi to excellence!

Busy in the kitchen Always have time for selfies! Engrossed in Gatte-cutting!

Soon enough, the dishes were lined up for the judge to choose the best. Suresh Hinduja, prominent member on the Bangalore food scene, and a great cook himself, was the judge for the day. I did not envy him even for a moment, for each team had outdone itself in effort and passion. While I would have loved to end this tale with an ending that the Gatte ki Subzi stole the thunder from all other entries, had people swooning over it, and so on,…. sadly, the tale did not end thus! Kerala Roast Chicken was judged the best for its perfect cooking, great balance of spices and hence the best dish.

The Gatte ki subzi

The proud Team members with Chef Ranjit Singh

All were treated to a sumptuous lunch, pampered by the attentive staff of Marriott, Whitefield. Perfectly flaky Malabar Parathas, Red Matta rice cooked to soft grainy perfection, white rice and rotis were chosen to accompany the brilliant curries, dals, Salan and Raita. If this lunch is anything to go by, folks, do yourself a favour and make your reservations for this Indian Culinary Route week.

Sep 6, 2015

Aval Payasam

Wishing all readers a happy Janmashtami. Praying for more love, peace and happiness in all your homes.

“Pathram Pushpam Phalam Toyam Yo Me Bhaktya Prayachati Tad Aham Bhaktyupahritam Ashnami Prayatatmanaha.” “If one offers to me with Love and devotion, a leaf, a flower, a fruit or water, I will accept it.” Bhagwad Gita, 9.26.

The humble aval, poha, beaten rice has a legendary status in Lord Krishna’s life. His childhood friend, Sudama, redeemed himself by offering a handful of beaten rice when they met after several years. It is said that Lord Krishna relished this offering of Love and Surrender so much that Sudama’s poverty stricken home was turned into a palace of riches, after the Lord accepted this offering.

Here is a recipe for Aval Payasam for Janmashtami. Let us try to make it and offer it to the Lord with single-minded devotion and Love. For He is most fond of a devotee’s Love.

Payasam fit for the Gods 

ALLERGY INFORMATION

  • Contains milk (lactose). Not suitable for lactose intolerant people.
  • Does not contain gluten, soya, corn.

Preparation time – 10 minutes, Cooking time – 30 minutes,  Serves - 4

YOU NEED

COOKWARE – Heavy bottomed sauce pan, ladle

INGREDIENTS

  1. 1/4 cup red aval/poha/beaten rice*
  2. 1 litre whole milk
  3. 1 cup sugar
  4. 1/4 teaspoon ghee

METHOD

  1. *Aval can be thick or medium aval. Do not use thin flat aval. If using thick aval, rinse under running water and soak for 10 minutes. If using medium aval, rinse under running water and add directly to boiling milk.
  2. Bring the whole milk to boil in a heavy bottomed sauce pan. Once the milk is on a rolling boil, drain water from the soaking aval, and add the soaked/rinsed aval to the milk. Keep stirring over low to medium flame to avoid charring at the bottom of the pan. Keep mashing the aval as you stir. This lends a creamy texture to the payasam.
  3. When the milk is reduced to half its volume, switch off flame and add sugar. Stir in the sugar gently until fully dissolved.
  4. Return milk to flame, keep stirring over medium to high flame for 4-5 minutes more.
  5. Switch off flame and cover with a tight lid.
  6. Add 1/4 teaspoon of ghee before offering this to God.
  7. Creamy aval payasam tastes good hot or at room temperature.

Red Aval Payasam

Aug 28, 2015

Pineapple Pulissery

Happy Onam to all readers who celebrate. May there be good health, peace, joy, and plenty in all your homes. Enjoy the day with your loved ones and with an extensive Onam Sadya!

Here is an unusual recipe in time for the Onam Sadya. Pulissery or Moru Kuzhambu is a staple dish in a Malayalee menu. Usually made with vegetables boiled and then simmered in a spicy coconut and curd paste, this Pulissery uses pineapple as the ‘vegetable’. The fruit gives the dish a unique flavour and a welcome tartness. Whether you celebrate Onam or not, this Pulissery will lift your meal to a gourmet level. So go ahead, and cook it up at your homes too.

Pineapple Pulissery

ALLERGY INFORMATION

  • Does NOT contain gluten, soya, eggs.
  • Contains coconut. People with nut allergy usually tolerate coconut.
  • Contains yogurt/curd. Usually tolerated by people with lactose intolerance.

YOU NEED

COOKWARE – Small fry pan/tadka pan, mixer grinder, Pressure cooker.

INGREDIENTS

  1. 1 cup chopped pineapple
  2. 1 cup sour thick curd or 2 cups buttermilk
  3. 1/4 cup fresh grated coconut
  4. 1 tablespoon fenugreek seeds
  5. 4 red chillies
  6. 1 teaspoon salt
  7. 2 tablespoon powdered jaggery
  8. 1/2 teaspoon turmeric powder

For Tempering -

  1. 1 teaspoon coconut oil
  2. 1/2 teaspoon fenugreek seeds
  3. 1/2 teaspoon mustard seeds
  4. 1 red chilli
  5. 7-8 curry leaves, torn up

METHOD -

  1. Place chopped pineapple, salt, turmeric powder, and jaggery in pressure cooker, add half cup water and pressure cook for 3 whistles.
  2. Fry 1 tablespoon fenugreek seeds and 4 red chillies in 1/4 teaspoon coconut oil. Fry on medium flame until just fragrant. Grind this with fresh grated coconut to smooth paste using water/buttermilk/curd.
  3. Mix the ground paste, cooked pineapple, curd/buttermilk and stir over medium heat. Remove from flame as soon as the mixture begins to boil. Do not leave it unattended or over high flame.
  4. Add coconut oil to fry pan, add tempering ingredients to it, and pour sizzling hot over the moru kuzhambu/pulissery. Cover with a tight fitting lid and let the flavours develop.
  5. Serve with steamed rice and a thoran. Crispy papads are welcome too!

Pineapple moru kuzhambu Happy Onam!

Aug 27, 2015

Above Ground Levell Lounge –Departure Lounge

The Above Ground Levell Lounge at Domestic and International Departure Terminals of Bangalore International Airport have been conceived to provide travellers a complete relaxed experience while at the airport. Currently operational in Bangalore airport, this is the first foray of the Bird Group into airport lounges.

I was invited to review the Lounge at the Domestic Departure Terminal. Here is what I saw and experienced.

Key features of the Above Ground Levell Lounge are -

At the mezzanine floor, look out for it’s entry at the fag end of the departure hall.

Logo at Entrance of the Lounge Coffee shop zone

Offers a refreshing experience. Accessible to both special card holders as well as having a Pay and use option. Guests can purchase plans as per need. For eg., choose between simple refreshments or a full meal option. Guests can then avail of the lounge’s facilities which include food and a fully equipped business centre, charging stations as well. I noticed the Flight Information Display Systems at vantage points in the lounge.

The lounge has a very roomy feel, since it is spread over 13,000 square feet with 250 seats at the domestic terminal. This vast space is intelligently divided into zones that also merge into each other seamlessly - the coffee shop, the bar and the dining area. The interiors are done up tastefully incorporating traditional motifs from Hampi. I especially liked the idea of Rangoli designs on the plush carpeting. Tree pods add to the ‘Green Bangalore’ feel apart from offering privacy to different sections of the vast lounge. Along with the pleasing music being played, and the soothing ambient lighting all around the space, the space looked inviting and relaxing. Plush seating, intelligent use of decor to offer privacy, I would surely choose this lounge over other options currently available at the departure terminal.

Seating at coffee shop Plush chairs and soothing lighting  

Well-stocked barHampi inspired murals on walls

Offering massage chairs and showers in addition to the premium facilities they have currently, could take passenger comfort to the next level here.

Buffet spread, live counters, are all in place to offer guests a wide choice of food and beverages. Buffet for the major meals of the day as well as live stations doling out eggs made to order, chaat stations, dosa counters are all geared to pampering travellers’ taste buds. Head chef Shadab proudly informed us that the menu keeps changing every fortnight. This way, frequent travellers can look forward to new culinary offerings each time. The Chef is also particular about seasonal produce, healthy cooking and serving home style food to his guests.

Food cooked fresh, special diet requirements taken care of, customisable dishes, comfortable seating - the Above Ground Levell lounge is fully equipped to handle every need of the weary and tired traveller.

A picture tour of the food sampled that day -

Home-style fresh, soft phulkas Sweet and savoury cookies baked fresh in-house Spicy crackers with dip Salad station at the dinner buffet  Honest, fresh dinner from the buffetThe elegant buffet area