Showing posts with label perfect meal. Show all posts

Mar 9, 2015

Samai Pongal / Little Millet Pongal

Ven Pongal or Khara Pongal is a much loved breakfast food in South India. However, you can have it any time of the day. Ven Pongal works at the brunch or dinner table with equal ease.  With the millet wave sweeping the diets of all, I feel this is a good time to share a recipe with millets.

Samai rice/Little Millet replaces white rice in this preparation. Not only is it far healthier, the millet also cooks faster than rice. Isn’t that great news? Samai has 8 times more iron than white rice and 10 times more fibre. If that was not enough, it is higher in thiamin(vit. B1) , riboflavin(vit. B2) and folic acid content as well. Owing to their low glycemic index, millets are good grains to include in diets for weight management, diabetes, as well as in pregnancy. Since Pongal is usually cooked to a soft mush, this dish can be fed to weaning babies or toddlers also.

Pongal tastes best when served hot, so packing for school lunch may not be a great idea. However, you can pack for an office lunch if you can re-heat your food at work place. Now that I have shared enough reasons to switch to the millet from rice, let us proceed to the recipe, shall we?

Making Pongal is really simple. Cook a grain and a lentil together, fry some seasonings in a fry pan, mix the two with some salt and your dish is ready! Read on for the proportions and method here -

Samai Pongal with chutney

ALLERGY INFORMATION

  • Does not contain gluten, corn, soya, eggs, lactose, dairy.
  • Adding nuts is optional. Omit if you have nut allergy.

Preparation time –10 minutes, Cooking Time –15 minutes, Serves – 4-5.

You Need

Cookware – Pressure Cooker, fry pan, mortar and pestle

Ingredients

  1. 1 cup Samai rice
  2. 1/2 cup Moong Dal
  3. 4 cups water
  4. 1/2 tsp salt
  5. 1 tsp cooking oil
  6. 1 tsp ghee
  7. 10 whole cashew nuts (optional)
  8. 1/2 tsp Cumin seeds
  9. 1 tsp black pepper
  10. 1 tsp ginger juliennes
  11. 7-8 curry leaves, torn up
  12. 2 green chilli, slit (optional)

 Method -

  1. There are two methods to cook this pongal. You can choose between – 1. Pressure cook the Samai rice and Moong dal together in the pressure cooker. For this, rinse the grains together, cover with 3 times the volume of  water and pressure cook for 2 whistles. Or, 2. Pressure cook the dal alone, and the Samai rice on the stove top. For this, cover dal with double volume of water and cover the millet with double the volume of water and cook for about 3-4 minutes. Mix both in a serving bowl.
  2. Coarsely pound the black pepper and cumin in a mortar and pestle.
  3. To a fry pan, add in the oil + ghee, fry the cashew nuts (if using) to a golden brown.
  4. Tip in the pounded pepper +cumin, curry leaves, ginger juliennes, and green chilli.
  5. Add salt to the cooked mixture, pour in the seasonings and mix well. You may add 1/2 cup of hot boiling water to the mixture if it looks very hard. We want a soft mushy texture to the pongal.
  6. Serve steaming hot pongal with a spicy chutney, or sambar or even the traditional gothsu! Here I have served it with a tangy raw mango chutney.

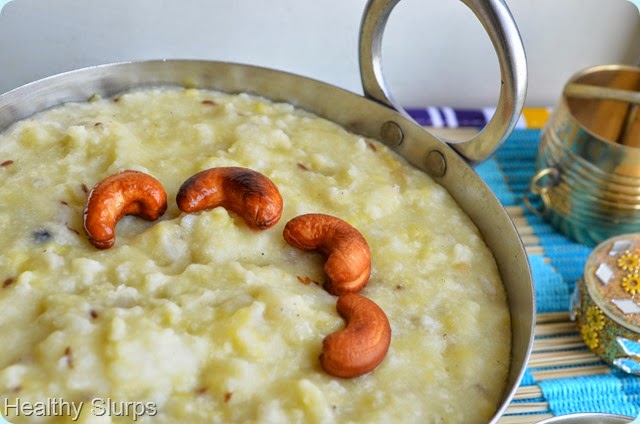
Perfect weekend breakfast or brunch

Enjoy your power packed meal!

Jan 24, 2015

Methi (No)Malai Matar

Some days are different. In a lazy luxurious kind of way. Some days when the routine is banal, when the mundane will just not cut it. Days when we linger just a little longer in bed, luxuriate in the bath, indulge in a hot tea while soaking in the morning sun. I am sure you have these days in your life too.

Such days call for a special meal. A rich, creamy, sinful dish around which a deeply satisfying repast can be planned. Today was such a day. A day to be extravagant, yet sensible. A day to savor. Time to gratify the tongue, body and soul with gastronomic hedonism, yet, not feel the pain of sin later. Time for another recipe to get the Healthy Slurps tweak.

Before you wonder any more, let me share this winner of a recipe with you. Winter is a season of amazing variety of produce in India. Fresh green peas are an irresistible part of this season. Every year, I buy fresh green peas in bulk, shell them, and freeze to use later through the year. After gorging on them in various avatars through the winter, that is. Punjabi and other North Indian cuisines have several dishes with peas as the star ingredient. Of these, I have been wanting to try this Methi Malai Matar for a long time. Translated from Hindi, it means a gravy/curry of fragrant fenugreek leaves and green peas laced generously with fresh cream. I could never bring myself to add cream in the quantities mentioned in most recipes. I just had to find a good healthier substitute.

Today, the idea just presented itself and I went along with the inner flow. The result was a rhapsody of aromas, flavours, an appearance that was alluring and beckoned us to the dining table! Substituting skim milk curd/yoghurt for cream was a fitting idea. The almond meal also added to the richness and added to the good fats in the meal. I prefer almonds over cashews to thicken a gravy as the former has a better fatty acid profile. In plain speak, it means, almonds have more heart-healthy fats than cashew nuts have.

The dish gets done in 4 simple steps. Soak the almonds in warm milk. Fry all ingredients for grinding. Grind along with almonds.  Simmer chopped fenugreek leaves with the gravy. Add boiled peas, season, and the dish is ready!

I am so happy to share this recipe with all of you. So here goes -

Fragrant Fenugreek married to Perky Peas!

ALLERGY INFORMATION

  • Does NOT contain corn, soya, gluten.
  • Suitable for people with gluten intolerance.
  • Contains lactose from milk. Those with lactose intolerance can substitute milk with same volume of water in the recipe.
  • Contains nuts. Those with nut allergy can substitute almond in the recipe with pureed silken tofu.

Preparation Time – 15-20 minutes, Cooking Time – 20-25 minutes, Serves – 4-6.

You Need -

Cookware – Saute pan, Small saucepan/Glass bowl, Mixer grinder

Ingredients -

  1. 3/4 cup fresh or frozen green peas
  2. 2 cups loosely packed fenugreek leaves ( Methi saag)
  3. 1/4 cup almond meal OR 2 tbsp whole almonds powdered with skin OR 1/4 cup pureed silken tofu
  4. 1/2 cup skim milk OR 1/2 cup water
  5. 1 heaped tsp salt
  6. 1 cup skim milk yoghurt
  7. 1 tbsp grated jaggery Or sugar (optional)

To fry and grind -

  1. 1 heaped cup chopped onions
  2. 3-4 tomatoes
  3. 2 tbsp chopped ginger
  4. 2-3 garlic cloves
  5. 2-3 green chillies depending on heat preference
  6. 1 inch stick of cinnamon
  7. 3 cloves
  8. 2 green cardamom pods
  9. 1/4 cup chopped green coriander leaves
  10. 1 tbsp cooking oil

Method -

  1. If you have whole almonds, soak in measured warm milk OR measured warm water(use warm water if you have lactose intolerance). If you have almond meal, soak those in warm milk too. Set aside. If you have nut allergy, omit the almonds, thaw the silken tofu, puree and set aside.
  2. Heat a fry pan, add oil, toss in the chopped onions, saute for a minute. Then tip in the chopped ginger and peeled garlic. Fry another minute. When the onions take on a light pink tone, add the chopped tomatoes. Also stir in the cinnamon, cloves and cardamom. Fry over a medium flame. Do not brown the onions. After 3-4 minutes of frying, when the tomatoes look slightly mushy, take off the flame.
  3. Grind this mixture along with chopped coriander leaves, and the soaking almonds+milk/water, or the pureed tofu. Blend to a smooth paste.
  4. Return this blend to the first fry pan, and set to simmer again.
  5. Chop the cleaned fenugreek leaves finely and add to the simmering sauce. Add 1/4 cup water if too thick and let the greens simmer in the sauce for 3-4 minutes. Stir in between to avoid charring at the bottom.
  6. Meanwhile boil the fresh or frozen green peas over stove top or microwave. Cover the peas with 1/2 cup water and cook for 3-5 minutes until soft and cooked. Add this cooked peas along with any remaining cooking water to the simmering sauce too.
  7. Add salt, sugar, curd, and mix in well. Bring to boil over medium heat. Switch off and let the gravy rest for 10-15 minutes.
  8. Serve warm with phulka/kulcha/pita bread/jeera rice/any mild pulao/pilaf. i served it with fragrant jeera rice and a carrot salad.

A satisfying repast

Creamy rich Methi Malai Matar minus the guilt 

Nov 17, 2014

Roasted Brinjal Raita / Eggplant Raita / Roasted Eggplant Dip

The best meals are often the simplest ones. Those which can be rustled up with really few ingredients, in minimum time, and deliver high on nutrition, as well as satisfaction. Quick cooking=happy eating=content tummies.

This raita is one such recipe. Besides, the dish is versatile in that it can be used in many ways. The day I made it at home, we used it as raita, dip, as well as a substitute for mayo in sandwiches! So does it taste like baba ghanoush? Well, not quite. Tzatziki? well, maybe. Punjabi Baingan Bharta? mmm, not that either.

Why don’t we  just delve in and find out? Shall we?

Chilled bowl of smoky raita

The secret to an amazing brinjal raita lies in how it is smoked. While purists will tell you to rub some oil on the skin and roast on all sides over an open flame patiently turning it over and watching lest it char beyond recognition, i am going to let you in on a secret!

Just rinse the brinjal, wipe dry, slit into four long pieces, place in a microwave safe glass bowl and cook on the highest power for 6-7 minutes. Now take each piece and roast them individually over an open flame for just a minute per piece.  Dunk them in a bowl of cold water, peel the charred skin and reserve the pulp. This whole process takes less than 15 minutes. This gives the right amount of smokiness to the pulp without being overpowering. It also frees you up to attend to the rest of the meal while it cooks in the microwave. No need to tend to it constantly. Plus a total reduction in cooking time.

Now that I have simplified it for you, go ahead and make yourself some fragrant raita/dip/sandwich filling/meal by itself.

Come and eat me!

ALLERGY INFORMATION

  • Does NOT contain gluten, nuts, corn, soya, eggs.
  • Has dairy in the form of skim milk curd (yoghurt). Usually tolerated by people with lactose intolerance.

Preparation Time – 15 minutes, Cooking time – 15 minutes, Serves – 4

You Need

Cookware – Knife, Cutting Board, Small Sauce pan / Tadka pan,  Bowl of 1 litre capacity.

Ingredients

  1. 1 Big Violet Brinjal/Eggplant weighing approximately 500gms
  2. 1 cup Fresh curd
  3. 1/2 tsp salt
  4. A pinch sugar
  5. 1/4 tsp mustard seeds
  6. 1 small green chilli
  7. 1/4 tsp cooking oil
  8. a pinch of asafoetida powder
  9. a few curry leaves and coriander leaves for garnish – optional

To Assemble

  1. Prepare the brinjal/ aubergine/eggplant as described earlier. To repeat – wash, wipe dry, slit along length of brinjal into 3 pieces. cook for 6-7 minutes in microwave safe glass bowl at highest power. You may add 2-3 tbsp water to the bowl to help cook without shrinking. I find this method works best for me.
  2. After this, place each piece individually over an open small flame and char the skin. Dunk all of them into a bowl of cold water. When cool enough to handle, peel the skin off and reserve the pulp.
  3. Mash the pulp with potato masher/fork.
  4. Whip curd with sugar and salt. Add the mashed brinjal, and stir in well to combine. Raita just needs seasoning now.
  5. Prepare the seasoning by heating oil in a small sauce pan/tadka pan. Add mustard seeds, when they crackle, add slit green chilli, asafoetida powder. Switch off flame. Pour over the raita. Add the curry leaves and coriander leaves, if using, stir in and let it rest for few minutes.

Your delicious fragrant raita is ready! Serve with hot phulkas, paratha, bisi bele bhath, biryani, filling for sandwich, dip for crudites, wraps. Don’t want to make anything else? Just have it chilled. A bowlful. As it is.

Get me a bowl of this,quick!

Notes -

  • This method of cooking first and smoking next allows for a good desirable smokiness. Even agnostics of smoky flavours will find it appealing.
  • Do not omit the seasoning. It is crucial in bringing all the flavours together.
  • Some chilling will really help in elevating this simple creation. However, if you are in a hurry, don’t worry. Just dig in.

Jul 19, 2014

My Bircher Muesli


We first sampled Bircher Muesli a couple of years ago at  Hong Kong Sky City, Marriott. Vacationing at Hong Kong, we were tucking into the amazing breakfast spread (which is a lot to say for vegetarians.)  My interest was sparked at the sight of very cute jars of muesli sitting on a bed of crushed ice. I enjoy hot muesli by pouring steaming skim milk over muesli, but this? On crushed ice? After confirming with the wait staff that it had all vegetarian ingredients (you never know, after all, even congee there has bacon in it) we tentatively sampled one jar, and boy, fell in love with it. My son declared, “Mom, we have been wasting life by not having this wonderful breakfast dish”.

I researched into it’s origin, and discovered that Bircher muesli was first developed by a Swiss doctor, Dr. Bircher – Brenner. First used for patients, the recipe has become hugely popular in Switzerland and Germany. It is traditionally made by soaking rolled oats in yoghurt/curd along with grated apple, apple juice and left overnight in the fridge. The next morning, it is enjoyed for breakfast along with choice of toppings such as roasted nuts, or more fresh fruit. With it’s easy make-ahead prep, versatile choice of toppings, and deliciousness in every spoonful, it’s not difficult to love Bircher Muesli.

But wait, what’s a recipe without customisation? I am a big fan of eating local, buying seasonal. So the muesli had to be localised and include seasonal fruit too. The apple had to give way to mango, the fruit of the season.The Bircher muesli became muesli parfait. Another ingredient, popped amaranth just begged to go in too. Some easily available dry fruits and nuts completed the meal-in-a-jar. Local ingredients, global flavours! Good morning muesli

So I set about soaking oats in skim milk yoghurt. I also soaked some pitted dates and raisins in honey in a separate bowl and left them to rest in the fridge overnight. The next morning, I chopped up some mangoes, toasted a few almonds and walnuts. Now I was ready to assemble. The layering of the ‘breakfast-parfait’ began with a few spoons of the soaked oats. On this, I piled some chopped mangoes, then came the turn of another star ingredient, popped amaranth. A few drizzles of honey and then the turn of the oats again. The soaked dates+raisins went in next followed by some more chopped mangoes and popped amaranth. The parfait was finished off with nuts and another drizzle of honey. There, so simple. It took 5 minutes to assemble two servings. A most delicious, filling, uber healthy breakfast ready. Needless to say it was demolished as quickly as it was assembled.

While you can play around with ingredients and serving size, I am giving the ingredients and measures I followed. Feel free to play around the main theme and come up with a combination that your family loves.

Preparation time –15 minutes+8 hours soaking time, Cooking Time –3 minutes, Serves – 2

Allergy Information

  • Does NOT contain egg, soya, peanuts, corn, milk.
  • Contains yoghurt, some gluten from oats.

You Need

Cookware –2 mixing bowls, chopping board, knife, small saucepan,300-400 ml jars to assemble the meal.

Ingredients

  1. Quick cooking oats – 4 tbsp
  2. Skim milk yoghurt – 400 ml ( 2 cups)
  3. Skinned and chopped mango – 1/2 cup
  4. Popped amaranth – 3-4 tbsp
  5. Dates – 6-8
  6. Golden raisins – 12
  7. Almonds – 6
  8. Walnuts – 2
  9. Honey – 2 tbsp+2 tsp

To Assemble

  1. Mix the measured oats into the yoghurt, stir in well, cover and rest in refrigerator overnight. Also place the pitted dates and raisins with 2 tbsp honey in a small bowl, cover and store in refrigerator.
  2. I popped the amaranth at home from amaranth seeds. To pop, you add amaranth seeds to a super hot wok, a tsp at a time, stir gently and watch them seeds merrily popping and dancing in front of your eyes! You could use store bought popped amaranth or omit it entirely too. Or attempt popping at home if you get hold of amaranth seeds.
  3. Chop the mangoes and almonds, keep aside.
  4. Take the serving bowls, or jar or tall glass to assemble the parfait. Rinse well and wipe dry.
  5. Layer the soaked oats at the bottom, 2 tsp should suffice. Place the chopped fruit on the oats. Next, add the popped amaranth, about 1 tbsp would do. Place the soaked and plump dates+raisins mixture over this and cover again with a couple of tsp of soaked oats. A drizzle of honey, then fruit, popped amaranth and finally topped with toasted nuts follow. Finish off with a good drizzle of honey.
  6. Enjoy for breakfast, or assemble in ajar with screw top lid, and carry to work. Ideal for mid-morning or 4 p.m. hunger pangs.

Meal in a jar


Bircher Muesli Parfait

Jun 28, 2014

Magic under the stars


Childhood memories and family mealtimes are closely intertwined in my mind. My earliest memories of happy times are of those spent at my grandparents' place. Carefree days filled with play time, bonding with cousins, fun and games nonstop, and of course, meals shared with all in the family. My grandmother, a powerhouse who could create meals for the huge family with astounding ease - would effortlessly cook up giant pots of the most aromatic dishes and enjoyed serving them to her family. Nothing gave her more happiness than to see her food being polished off.

As a special treat to the young brigade, my grandma would lovingly mix cooked rice, soft thick curd, add a pinch of salt, some hing powder, and season with cracked mustard and curry leaves. Into this, she would fold in some grated carrot or pomegranate or green grapes depending on supplies at home. When in a generous mood, she would also add a dollop of butter to the rice mixture. I would run and chop up some fresh coriander leaves and mix in. The milky white of the rice, dotted with brown mustard, a splash of green from the herbs, interspersed with the hues of the fruits made a meal fit for the Gods.

The entire creamy goodness would then be transferred to a steel bowl and carried to the terrace. All the grandchildren would throng around her. There, under the clear summer starry skies, the magic would unfold. She would narrate tales of kings and kingdoms, of brave men who fought for their land, all the while filling each child’s cupped palm with a scoop of heavenly curd rice. We would never know when we ate, and how much. Even the most fussy child would join in and be fed happily thus. What a feast under the stars! Tummy and soul nourished, we would all retire to a good night’s sleep.

Another age, another bunch of kids. I wanted to recreate this magic for my children and their cousins too. The terrace was cleaned and mats spread out in readiness. I read up and armed myself with a couple of stories from the Panchatantra and Anderson’s fairy tales. The lush, smooth, rich curd rice was assembled. To this meal, I added a roasted baby potato curry. Who can resist golden brown baby potatoes, enhanced with a fragrant mint and garlic spice mix! This dish would be best cooked in this Grill & Drop Casserole. I would love to check if I can make a killer roast without having to use too much oil and not end up scorching them either. For a spicy accompaniment,  I would also carry some fried curd chillies in this Gourmet Bowl.

To make the meal visually arresting, and to help cast a spell on today’s children, I would serve this delectable meal in these Gourmet Cook and Store bowls. The clear bowl could show off the beautiful embellishments, the speckled red from the pomegranate and the tinge of green from the coriander in this delicious dish to good effect. The snug lid would help to carry it safely without spillage to the terrace.

A fitting finale to the meal would be some home made fruit and nut chocolates nestled in pretty paper cases, served in the elegant Variety Platter.

Did I forget to add? While I am at creating this magic, I would like to add to the ambience by lighting up a few of these lovely Tea Lights too.

My entry to ‘My Beautiful Food’ contest announced by Indiblogger and Borosil.  Round 1 – Alphabet Soup.

Per requirements for contest, I have attempted describing a perfect meal with words alone and without using any pictures.