Showing posts with label gestational diabetes recipe. Show all posts

Jun 3, 2015

Idli – The Ultimate Guide to Softest Idlis.

Idli. Enough said. That spongy, light as air, uber healthy, steamed breakfast of millions in India. It is every idli lover’s dream to make the fluffiest, softest, ‘malli poo’ idlis (as soft as jasmine flower) at home. Idli is the stuff of  culinary dreams. The perfect idli seems so much in reach and yet, so elusive. As my friend put it, “Idli is the cause and weapon of marital fights at our home.” If you want Idli to be the cause of marital harmony rather than distress, or if you are looking for a healthy breakfast recipe, read on..

Much has been written about how to grind the perfect idli batter. Family and friends who have tasted my idlis have been reminding me to document my recipe at the blog. So here I am, with my method of making idli batter. Do share what works for you as well. It would be great to hear from everyone.

The key to good food begins with good ingredients. I use Salem idli rice. I use the best quality whole white urad that I can find. In Bangalore, Salem idli rice and whole white urad can be bought at most wholesale rice and grain shops. (rice mandi) Some supermarkets like Nilgiris, Spar, Star Bazaar, Towness also carry them. “Can I use idli rava instead of the rice?” You can. But the texture of idli will be different. Don’t tell me I did not warn you.

The next step is correct technique. For fermentation, timing is key! I soak the grains overnight, grind it the next morning and leave it to ferment through the day. By evening, the batter is ready. I store the fermented batter in the fridge and use it for up to a week without any loss of flavours.

Idli topped with two chutneys 

If you are eager to make the perfect idlis for your family, follow these steps carefully. Please read the method thoroughly before trying. As with other recipes, perfection comes with practise. If you have any doubts, write to me and I can try to sort it for you.

YOU NEED

COOKWARE – Wet grinder, big bowls, spatula, idli steamer 

INGREDIENTS

  1. 4 cups Salem Idli Rice
  2. 1 cup Whole white urad
  3. 1 tsp Fenugreek seeds – (optional)
  4. 2 tsp Salt
  5. 5-7 cups chilled drinking water for grinding.

METHOD

  1. Measure out rice and urad in two separate bowls. Add fenugreek seeds, if using, to rice bowl. Rinse in enough changes of water till water runs clear. Soak in fresh drinking water. Water level should be 1 inch above the grains. Soaking time can range from minimum of 4 hours to maximum of 8-9 hours. I soak overnight. (about 8 hours)
  2. Measure out 2+1/2 cups of drinking water. Drain the soaking water from urad and grind in wet grinder. Keep sprinkling a quarter cup of water every 8-10 minutes. Use all of the 2 cups of water. Add as much of the 1/2 cup as needed. I grind for 40-45 minutes. Remove to a deep bowl when the batter looks doubled in volume and is silky smooth when you feel between your fingers.
  3. Measure out 3+1 cups of chilled drinking water. Drain out the soaking water from rice. Grind in wet grinder with 1 cup of water to begin with. Sprinkle just enough water to keep the grinder running smoothly. Keep checking every 4-5 minutes while grinding. Add water as necessary. I grind rice for 20 minutes. I stop grinding when the rice feels a little coarse and before the rice becomes a very smooth paste. That is not to say a semolina texture. Rather, between fine semolina and paste….
  4. Remove to same bowl as urad batter. Add salt and mix well with your hand. Yes, I dip most of my forearm into the batter to mix it up. This is vital to good fermentation. Have you not heard?
  5. Set this covered bowl of batter to rest in a warm place. Make sure to fill you bowl only half way to give room for rising. You can divide the batter into two bowls too. At my home, the batter takes about 8 hours to ferment. If your room temperature is below 20C, set to ferment inside your cold oven. Or cover the bowl with a beach towel/blanket. And pray that the batter does not attach itself to your blanket!
  6. The batter is completely fermented when it rises to double in volume, has a sour-sweet fragrance. Stir it lightly. Pour into greased idli moulds.
  7. Steam for 10-12 minutes over a medium flame. The idlis are done when a knife inserted through the centre comes clean.
  8. Serve hot with assorted chutneys, or molaga podi or sambar. Or all of them!

Mini idli served with love

May 29, 2015

Watermelon Shikanjvi

In keeping with the need of the summer season, here is a winner drink recipe. Watermelon juice spiked with Indian spices. These spices were chosen not just for the flavours but also for their ability to aid digestion and add essential salts to the body.

In my earlier post, I had promised to share a drink recipe that does not include sugar. This is especially so that diabetics can also indulge in a refreshing drink. Summer need not be tiring or exhausting if we have refreshing, nourishing, hydrating drinks such as this watermelon shikanjvi in our repertoire. The ultimate thirst quencher. Rich with natural salts to rehydrate, and full of fruit vitamins and minerals. The fruit is rich in anti oxidants which helps in maintaining skin tone as well. Something we could surely use in the dry scorching months!

 
Enjoy a sip by the pool


In fact, most juices and colas are not advisable for diabetics since these release a surge of sugar into the blood stream almost immediately. A spike in blood sugar is dangerous for any diabetic. As is dehydration. In diabetics, if there is excess sugar in the blood, the kidneys will try to flush out some sugar through urine. It makes this happen by drawing on body water from blood, cells, saliva. This, in turn, increases the dehydration in the body.

Without further ado, here is the recipe for a super refreshing, very low calorie, drink. For ease, I am giving measures for 2 glasses. Of course, you can make a big batch ahead (do not add the soda ahead. Mix it in just before serving) and store chilled in the fridge. When you feel like downing a glass, pour yourself half a glass of this juice mixture, top with soda and sip for instant relief from summer.

Chilled watermelon shikanjvi


 ALLERGY INFORMATION

  • Does NOT contain lactose, soya, corn, yeast, gluten.

Preparation Time – 10 minutes + chilling time, Cooking Time – nil, Serves - 2

YOU NEED -

COOKWARE - Mixer grinder, lemon squeezer, and serving glasses

INGREDIENTS -

  1. 1 heaped cup chopped, deseeded watermelon chunks
  2. 250 ml chilled club soda
  3. Juice of 1 lemon
  4. a  big pinch of cooking salt
  5. pinch each of roasted jeera powder and kala namak powder
  6. Ice cubes to top up and serve

METHOD -

  1. Whiz the watermelon chunks in the mixer until you get a smooth puree. .
  2. Add the lemon juice also to the mixer jar.
  3. Add also a big pinch of salt, followed by a small pinch each of roasted jeera powder and kala namak.
  4. Whiz the mixture well, and divide between 2 glasses.
  5. Top with club soda, ice cubes and serve chilled!


 Watermelon Shikanjvi


Apr 16, 2015

Jowar dosai

Why millets? Why so much brouhaha over these pseudo cereals? Why is it important in a modern urban diet? Are they good at all? Who should eat millets? Who should not? These and many more facts set out for you here. Read on to know more.

Millets are not cereal grains, so they are called pseudo grains. Millets are smaller grains. They belong to five (or more) different botanical families, but are classified under one name as millets. Millets are grown for bird, animal and human consumption. Factors that go in favour of their cultivation are that they have a short growing season, grow in semi arid regions, (they need very little water) need very little attention. Different countries across the world have been growing and consuming millets for thousands of years. Unfortunately, urban diets have not included millets for about 50 years now.

So what is the good and bad about eating millets? Here, I split it up into its constituents and make it simple for all to understand.

The Carbohydrates -  Millets have complex starches in form of amylose and amylopectin. Such a starch can only be digested in cooked form by humans. Since they not easily digestible, they have a low glycemic index. That means they release their sugars into the blood stream in a slow steady fashion. Much like how a sustained release medicine works. There are no highs and lows in blood sugar when you are eating such starches. And yes, you guessed it right: this is great news for diabetics and pretty much everybody else.

The Proteins – After carbohydrates, proteins form the major part of millets. Egg and human milk are considered perfect proteins because they have the best combination of amino acids that the human body needs. When compared to these proteins, most millets are found to have insufficient amino acids to provide all nutrients for infants and growing children. Millets have been found to be deficient mainly in lysine, an essential amino acid. What are amino acids?

Amino acids are the building blocks of proteins. There are 21 amino acids that form all the proteins ever known. Several of these amino acids are made in the human body. These are called non-essential amino acids because the body can make it on its own. Some of these are called essential amino acids. Why are they called so? Because they are necessary for growth and cell repair but cannot be synthesised in the human body. So they have to come from the food we eat. Lysine is one of these essential amino acids.

Does this mean that millets are not good enough for weaning food? Or to feed growing children? No. Millets are very good for children, when cooked well and when paired with a legume such as mung bean or tuvar dal. Legumes are naturally rich in lysine and by combining them in the same meal ensures that the meal gives complete protein for the growing body. Besides, millets are gluten free as well. So they are a safe bet for all, children, older people or those with gluten allergy.

Look forward to more information and recipes with millets in my forthcoming posts.

Meanwhile, here is a recipe for Jowar Dosai. This recipe is good for beginners who are not sure about how to begin including millets. Millets are great for people who need a gluten–free diet as well. Besides, here, the ground batter is fermented which increases the food’s digestibility as well as increasing the availability of several vitamins and minerals from the grains.

The initial trouble of soaking, grinding and fermenting is well worth the effort. The batter keeps well in the fridge for up to a week. When you have batter ready in the fridge, making dosai for a meal takes only a few minutes. You can choose to make regular size dosai for breakfast, dinner or coin-sized ones for your child’s lunch box.

Coin Dosai platter dotted with molaga podi

ALLERGY INFORMATION

Preparation Time – 8 hours soaking+1 hour grinding+8 hours fermentation, Cooking Time – 10-15 minutes, Makes – about 20 dosais.

YOU NEED -

COOKWARE - Wet grinder or mixer grinder, Iron skillet/griddle, Big deep dish mixing bowls, ladle, sharp metal spatula

INGREDIENTS -

  1. 1 cup Jowar grains
  2. 1 cup salem idli rice/boiled rice/raw rice
  3. 2 tbsp fenugreek seeds
  4. 2 tbsp urad dal
  5. 1 heaped tsp salt
  6. Sesame oil for drizzling over dosais, about 1/4 cup oil

METHOD -

  1. Measure out all ingredients except salt and oil. Rinse the grains well, Soak overnight. To do this, steep in enough water to cover the grains plus an inch higher.
  2. The next morning, grind the soaked grains. If using wet grinder, keep sprinkling water every 7-10 minutes. You can use up to 3 cups water for grinding. I grind my batter in a wet grinder. When using jowar grains, it takes longer to grind. About 1 hour of grinding gives me a smooth batter. When the batter looks smooth, add salt, mix well and remove to a deep bowl. Allow plenty of head room for fermentation. Leave overnight for fermentation.
  3. The batter is ready when it has risen to double volume.
  4. Heat up an iron skillet/dosa tawa. Smear oil all over to grease.
  5. Pour a ladleful batter in the centre of skillet. Spread with back of ladle in concentric circles. Drizzle few drops of oil around the sides. When brown at edges, loosen the edges, flip over with a sharp spatula and cook on other side. Repeat for the next ladle of batter.
  6. Alternately, pour tiny spoonfuls of batter all over the skillet to make ‘coin dosais’. Drizzle oil around the sides, flip over to cook briefly on other side. Remove to serving platter when done.
  7. Serve with any chutney of choice or with dosai molaga podi!

Coin dosai topped with molaga podi

Crispy or soft - fragrant Jowar Dosai

Mar 9, 2015

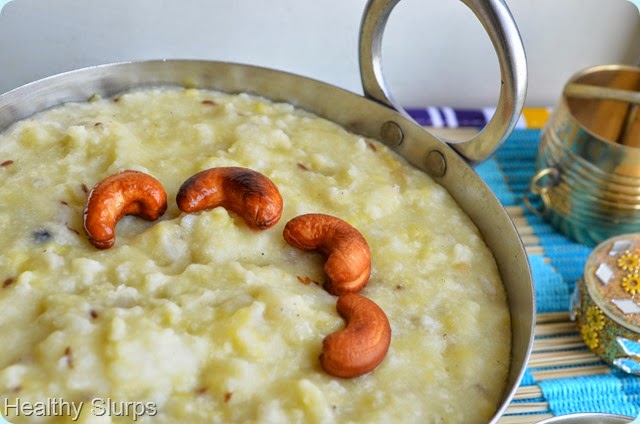
Samai Pongal / Little Millet Pongal

Ven Pongal or Khara Pongal is a much loved breakfast food in South India. However, you can have it any time of the day. Ven Pongal works at the brunch or dinner table with equal ease.  With the millet wave sweeping the diets of all, I feel this is a good time to share a recipe with millets.

Samai rice/Little Millet replaces white rice in this preparation. Not only is it far healthier, the millet also cooks faster than rice. Isn’t that great news? Samai has 8 times more iron than white rice and 10 times more fibre. If that was not enough, it is higher in thiamin(vit. B1) , riboflavin(vit. B2) and folic acid content as well. Owing to their low glycemic index, millets are good grains to include in diets for weight management, diabetes, as well as in pregnancy. Since Pongal is usually cooked to a soft mush, this dish can be fed to weaning babies or toddlers also.

Pongal tastes best when served hot, so packing for school lunch may not be a great idea. However, you can pack for an office lunch if you can re-heat your food at work place. Now that I have shared enough reasons to switch to the millet from rice, let us proceed to the recipe, shall we?

Making Pongal is really simple. Cook a grain and a lentil together, fry some seasonings in a fry pan, mix the two with some salt and your dish is ready! Read on for the proportions and method here -

Samai Pongal with chutney

ALLERGY INFORMATION

  • Does not contain gluten, corn, soya, eggs, lactose, dairy.
  • Adding nuts is optional. Omit if you have nut allergy.

Preparation time –10 minutes, Cooking Time –15 minutes, Serves – 4-5.

You Need

Cookware – Pressure Cooker, fry pan, mortar and pestle

Ingredients

  1. 1 cup Samai rice
  2. 1/2 cup Moong Dal
  3. 4 cups water
  4. 1/2 tsp salt
  5. 1 tsp cooking oil
  6. 1 tsp ghee
  7. 10 whole cashew nuts (optional)
  8. 1/2 tsp Cumin seeds
  9. 1 tsp black pepper
  10. 1 tsp ginger juliennes
  11. 7-8 curry leaves, torn up
  12. 2 green chilli, slit (optional)

 Method -

  1. There are two methods to cook this pongal. You can choose between – 1. Pressure cook the Samai rice and Moong dal together in the pressure cooker. For this, rinse the grains together, cover with 3 times the volume of  water and pressure cook for 2 whistles. Or, 2. Pressure cook the dal alone, and the Samai rice on the stove top. For this, cover dal with double volume of water and cover the millet with double the volume of water and cook for about 3-4 minutes. Mix both in a serving bowl.
  2. Coarsely pound the black pepper and cumin in a mortar and pestle.
  3. To a fry pan, add in the oil + ghee, fry the cashew nuts (if using) to a golden brown.
  4. Tip in the pounded pepper +cumin, curry leaves, ginger juliennes, and green chilli.
  5. Add salt to the cooked mixture, pour in the seasonings and mix well. You may add 1/2 cup of hot boiling water to the mixture if it looks very hard. We want a soft mushy texture to the pongal.
  6. Serve steaming hot pongal with a spicy chutney, or sambar or even the traditional gothsu! Here I have served it with a tangy raw mango chutney.

Perfect weekend breakfast or brunch

Enjoy your power packed meal!

Feb 10, 2015

Nellikkai Thair Pachadi / Amla Raita

Do you know that Amla or the Indian Gooseberry has the highest Vitamin C content among all vegetables and fruits? That it has mention in ancient Sanskrit texts, is used extensively in Ayurvedic medicine, and is considered a miracle fruit. Amla can be used to treat eye disorders, increase calcium absorption in the bones, help build strong bones, cure skin ailments, strengthen and nourish hair, promote hair growth, actually just about do anything healthy and nourishing for our bodies.

The Indian Gooseberry (Amla) also has known anti oxidant properties. Amla has been found to offer a full range of benefits from free radical scavenging, anti inflammatory properties, beneficial effect on diabetes.   It is also widely used for its ability to dissolve plaques in arteries, reducing serum cholesterol levels.

Studies have also shown that even preserving in brine or pickling does not reduce the availability of vitamins, especially Vitamin C. Readers may be aware that vitamins B and C are easily destroyed when food is exposed to sunlight or heat, or excess water during cooking. So excessively cooked foods or preserved foods lose their vitamin content over time. Not so with Amla. This miracle fruit continues to dole out its health benefits even when cooked or preserved.

Despite having such a wonder fruit growing in our midst, I feel people in India do not make full use of it. We are in search of that elusive magic potion sourced from deep in the Amazon forests or some wonder drug that is shipped from a Scandinavian country. While those drugs/potions/foods may be good in them selves, I ask myself and everyone reading this – Is it wise to ignore the wealth in your backyard and seek something from far away? Are the money, effort, rising fuel costs, justified?

I, for one, am going to include more of this wonder fruit ‘Amla’ in my family’s meals. I am sure all of you have recipes from different cuisines with Amla as the main ingredient. Do share your favourite recipes with Amla in the comment section below.

Here is one simple, really quick, tongue tickling recipe with Amla. Perks up any meal and loads you up with its nutrients. Go on. Try it out.

Luminous Amla

ALLERGY INFORMATION

  • Does NOT contain gluten, lactose, nuts, corn, soya.
  • Suitable for people with gluten or lactose intolerance, or nut allergy.

Preparation Time – 10 minutes, Cooking Time – 5 minutes, Serves – 4-6

You Need -

Cookware – Small wok, Mixer grinder

Ingredients -

  1. 4-5 Amla fruits
  2. 2 tbsp fresh grated coconut
  3. 3-4 green chillies
  4. 1/2 cup skim milk curd
  5. 1/4 tsp salt

For Seasoning -

  1. 1/4 tsp oil
  2. a pinch mustard seeds
  3. a pinch fenugreek seeds
  4. a pinch asafoetida
  5. 3 curry leaves
  6. 1/2 red chilli (optional)

Method -

  1. Rinse the Amla well. Cut incisions along the segments. Pull out the flesh and discard the seeds.
  2. Grind along with coconut, green chilli, and part of the curd to make a paste. Grind more than a coarse paste but stop short of a fine paste.  Add the rest of the measured curd and whip along with the paste.
  3. Heat oil in a small wok/kadai/fry pan.
  4. Add ingredients for seasoning in order. When mustard crackles, pour in the ground mixture, and add salt. Simmer until the liquid foams up.  Do not boil this mixture. Keep stirring over medium heat for it to cook lightly.
  5. Remove to serving bowl and enjoy with hot phulkas,  or steamed rice, a dal and some stir fried vegetables.

Quick Amla Raita


Jan 24, 2015

Methi (No)Malai Matar

Some days are different. In a lazy luxurious kind of way. Some days when the routine is banal, when the mundane will just not cut it. Days when we linger just a little longer in bed, luxuriate in the bath, indulge in a hot tea while soaking in the morning sun. I am sure you have these days in your life too.

Such days call for a special meal. A rich, creamy, sinful dish around which a deeply satisfying repast can be planned. Today was such a day. A day to be extravagant, yet sensible. A day to savor. Time to gratify the tongue, body and soul with gastronomic hedonism, yet, not feel the pain of sin later. Time for another recipe to get the Healthy Slurps tweak.

Before you wonder any more, let me share this winner of a recipe with you. Winter is a season of amazing variety of produce in India. Fresh green peas are an irresistible part of this season. Every year, I buy fresh green peas in bulk, shell them, and freeze to use later through the year. After gorging on them in various avatars through the winter, that is. Punjabi and other North Indian cuisines have several dishes with peas as the star ingredient. Of these, I have been wanting to try this Methi Malai Matar for a long time. Translated from Hindi, it means a gravy/curry of fragrant fenugreek leaves and green peas laced generously with fresh cream. I could never bring myself to add cream in the quantities mentioned in most recipes. I just had to find a good healthier substitute.

Today, the idea just presented itself and I went along with the inner flow. The result was a rhapsody of aromas, flavours, an appearance that was alluring and beckoned us to the dining table! Substituting skim milk curd/yoghurt for cream was a fitting idea. The almond meal also added to the richness and added to the good fats in the meal. I prefer almonds over cashews to thicken a gravy as the former has a better fatty acid profile. In plain speak, it means, almonds have more heart-healthy fats than cashew nuts have.

The dish gets done in 4 simple steps. Soak the almonds in warm milk. Fry all ingredients for grinding. Grind along with almonds.  Simmer chopped fenugreek leaves with the gravy. Add boiled peas, season, and the dish is ready!

I am so happy to share this recipe with all of you. So here goes -

Fragrant Fenugreek married to Perky Peas!

ALLERGY INFORMATION

  • Does NOT contain corn, soya, gluten.
  • Suitable for people with gluten intolerance.
  • Contains lactose from milk. Those with lactose intolerance can substitute milk with same volume of water in the recipe.
  • Contains nuts. Those with nut allergy can substitute almond in the recipe with pureed silken tofu.

Preparation Time – 15-20 minutes, Cooking Time – 20-25 minutes, Serves – 4-6.

You Need -

Cookware – Saute pan, Small saucepan/Glass bowl, Mixer grinder

Ingredients -

  1. 3/4 cup fresh or frozen green peas
  2. 2 cups loosely packed fenugreek leaves ( Methi saag)
  3. 1/4 cup almond meal OR 2 tbsp whole almonds powdered with skin OR 1/4 cup pureed silken tofu
  4. 1/2 cup skim milk OR 1/2 cup water
  5. 1 heaped tsp salt
  6. 1 cup skim milk yoghurt
  7. 1 tbsp grated jaggery Or sugar (optional)

To fry and grind -

  1. 1 heaped cup chopped onions
  2. 3-4 tomatoes
  3. 2 tbsp chopped ginger
  4. 2-3 garlic cloves
  5. 2-3 green chillies depending on heat preference
  6. 1 inch stick of cinnamon
  7. 3 cloves
  8. 2 green cardamom pods
  9. 1/4 cup chopped green coriander leaves
  10. 1 tbsp cooking oil

Method -

  1. If you have whole almonds, soak in measured warm milk OR measured warm water(use warm water if you have lactose intolerance). If you have almond meal, soak those in warm milk too. Set aside. If you have nut allergy, omit the almonds, thaw the silken tofu, puree and set aside.
  2. Heat a fry pan, add oil, toss in the chopped onions, saute for a minute. Then tip in the chopped ginger and peeled garlic. Fry another minute. When the onions take on a light pink tone, add the chopped tomatoes. Also stir in the cinnamon, cloves and cardamom. Fry over a medium flame. Do not brown the onions. After 3-4 minutes of frying, when the tomatoes look slightly mushy, take off the flame.
  3. Grind this mixture along with chopped coriander leaves, and the soaking almonds+milk/water, or the pureed tofu. Blend to a smooth paste.
  4. Return this blend to the first fry pan, and set to simmer again.
  5. Chop the cleaned fenugreek leaves finely and add to the simmering sauce. Add 1/4 cup water if too thick and let the greens simmer in the sauce for 3-4 minutes. Stir in between to avoid charring at the bottom.
  6. Meanwhile boil the fresh or frozen green peas over stove top or microwave. Cover the peas with 1/2 cup water and cook for 3-5 minutes until soft and cooked. Add this cooked peas along with any remaining cooking water to the simmering sauce too.
  7. Add salt, sugar, curd, and mix in well. Bring to boil over medium heat. Switch off and let the gravy rest for 10-15 minutes.
  8. Serve warm with phulka/kulcha/pita bread/jeera rice/any mild pulao/pilaf. i served it with fragrant jeera rice and a carrot salad.

A satisfying repast

Creamy rich Methi Malai Matar minus the guilt 

Dec 2, 2014

Peanut and Potato Salad

It is the season of peanut harvest in and around Bangalore. There is an interesting story around peanut harvest in our city.
Legend has it that a bull would roam over the fields every full moon night destroying the peanut crops. Flustered farmers offered their first harvest at the Bull temple and the roaming of the bull ceased!Local farmers offer their first crop to Nandi, the bull devotee of Lord Shiva at the Bull temple in Bangalore to this day. The temple vicinity wears a festive look during these two days. A village fair unfolds in the middle of the city. This annual fair is known as ‘Kadalekai Parishe’.
I love the earthy aroma of freshly dug up peanuts here. Call me biased, but the aroma and incredible, sweet, nutty flavours of peanuts that I buy from this fair every year beats all other. I cook the peanuts in their shells in salted water. All of us then gather around the steaming hot bowl of boiled peanuts, shell them and gobble them before some one else grabs it! Warm bonding  during chilly evenings over hot boiled peanuts!
Mostly I have no peanuts left over to include in any dish. However, I managed to make this peanut-potato salad from some that survived the onslaught. Even if the salad was made up from simple, readily available ingredients, it was bowl-scraping, finger-licking, slurp-worthy good. Ok, I’ll stop now.
I am documenting this recipe as much for myself as for sharing with all of you. Fresh seasonal ingredients. A good mix of crunch, soft, and crisp textures. A tongue tickling interplay of flavours. No fried ingredients. Healthy carbs and protein with a giant dose of fibre and vitamins. Do you need any more reasons? Just try it once. I am sure you’ll be hooked.
Peanut Potato salad served with baguette
ALLERGY INFORMATION
  • Does NOT contain gluten, lactose, corn, soya, eggs.
  • Suitable for lactose or gluten intolerant people
  • Contains peanuts.
  • NOT SUITABLE for people with nut allergy.
Preparation time – 30 minutes + 30 minutes optional chilling time, Cooking Time – 30 minutes, Serves – 3-4.
You Need
Cookware - Pressure Cooker with 2 containers that fit into it, Metal/Glass Bowl, Colander/Salad spinner, Knife, Chopping Board
Ingredients
  1. 2 cups peanuts in their shells
  2. 2 medium potatoes, chopped with skin into quarters. 
  3. 3 heaped cups Iceberg/Romaine Lettuce
  4. 1 big Tomato
  5. 2 tsp salt
  6. 2-3 cups fresh water
  7. a big bowl of ice water
For Salad Dressing
  1. 2 tbsp Apple Cider Vinegar
  2. 1/2 a red onion
  3. 8-9 tbsp Extra Virgin Olive oil (EVOO)
  4. 2 generous pinches crushed black pepper
  5. 1/4 tsp salt
To Assemble
  1. Dunk the peanuts in shells into a huge bowl of water. Let it sit for a few minutes. Rub the shells vigorously with both hands to loosen the dirt on them. Drain the water and repeat with 2 more changes of water. You can omit this step if using shelled peanuts. Just rinse peanuts once in water is enough.
  2. Now place in a container, pour enough water to cover all the peanuts,  scatter 2 tsp salt over it. Place the rinsed and chopped potatoes also in another container. Place both containers in pressure cooker and pressure cook for 3 whistles.
  3. Rinse the lettuce first under tap water, then place in ice water.
  4. Peel and dice/slice the red onion. Place in a bowl, add 1 tbsp apple cider vinegar to it and let steep.
  5. Meanwhile, whisk the remaining vinegar, EVOO, salt and crushed pepper into an emulsion.
  6. Shell the peanuts and peel the potatoes. You can dice the potatoes into smaller size if you wish. Chop the tomato finely. Place all these together in a bowl.
  7. Drain the lettuce, use a salad spinner if you have one. Else just drain in a colander and shake it well. Tear up the large leaves into bite size ones by hand. Add to the other vegetables.
  8. Combine the onion and dressing from step 4 and 5. Drizzle over the salad vegetables. Mix well.
Combine the dressing with salad ingredients
The salad tastes best if allowed to chill for half an hour before serving. But, if you are in a hurry, just dig in and enjoy! We coupled it with 2 slices of warm toasted baguette for an after school snack.
A complete meal -warm toast and chilled salad

Nov 4, 2014

Mung Dal with Ash gourd

Often the food we crave for is simple, nourishing, soul satisfying food which we grew up with. Steamed rice and tempered dal is high on most people’s comfort food list. Especially when we are far away from home. Or returning to normal life after an illness. Or trying to renew the jaded palette. Or seeking a respite from a frenzied social life. Or even if we have no energy to cook and much less to venture out to eat!

Whatever may be your reason, there can be nothing easier to rustle up than a typical dal-chawal meal.(Steamed Rice+ seasoned Lentils) A meal that can be put together in as less than 30 minutes with just a handful of ingredients. If this meal also nourishes, is curative, soothing to the tummy, and alleviates gastric discomfort as well, then we do have a winner at hand, right?

Bowl of wholesome comfort

Allow me to introduce you to the humble Ash Gourd. Also known as Winter Melon, White Gourd, Wax Gourd. Quite underestimated, un-glamorous, under used vegetable in most cuisines. It is a creeper, grows easily, available at low cost through the year, cooks quickly, has a bunch of health benefits, and yet not included enough in daily meals.

In clinical studies, Ash Gourd is proven to soothe hyper acidity, heal stomach ulcers. It is used as a diuretic as well. Besides, this humble vegetable contributes plenty of easily digestible fibre, moisture. It also helps regulate blood sugar levels, so useful in treatment of diabetes and obesity. It packs less than 20 calories per 100gms. So it is a weight watcher’s delight. Do we really need any more reasons to add more of this unpretentious vegetable in our meal?

If you are a single person, cook this in bulk and freeze in single use portions for simple weeknight dinners. Or halve to serve 2-3 people. Works well with phulkas, brown rice or use some pita bread to mop it up too.

Simple meal in 30 minutes

ALLERGY INFORMATION

  • Does NOT contain gluten, soya, egg, corn, lactose, nuts.
  • Suitable for gluten intolerance or lactose intolerant people or for people with nut allergy.

Preparation Time – 5 minutes, Cooking Time – 30 minutes, Serves – 4

You Need

Cookware – Pressure Cooker of minimum 3 litre capacity, Small Saucepan, Knife, cutting board

Ingredients

  1. 1 cup diced ash gourd
  2. 3/4 cup Mung Dal
  3. Pinch of turmeric powder
  4. 1 tsp Cooking Oil
  5. 1/2 tsp Cumin seeds
  6. 1/4 cup finely diced Onions
  7. 1 Green chilli (optional)
  8. 1/2 tsp Salt

To Assemble

  1. Rinse the ash gourd, peel skin, remove seeds, dice into even sized pieces. 
  2. Rinse the Mung dal in 3-4 changes of water, place the dal and ash gourd  in a suitable container, add the pinch of turmeric, fill water up to cover contents. Pressure cook on high flame until first whistle, and for 5 minutes after that over a small flame. Switch off and let cool. Open the pressure cooker only after all the pressure has released. This should take about10 minutes. (In this interim, you could rinse your rice for the meal, and set it to cook over another burner. The rice will be done by the time you have tempered the dal.)
  3. Peel onion and dice them really fine. Slit the green chilli lengthwise.
  4. Add salt to dal and set to simmer.
  5. Add oil to a small saucepan, heat it, add cumin seeds. When they crackle, add slit chilli, onions and fry over high flame until just beginning to brown.
  6. Pour the fragrant seasonings over the dal. Switch off, cover and let flavours blend for a few minutes. You may remove the green chilli and then serve too. Or omit the chilli entirely.
  7. Serve with hot steamed rice and a salad.

Enjoy your comfort food

Mung dal with steamed rice and salad

Oct 4, 2014

Sprouted Mung Bean Sagu

A sensible diet does not mean fasting for most part of the day. Rather it means eating smart, deriving maximum nutrition for every bite, making the right food choices. For vegetarians, a healthy diet also means an intelligent blend of cereals and proteins. You may ask why?

Egg is called a complete protein source because it contains all the 20 amino acids needed by the body.

Does that mean you lose out on the proteins if you follow a vegetarian or a vegan diet? NO!!

Nature has provided so much variety that we can easily make every meal a complete protein meal simply by smart pairing of a cereal and a legume. This is because, cereals and legumes have complementary amino acid profiles. In simple speak, cereals will supply the amino acids found missing in legumes and vice versa. By consuming both at the same meal, every time, we can compensate for the amino acids missing in each of these grains and make the meal a nourishing and strengthening one.

Power Breakfast - Idlis and Sprouts Sagu

Enter - a favourite South Indian breakfast. Rava Idlis are made with wheat semolina unlike usual idlis which are made from a rice based batter. Rava Idlis are always paired with Potato Sagu in homes and restaurants in Bangalore. In Tamil Nadu or other Southern states, the dish is usually paired with a mixed vegetable ‘kurma’, or chutney. All these dishes are great spicy accompaniments to the bland, soft rava idli.

However, I wanted to take this meal a notch up in the nutrition ladder. Looking for a protein ingredient to accompany the ‘rava’, I felt the best one would be mung bean sprouts. Several reasons for this – mung beans are a pantry staple in most homes, they sprout with little effort, are quick cooking, and lend character to any meal. Still, with great trepidation, I waited to see the reaction on my family’s faces when I served this up for breakfast. One look at them all, and I was satisfied we have a winner at hand.

I urge all of you to try this out too. Enjoy it for breakfast, brunch or even dinner. And let me know your thoughts. Here is how I made our weekend breakfast.

ALLERGY INFORMATION

  • Contains gluten from rava. NOT suitable for celiacs, or people with gluten sensitivity.
  • Contains buttermilk. Usually suitable for people with lactose intolerance.
  • Does NOT contain egg, corn, soya, nuts. Suitable for people with nut allergy.

Preparation Time – 30 minutes, Cooking Time – 30 minutes, Serves – 4-6.

YOU NEED

Cookware – Idli steamer, Pressure Cooker, Mixer Grinder, Sauce Pan

Ingredients

For the Rava Idlis – I used an Instant Mix of Soulfull Rava Idli Mix. This was part of the goodies we received at the IFBM. Quite fresh and convenient. Mix the contents of the packet with enough sour buttermilk to make a thick pouring batter. Grease idli moulds, pour in batter and steam in a pressure cooker/idli steamer for 10-12 minutes until done.

Spongy soft Rava Idlis

For the Mung Bean Sprout Sagu

  1. 1 heaped cup Mung Bean Sprouts
  2. 1/2 cup finely chopped Onions
  3. 1/2 cup diced Tomatoes
  4. 1 tsp Ginger garlic Paste OR make a paste of a thumb size ginger piece and 2 cloves garlic
  5. 2-4 green chillies depending on your heat preference
  6. 1 tbsp khus khus (poppy seeds) soaked in hot water for half an hour
  7. 2 tbsp fresh grated coconut
  8. 1/4 cup roughly chopped green coriander leaves with stem
  9. 1/2 tsp salt
  10. 1 tsp Cooking Oil
  11. 1/4 tsp Mustard seeds
  12. 1/4 tsp Cumin seeds

To Assemble

  1. Set the khus khus to soak in 1/4 cup very hot water.
  2. Rinse the sprouts, place in bowl, add 1/2 cup water and pressure cook for 2 whistles.
  3. Rinse, dice, prepare all vegetables as mentioned in ingredient list.
  4. Grind these ingredients into a smooth paste – khus, fresh coconut, green chillies, fresh coriander leaves, ginger and garlic. You can add some water to help grind too.
  5. Set a sauce pan over heat, add oil, tip in mustard and cumin to season.
  6. When they crackle, add the onions, fry till soft, then add tomatoes. Add salt, fry till tomatoes are pulpy.
  7. Pour in the cooked sprouts, add the ground paste, mix well, and simmer for 5 minutes. Do not boil on high heat. Add 1/2cup water to thin down if needed. We want a liquid dipping consistency. Check for salt. When the sagu is well blended, remove to serving bowl and enjoy with hot steaming rava idlis.

Enjoy hot breakfast with a view

Bowl of fragrant sagu

Sep 20, 2014

Stir fried Bitter Gourd–Nothing Bitter About It

Is it really possible? Can bitter gourd turn sweet? Bitter gourd cannot become sweet, but with this recipe, you will convert the haters into lovers. If you are a lover of the vegetable already, then this recipe is sure to seal your love affair with it for life.

Stir Fried Bitter Gourd

The first step to a successful stir fry is selecting the best produce. If you are a hater, but are going to try this vegetable for the first time, then choose bitter gourd with light green skin. Alternatively, you can select the tiny bitter gourd also called ‘kantola’.

So what is special about this recipe? It can be put together with minimum ingredients. Tastes like a star dish on the table. You can earn brownie points for feeding your family as healthy a vegetable as bitter gourd. Would you like to try it out too? Read on to find how we make it.

Allergy Information

  • Does not contain eggs, soya, dairy, corn, peanuts, any nut.
  • Suitable for gluten intolerant and lactose intolerant people.
  • Suitable for people with nut allergy also.

Preparation time – 20 minutes, Cooking time – 20 minutes, Serves –4-5.

You Need

Cookware – Knife, Cutting board, Deep fry Pan with tight fitting lid

Ingredients

  1. 3/4 cup finely chopped red onions
  2. 1 cup finely chopped vine tomatoes
  3. 1 cup finely chopped bitter gourd
  4. 1/2  tsp turmeric powder
  5. 1 heaped tsp salt
  6. 2 tbsp jaggery powder (optional)
  7. 1 heaped tsp of the most fragrant sambar powder you can find
  8. 2 tsp oil
  9. 1/2 tsp mustard seeds
  10. 1 tsp Urad dal
  11. few curry leaves

Method

  1. Chop all vegetables.
  2. Heat a fry pan, pour oil in. Add mustard seeds, Urad Dal, and curry leaves in that order.
  3. When mustard seeds sizzle, add chopped onions, stir well over high flame. When the onions turn light brown, add tomatoes and fry till mushy.
  4. Crank up the heat, and toss in the bitter gourd, stir real quick over high flame. After 2 minutes of action on high heat, add turmeric powder, salt, jaggery powder (if using) and half of the sambar powder.
  5. Mix in the seasonings well, and cover with a tight lid. Lower the heat, and allow to simmer for 5-7 minutes.
  6. You can sprinkle a few teaspoons of water once, if the contents become too dry. Stir a couple of times in between the cook.
  7. The stir fry is done when it tastes soft but not mushy. Add the other half of the sambar powder and mix in well.
  8. You could finish it off with some chopped coriander leaves too.
  9. Do remember to scrape off the delicious burnt bits from the bottom of the pan, add them to your serving bowl. Those caramelised onions and tomatoes take the stir fry to blissful levels.
  10. Enjoy with a bowl of hot steamed rice or just by itself too.

Nothing bitter about it

Come pick me up and enjoy.

Apr 8, 2014

Little Millet Khichdi


Weight loss is the most important reason people visit a dietician or nutritionist. People want to lose weight for many reasons. Some of them could include - to look good, be able to carry off several outfits, to feel more energetic and several other reasons too. It is not advisable, however, to attempt weight loss in an unhealthy, unscientific or haphazard manner. Many people adopt extreme measures to lose weight. We would have heard of several restrictive diets such as all fluid diets, cabbage diet, only fruit diet, only vegetable diet, only milk diet, and several other ‘only diets’. Pause for a moment and think: are these really nourishing, sustaining, or even feasible in the long term?

The big goal and focus should be on achieving good health and fitness. Weight loss should only be a part of the journey to fitness and better health. Weight loss and weight management should also be approached with common sense, moderation and with a long term goal in mind.  Changes in diet should be made gradually and systematically. Including healthy grains, increasing fluid and fruit intake, keeping an eye on what one eats/drinks through the day are all important points to be kept in mind when attempting weight loss.

Pack of the Organic Millet I bought

In a study published by the American Journal of Clinical Nutrition on Glycemic Index and Obesity, scientists found a strong correlation between the type of grains consumed, its glycemic index and the ability to lose weight and keep it off too. This means, by choosing grains intelligently, it is possible to feed the body maximum nutrition while keeping weight in check too. Millets are a valuable group of grains which most of us in India have forgotten in the last century or so. Millets pack complex carbohydrates,(hence low glycemic index), more fibre than polished rice/wheat, are high in several minerals like Calcium, Iron, Magnesium. They are easy to cook too and flavours are quite mild and palatable. It is time we undo this damage of ignoring such nutrient powerhouses and allow ourselves their benefits.

This recipe is part of my effort to include millets in my family’s meals in delicious and acceptable ways. Little millet, also called Saama rice, Saame, Koda, is slightly bigger than semolina in size. It cooks very quickly, has an unobtrusive flavour and lends itself to several dishes easily. I cooked up this delicious khichdi several times in the past few months altering the spices and vegetables used each time. It is now a family favourite.  Do use the recipe below as a broad guideline and feel free to make your own favourite version.

Bowls of goodness

You Need

  1. Saama millet – 1 heaped cup
  2. Mung dal – scant 3/4 cup
  3. Potato – diced, 1/4 cup
  4. Carrot – diced, 1 cup
  5. Fresh green peas – 1/4 cup
  6. Bay leaf – 1 large
  7. Cinnamon – 2 thin sticks
  8. Cloves – 3
  9. Black pepper corns – 1  tsp
  10. Cumin seeds ( Jeera) – 1 heaped tsp
  11. Butter – 1 tbsp + Cooking oil – 1 tbsp
  12. Salt – 1 heaped tsp + 1/2 tsp
  13. Fresh water – 4 1/2 cups

To Assemble

  1. Rinse the millet and mung dal together.Place them in a suitable large vessel along with the potato, carrot, green peas and bay leaf. Add measured water,( read notes) place inside pressure cooker and pressure cook as you would normally cook rice. I reduce the flame after the first whistle and let it simmer for 5 minutes before switching off and letting it cool naturally.
  2. To a small frying pan, add the butter + oil, heat and add all the other spices mentioned in ingredients. Do not burn the spices, let them sizzle gently until it just releases its aroma.
  3. Pour over the khichdi when aromatic, add salt, mix well.
  4. Serve steaming hot with plain curd and a salad or kadhi and salad.

Creamy millet khichdi

Notes

  • Water - Add 3 times the volume of grain+dal if you want a creamy mushy khichdi, or add lesser for a less gooey version. I prefer the former for ease of spooning and swallowing!
  • Add spices such as cardamom, saunf( fennel seeds) or omit bay leaf if you feel so.
  • Any combination of vegetables can be used. Or you can make it with no vegetables at all too.

Sending this recipe to the following event started by Pari and co-hosted by Shruti. I am so excited to participate in such a useful event where all can use the archives for several healthy recipes. Do check out the spaces of both these awesome bloggers.

Only Grains

Also linking dish to event run by Nupur of UK Rasoi and Priya’s Versatile Recipes.

Jun 21, 2013

Corn dalia upma


A few months ago, I was browsing the aisles of my usual supermarket and found a new product. Always one up for trying anything new, I picked it up right away. Toying with several recipe ideas using the product, I finally decided to play safe and use it to make upma. Clicked pictures as usual and then put up a teaser on my facebook page inviting guesses on the ingredient used and the dish made. There were several close guesses. The first person to get the guess totally right was Lubna Karim who blogs at http://www.kitchenflavours.net. She was so happy to guess the correct ingredient with only the picture on the facebook page for a clue. I was awed by her guessing skills.

In honour, I am dedicating this blog post to Lubna Karim.

Lubna is a multi talented person, and so modest about it to boot. Loving wife, caring mom, super cook, amazing photographer, the list goes on…Lubna recently completed five years of food blogging - hearty congrats to you dear! Do head over to her blog for amazing recipes and pictures that entice you to try out each dish right away!

So the ‘new ingredient’ is Corn daliya – or Broken Corn Kernels similar to Broken Wheat. Also called corn grits in several parts of the world, it is either used to make polenta or cooked into a porridge. Here is how I used the corn frits to make upma that day. This quantity serves 5 - 6 people. Halve the measures to serve 2 – 3.

What’s good about Corn dalia?

Corn dalia, is a low cholesterol, low sodium cereal. Being gluten free, this dalia can replace wheat dalia in upma, khichdi, porridge or any dish – a boon for gluten intolerance disorders, such as Celiac diease, or even Malabsorption Syndrome.

Corn is a fair source of Calcium, Phosphorus and Iron too. The cereal has a better contribution to vitamin A and dietary fibre when compared to rice, wheat or oats.

You Need

  1. Corn Dalia – 2 cups Organic Corn Dalia!
  2. Fresh drinking water – 6 cups
  3. Vegetable oil – 2 tbsp
  4. Red onion – 1/2 cup, chopped
  5. Tomato – 1 cup, chopped
  6. Carrot – 1 cup, grated
  7. Green chilli – 3 - 4 finely chopped
  8. Ginger – chopped, 1 tbsp
  9. Curry leaves – 8 -10, torn roughly
  10. Mustard seeds – 1 heaped tsp
  11. Urad dal – 2 heaped tsp
  12. Salt – 2 level tsp

To Assemble

  1. Clean, and prepare vegetables as mentioned in ingredients list.
  2. Measure out 6 cups of water and set to boil.
  3. Heat oil in a broad kadai / heavy bottomed pan.
  4. Add mustard seeds and urad dal. mustard and urad - yin yang
  5. When mustard crackles, add green chilli, ginger, curry leaves, saute for a minute.
  6. Add onions tomatoes and the carrot. Stir fry for a minute on high flame. Seasonings and veg added
  7. Pour the boiling water into the kadai, add salt.
  8. When the water reaches a rolling boil, pour the measured corn dalia in a steady stream into the pan. Keep stirring steadily to avoid any lumps.
  9. After all the dalia is incorporated into the water, simmer and cover the pan with a fitting lid. Let cook on the lowest flame for 12 – 14 minutes. Cover and Cook
  10. Fluff up and serve with onion raita or chutney of choice.

Notes

  • Corn Dalia cooks for longer than wheat dalia, so the same upma can be assembled in a pressure cooker also.
  • Other interesting uses could be in recipes like khichdi, bisi bele bhath, corn bread, porridge, soups.

Glamorous Corn dalia upma

Upma - A closer look at texture

Dec 4, 2010

Godhumai Pongal

 DSCF1081
You need
  1. Cracked wheat – 1 cup DSCF1050
  2. Mung dal – 1 cup
  3. Salt – 1 1/2 tsp
For seasoning
  1. Vegetable oil + ghee – 2 tbsp
  2. Whole black pepper- 2 tsp
  3. Jeera – 1 tsp heaped
  4. Cashewnuts – 2tbsp (optional)
  5. Ginger – juliennes – 2 tsp
  6. Greenchillies – 3 slit lenghtwise
  7. Curry leaves – 12-15
To assemble
  1. Wash cracked wheat (godhumai ravai) and mung dal together.cooked dalia and dal
  2. Pressure cook with three times the volume of water.
  3. Break cashews into halves if using
  4. Pound together pepper and jeera to a coarse powder
  5. Slit green chillies, chop ginger into juliennes,tear the curry leaves roughly.
  6. In a  small pan, Heat the oil + ghee, add the cashews first.
  7. When they brown up lightly, add other ingredients for seasoning  with pepper powder in the end.
  8. Switch off gas and add the seasoning to the cooked pongal, add salt and mix everything well.
  9. DSCF1081
    Godhumai Pongal
    Enjoy hot godhumai pongal with onion raita or sambar or chutney of your choice.
The nutri notes-
This is a typical south Indian version of the previous recipe - Dalia khichdi.This tasted very similar to usual pongal made with rice and mung dal.I hope this recipe helps people who enjoy south indian cuisine to include wheat easily in their diet.
  • The nutritional benefits of this recipe are the same as that of the previous recipe.This recipe is ideal for pregnant and lactating mothers, in case of gestational diabetes or anyone who has diabetes.
  • The recipe also benefits people who  need to increase intake of soluble fibre such as those with constipation or piles.
  • However, please refrain from using wheat based recipes if you have gluten allergy.