Showing posts with label anti oxidants. Show all posts

Mar 11, 2016

Apple Berry Milkshake

It feels wonderful to be back after a long break. How have all of you been?
Before we knew it, winter turned to summer in Bangalore. With exams on, and summer heat in full force, we are constantly searching for chilling, refreshing drinks. Surely, staying cool and hydrated has to include delicious and inviting options, correct?
This apple berry milkshake has been the answer to such heated discussions about the best drink in summer. The sudden jump in season from winter to summer made plenty of winter produce like apples and strawberries still available in the market. So, we are making the best use of it.
Made with only 3-4 ingredients, this milkshake can be blended in no time, but tastes best when chilled. So make sure you stock up on chilled milk in your fridge! We are exploring many more liquid deliciousness at our home. Stay tuned for more such chilling posts!Winking smile
Healthy delicious Apple Berry Shake
ALLERGY INFORMATION
  • Contains lactose. People with lactose intolerance can substitute coconut milk or almond milk in place of dairy milk.
  • Does NOT contain gluten, yeast, soya, nuts, corn, eggs.
Preparation time – 10 minutes, Cooking time – nil. Chilling time – 2 hours, Serves - 2
YOU NEED
COOKWARE – Blender, peeler, knife, glasses to serve
INGREDIENTS -
  1. 1 Red Delicious or Fuji apple
  2. 4-5 strawberries
  3. 400 ml chilled skim milk
  4. 1 drop vanilla extract
  5. 1-2 teaspoons sugar (optional)
METHOD
  1. Rinse the fruits thoroughly. Peel and core the apple. Hull the strawberries. Chop the fruits up roughly.
  2. Add the chopped fruits to a blender, pour in half the chilled milk, vanilla extract and blend to super smooth and frothy milk shake. Top up with rest of milk and blend in too.
  3. Taste and add sugar only if needed. Blend for another minute if you are using sugar.
  4. Serve in tall glasses. Top with ice cubes if you wish to.
Cool shakes to beat the heat
Apple Berry Milkshake

Sep 30, 2015

Chocolate Marbled Energy Bars

Breakfast is the most neglected meal of the day. On busy weekday mornings, most people are in a great rush to reach workplaces, schools, just about anywhere. No wonder then, that, people do not spare time for breakfast. Yet, starting a day without breakfast just works against what we set out to achieve. We are more likely to be zapped of energy and enthusiasm early into the workday. To help us perform better at our tasks, a healthy breakfast is vital. If so, would it not be wonderful if we could have breakfast on the go? Enter granola bars, energy bars, muesli bars. Call them by any name. They are just as convenient, delicious and perfect snacks or meal on the go.

Energy bars can be made ahead, store well, and can be packed as breakfast on the go, or anytime snacks, or on road trips, picnic munchies. They are great for a pre workout or a post workout snack too.

I came across these chocolate marbled energy bars first in ‘Chocolate’ by Delia Smith. The book is filled with decadent chocolate based recipes. However, these energy bars were the ones that caught my eyes first. I tweaked around the ingredients and proportions to suit my requirement. I have substituted the condensed milk with brown sugar/jaggery syrup. You could add both the condensed milk and jaggery syrup to increase the richness of the energy bar too. If using condensed milk, keep the total liquid at the same volume as mentioned in this recipes. I have added popped amaranth seeds to add a good protein to the bar. The only part I have left unchanged is the beautiful marbled chocolate topping! I had to work on the recipe a few times to get a proportion that works best. One that gave just the right hint of sweetness, and had just enough liquid to solid ratio to bake well. I also made sure that the baked energy bars could be cut into neat squares!

Healthy Chocolate marbled Energy Bars

I am sure you are eager to get to the recipe and make some for yourself too. So here goes…

ALLERGY INFORMATION

  • Has gluten from oats. NOT SUITABLE for people with gluten intolerance. Substitute oats with total 5 cups rice flakes to make it gluten free. 
  • This recipe does NOT contain lactose. Suitable for people with lactose intolerance. However, adding condensed milk will bring lactose into the recipe.
  • Does NOT contain corn, soya, eggs.
  • Contains nuts. Omit nuts if you have nut allergy.

Preparation Time – 20 minutes, Cooking Time – 30 minutes, Makes 9 squares

YOU NEED

COOKWARE – Convection oven, 8 inch square baking tray, baking paper to line tray, deep mixing bowl, rubber spatula, sauce pan, 2 glass bowls, steel fine mesh filter, sharp knife

INGREDIENTS

  1. 4 cups quick cooking oats
  2. 1 cup popped amaranth seeds
  3. 1 cup thin rice flakes (poha, aval, attukulu, avalakki)
  4. 1 cup deseeded, chopped sweet dates
  5. 1/2 cup dried cranberries/strawberries/blueberries (optional)
  6. 1/4 cup chopped walnuts/almonds
  7. 1 cup powdered jaggery/brown sugar
  8. 1/2 cup drinking water
  9. 1/2 cup dark cooking chocolate
  10. 1/2 cup white cooking chocolate

METHOD

  1. Bring the water to boil in a saucepan, add the jaggery, mix and let it rest for a few minutes for the jaggery to dissolve. When the jaggery has dissolved completely, strain through the mesh filter to remove impurities. Collect the jaggery solution in the deep mixing bowl.
  2. To the bowl add the oats, popped amaranth, rice flakes, dates, dried berries (if using), and nuts. Mix all the ingredients together until the liquid has coated all dry ingredients.
  3. Preheat oven to 180 C.
  4. Line the baking tray with paper leaving an overhang.
  5. Pat the mixture into the tray, pressing down firmly with a rubber spatula. Make sure there are no dry bits of ingredients on the surface. If needed, sprinkle a few drops of water on top to moisten, and pat down again.
  6. Bake in preheated oven for 20-23 minutes.
  7. Remove and cool the tray on a cooling rack. Do not remove granola from tray. Cool for 20-30 minutes.
  8. Chop the dark and white cooking chocolate into different glass bowls. Microwave in bursts of 20-30 seconds until just beginning to melt. Do not overheat the chocolate, stop heating when there a few bits of chocolate left to melt. Keep stirring with a metal spoon, to get a smooth melted chocolate.
  9. Spoon both the dark and white melted chocolate alternately in a wave pattern over the baked granola. Drag wavy lines using a fork tip or toothpick to create marbled patterns while chocolate is still wet. Tap the tray sharply on the counter top a few times for chocolate to even out.
  10. Place the tray in the fridge to set quickly.
  11. After half an hour, remove from fridge and set on counter top. Wait for the chocolate layer to warm up to room temperature a bit. I left it on the countertop for 10 minutes. Room temperature at my home is around 23C-25C. Cut into 9 squares with a sharp knife. If the chocolate layer seems to crack rather than cut up, wait for some more time and then cut up. The marbled energy bars are ready.
  12. Store in air-tight box. Stays good for at least 1 week, maybe more. I never got a chance to find out! Pack in baking paper for road trips or any place out of home. These marbled energy bars are great for breakfast on the go, for school snack boxes, for pre or post workout snacks, as well as a healthy snack option.

Guilt free healthy snacks

Notes -

  • Diabetics may/may not be able to eat these energy bars. Remember although the recipe uses jaggery, there is more sugar in the dates as well as chocolate. Omitting the chocolate could bring the sugar content of the energy bars lower.
  • The energy bars cut up neatly if baked through well. Also wait patiently for the top chocolate layer to set before cutting into squares.
  • Do not over heat the chocolate. Stop heating when three fourths of the chocolate is melted. Keep stirring in a circular motion, in the same direction for a smooth glossy chocolate.

May 29, 2015

Watermelon Shikanjvi

In keeping with the need of the summer season, here is a winner drink recipe. Watermelon juice spiked with Indian spices. These spices were chosen not just for the flavours but also for their ability to aid digestion and add essential salts to the body.

In my earlier post, I had promised to share a drink recipe that does not include sugar. This is especially so that diabetics can also indulge in a refreshing drink. Summer need not be tiring or exhausting if we have refreshing, nourishing, hydrating drinks such as this watermelon shikanjvi in our repertoire. The ultimate thirst quencher. Rich with natural salts to rehydrate, and full of fruit vitamins and minerals. The fruit is rich in anti oxidants which helps in maintaining skin tone as well. Something we could surely use in the dry scorching months!

 
Enjoy a sip by the pool


In fact, most juices and colas are not advisable for diabetics since these release a surge of sugar into the blood stream almost immediately. A spike in blood sugar is dangerous for any diabetic. As is dehydration. In diabetics, if there is excess sugar in the blood, the kidneys will try to flush out some sugar through urine. It makes this happen by drawing on body water from blood, cells, saliva. This, in turn, increases the dehydration in the body.

Without further ado, here is the recipe for a super refreshing, very low calorie, drink. For ease, I am giving measures for 2 glasses. Of course, you can make a big batch ahead (do not add the soda ahead. Mix it in just before serving) and store chilled in the fridge. When you feel like downing a glass, pour yourself half a glass of this juice mixture, top with soda and sip for instant relief from summer.

Chilled watermelon shikanjvi


 ALLERGY INFORMATION

  • Does NOT contain lactose, soya, corn, yeast, gluten.

Preparation Time – 10 minutes + chilling time, Cooking Time – nil, Serves - 2

YOU NEED -

COOKWARE - Mixer grinder, lemon squeezer, and serving glasses

INGREDIENTS -

  1. 1 heaped cup chopped, deseeded watermelon chunks
  2. 250 ml chilled club soda
  3. Juice of 1 lemon
  4. a  big pinch of cooking salt
  5. pinch each of roasted jeera powder and kala namak powder
  6. Ice cubes to top up and serve

METHOD -

  1. Whiz the watermelon chunks in the mixer until you get a smooth puree. .
  2. Add the lemon juice also to the mixer jar.
  3. Add also a big pinch of salt, followed by a small pinch each of roasted jeera powder and kala namak.
  4. Whiz the mixture well, and divide between 2 glasses.
  5. Top with club soda, ice cubes and serve chilled!


 Watermelon Shikanjvi


Apr 25, 2015

Orange Basil Iced Tea

With summer on, in full swing, we search often for different drinks to soothe our parched throat! It is truly important to keep ourselves well hydrated in heat. Drinking plain water through the day can be boring, and nauseous at times. The trick, then, is to flavour our drinks with some palate pleasers. This way, we can drink enough fluids to keep the body hydrated well enough.

For more on hydration, and it’s importance, read my article here on importance of water.

Here is an idea which you can use to add fun to your fluid intake. Tea is a diuretic, which means it increases water excreted from the body. So to help maintain the fluid balance in the body, I have diluted the iced tea with plenty of water and added orange juice for extra vitamins and minerals.

  • People who have special fluid restrictions like in kidney aliments will have to stick to their prescribed form of fluid intake. This drink may not be suitable for them.
  • If you have diabetes, or are obese, this is not the best way to replenish fluids for you. Cheer up! I will be back with interesting drink recipes for you also.

Enjoy chilled Iced Tea

ALLERGY INFORMATION

  • Does not contain gluten, soya, corn, yeast, lactose.

Preparation Time – 10 minutes + 1 hour chilling, Cooking Time – 3-4 minutes, Serves – 4-6 glasses

YOU NEED

COOKWARE – Tea pot/saucepan, jug, glasses to serve

INGREDIENTS

  1. Juice of 2 oranges, about 1/2 cup or more, freshly squeezed orange juice.
  2. 3 tea bags of your choice of flavour. Lemon, ginger, mint teas all work well.
  3. 2 cups drinking water + 4 cups chilled drinking water
  4. A tiny fistful Basil seeds/sabja seeds
  5. 2 tbsp honey
  6. Ice cubes and orange slices to serve

METHOD

  1. Bring 2 cups of water to boil in a saucepan. Place tea bags in the saucepan, remove from heat, cover and steep for 5-7 minutes.
  2. Soak the basil seeds in the remaining 4 cups chilled water.
  3. Squeeze out the tea bags. Mix in the orange juice, strained tea, chilled water and honey.
  4. Stir well, chill for an hour.
  5. Serve topped with ice cubes and slices of orange to garnish.

Orange Basil Iced Tea

Mar 28, 2015

Recipe: Sweet and Sour Pumpkin Curry

Sweet pumpkin is also known as Kaddu, Manjal Pooshanikkai, Gummadikayi in different Indian languages. Often considered as a lowly, humble vegetable, pumpkin actually packs a great punch in terms of nutrients. It is a weight watcher’s delight.

Sweet pumpkin has less calories and more nutrients. To explain this better, it has four times lesser calories than sweet potato, 50 times lesser Sodium but 3 times more Vitamin C, double the folic acid, and similar Calcium, Magnesium, Phosphorus, Iron content. This means that you can eat more of sweet pumpkin than sweet potato (up to 4 times more) and still benefit from its rich nutrients without the calorie overload. More health for lesser calories, now is that not a winner?

Sweet pumpkin seems to be this gentle, powerful giant among vegetables. It looks elegant despite its rotund form, swathed in deep green or mustard yellow skin revealing a firm sweet golden flesh when cut. Lends a quiet dignified presence to a dish, knows to be at home in sweet or savoury recipes with equal ease. Delicious whether cooked with skin or without. Pumpkin often comes to my rescue when I have to cook in a hurry.

Every family has their favourite pumpkin recipe. This is ours. I hope you have as much fun cooking it and enjoying as we do.

Pumpkin in a bowl

Preparation Time – 20 minutes, Cooking Time – 10-15 minutes, Serves – 4-6.

ALLERGY INFORMATION

  • Does NOT contain egg, gluten, soya, lactose, yeast, corn, nuts.
  • Suitable for gluten, lactose intolerance or nut allergy.

YOU NEED -

COOKWARE – Knife, Cutting board, Fry pan

INGREDIENTS -

  1. 2 cups chopped sweet yellow pumpkin (with* or without skin)
  2. 1/2 cup finely diced onion
  3. 1 cup chopped tomato
  4. 1 scant tsp salt
  5. 1/2 tsp turmeric
  6. 2 tsp jaggery powder
  7. 1 tsp garam masala powder
  8. 1 tsp sambhar powder
  9. 2 tsp cooking oil
  10. 1/2 tsp mustard seeds
  11. 1/2 tsp cumin seeds
  12. 2 tbsp coriander leaves for garnish

*Sweet pumpkin takes longer to cook with skin and lesser time without skin.

            METHOD -

            1. Clean, peel and chop all vegetables. Set aside separately.
            2. Heat oil in a fry pan, add mustard and cumin.
            3. When they sizzle and crackle, add in onions, fry on high flame for 3-4 minutes until they turn pink-brown.
            4. Next to go in is the chopped pumpkin. Saute on high heat for a minute, sprinkle water and cover and cook for a further 2 minutes.
            5. Finally add the tomatoes. Keep tossing over high heat until tomatoes mush up.
            6. Add salt, turmeric powder, jaggery, garam masala and sambhar powder. Mix everything well. Cover and simmer for 2-3 minutes more.
            7. Garnish with fresh chopped coriander leaves and serve hot with steamed rice.

            Pumpkin Sweet and sour curry

            Notes -

            • Sweet pumpkin cooks very quickly. Cook lesser if you want to retain the shape of the vegetables. Cook longer if you like a mushy texture.
            • Keep stirring while on high heat to avoid scorching.
            • Add the powders after the vegetables are mostly done. This helps to retain flavours better.

            Life's simple pleasures

            Mar 20, 2015

            Desi Health Bites: Guthi Vankaya and a Sub-wich

            Guthi Vankaya is a famous Andhra dish. It is made by stuffing tiny brinjals/eggplants/aubergines with a freshly made spice powder. The stuffed vegetables are then cooked in a gravy or sautéed in generous amount of oil until cooked. When served as an accompaniment to rice, it is guaranteed to uplift your meal to a gastronomic experience. Know someone who hates brinjal? Then offer them this Guthi Vankaya. And watch the magic.
            This Guthi Vankaya recipe was created for the Fortune Rice Bran Oil Desi Health Bites Activity. I have grilled the stuffed Vankaya instead of going the more oil-rich frying route. Also, I tried a sandwich version where I’ve taken the curry one step closer to chomp-heaven! The sandwich is very healthy if you use whole grain bread. Omit the onion rings in the sandwich if you do not want to increase the calories. Instead, raw onion rings soaked in vinegar will add a different dimension to the sandwich too.
            Do not let the long list of ingredients scare you. They are quite easy to bring together. Once you bite into the sandwich, any other thought will promptly be forgotten. Go on, try it out and let me know. 
              Guthi Vankaya -grilled to perfection

            ALLERGY INFORMATION
            • Does NOT contain gluten, soya, corn, eggs, lactose.
            • Suitable for gluten, lactose intolerance or people with nut allergy.
            Preparation Time – 20 minutes, Cooking Time – under 30 minutes including grilling time, Serves - 6

            You Need -

            Cookware – Oven proof glass bowl, mixer grinder, fry pan, sandwich toaster, microwave oven with grill or OTG.

            Ingredients -

            For Guthi Vankaya -
            1. 500 grams tiny violet brinjals
            2. ¼ cup dry coconut (copra) slices
            3. ¼ cup chopped onion
            4. 2 tablespoon Coriander seeds (dhania)
            5. 2 tablespoon chana dal
            6. 2 teaspoon urad dal
            7. 6-7 red chillies
            8. A thin 1 inch cinnamon stick
            9. 2 cloves
            10. ½ teaspoon Cumin (jeera)
            11. 1 teaspoon salt
            12. 2 tablespoon Fortune Rice Bran Oil*
            For Onion Rings –
            1. 2 big red onions
            2. 1 cup Panko Bread crumbs
            3. 3 tablespoon cornflour
            4. 3 tablespoons Gram Flour (besan)
            5. A pinch salt
            6. ¼ cup water
            7. Fortune Rice Bran Oil for deep frying
            For Honey Mustard dressing –
            1. 2 tablespoon good quality mustard
            2. 2 tablespoon honey
            For Assembling Sub Sandwich –
            1. 6 numbers 6” hot dog rolls or Ciabatta bread
            2. 1 teaspoon butter
            3. 1 European Cucumber (Or Salad Cucumber)
            4. 3 medium tomatoes
            5. A few leaves each of Iceberg, Romaine and Curly green lettuce
            6. 6 Cheese slices
            Method –

             For Guthi Vankaya –
            1. Add ½ teaspoon oil to a fry pan, and fry these ingredients over medium heat to a golden brown – dry coconut slices, chopped onion, dhania, chana dal, urad dal, red chillies, cinnamon, cloves, jeera. Cool, and grind with salt to a coarse powder.
            2. Rinse the brinjals, chop off the stem. Make ‘X’ slits starting from the bottom of each brinjal, going up to the head, but take care to leave the head intact.
            3. Stuff the slits with the above powder.
            Plump stuffed brinjals/eggplants
            1. Preheat Grill in microwave oven at 220⁰C.
            2. Place the stuffed brinjals (Guthi Vankaya) head down and filling-side upward, in a suitable oven proof glass bowl. Drizzle the remaining oil over the brinjals and grill covered for the first 10 minutes, then open for the next 5-7 minutes.
            3. The Guthi Vankaya is ready when the brinjal feels soft to touch and the filling looks toasted.
            Side dish or sandwich, how owuld you like it?
              
              *A word about the oil used here – Fortune Rice Bran oil has a substance called ‘oryzanol’ which helps in reducing cholesterol in the body. Oryzanol works by lowering cholesterol levels and has free radical scavenging actions as well. The latter action helps the body by improving skin texture, reducing wrinkles and ageing, apart from protecting against dangerous cancer causing cells in the body.

            For Onion Rings –
            1. Mix the gram flour and cornflour with salt and just enough water to make a thin (but not watery) batter.
            2. Peel the onions, slice horizontally into thick slices, and separate into rings.
            3. Dip each ring into the batter, coat with panko bread crumbs and set aside.
            4. Repeat until all onion rings are coated. Heat about 1 cup Fortune Rice Bran Oil in a suitable fry pan and deep fry the rings till they are golden brown. Set aside.
            For honey mustard dressing –  Whisk both ingredients to a smooth homogenous mixture.

            For Assembling Sub Sandwich –
            1. Immerse the lettuce leaves in ice cold water. Rinse the cucumber and tomato and cut into thin slices. Separate the Guthi Vankaya into segments.
            2. Cut each hot dog bun/Ciabatta bread horizontally into two. Brush with butter and toast in sandwich maker/tawa for a few minutes. Remove to serving platter.
            3. Drizzle some honey mustard dressing over the bottom side of bun. The first layer of sandwich
            4. Place the brinjal segments over the dressing. Arrange cucumber, tomato slices over this. Drizzle some more dressing over the vegetables. Layer the cucumber and tomato
            5. Drain lettuce, shake dry and tear up by hand into bite size pieces. Place lettuce over the sandwich, top with cheese slice. Cover with top of bun and press down lightly. Bring on the lettuce... and the cheese
            6. Repeat with the rest of the hot dog buns and filling similarly.
            7. Your super healthy, tasty, filling, homemade Guthi Vankaya sub sandwich is ready.
            Onion rings to tempt you further..
             ta da, the sub-wich is ready

            “This blog post is in association with Fortune Foods as a part of their Desi Health Bites activity– The Hunt for the Best Rice Bran Oil Recipes. For more updates and healthy recipes using Fortune Rice Bran Health Oil,
            follow Fortune Foods at www.fortunefoods.com
            on Facebook at www.facebook.com/FortuneFoods and
            on Twitter at @fortunefoods (https://twitter.com/FortuneFoods)
             

            Mar 13, 2015

            Carrot and Alfalfa Salad

            When did winter zoom past? Nobody knows. Not only is summer on us but it is exam season too. That means two things – light refreshing meals and hydration. When spending time over the stove top is a agony, we must think smart and eat sensibly. Salads are great additions to a meal and good at quenching thirst also. Salads are great even for snacking in between meals.

            Salads are mostly made of raw vegetables and fruits which have a higher moisture content. Since there is no cooking involved, the vegetables retain their juices and nourishing properties to the fullest. For more on how to make or when to not have salads, read through my article here.

            So, are alfalfa sprouts good for you? Here is the lowdown on alfalfa sprouts.

            These are a great source of protein, B complex vitamins, Vitamin K, Calcium, Iron, Potassium, Zinc, Copper. Also high in phytoestrogens. Traditionally used to treat  kidney ailments, diabetes, these wonder sprouts also mop up cholesterol from arteries. Great news for people with high cholesterol, or arterial plaques. While they are a wonder food for most people, some sets of population may have to proceed with caution.

            Pregnant women or convalescent people are better off eating all foods that are cooked, avoiding any raw sprouts including alfalfa. Since the sprouts mimic estrogen, women with low progesterone may do well to avoid eating it daily. People who have auto immune disorders such as Rheumatoid Arthritis, Multiple Sclerosis, or Lupus may find an increase in their symptoms with prolonged daily consumption of these sprouts.

            It is also useful too remember that this caution is only necessary if you plan to eat raw alfalfa sprouts daily for several months. In an otherwise balanced diet that includes alfalfa sprouts once a week or thereabouts, in combination with a variety of other foods, the food only delivers its abundant vitamins and minerals with no significant damage due to its phytoestrogen, canavanine, or other components.

            Carrot and alfalfa salad

            This is a salad I rustled up for lunch today. I feel it looks colourful, happy and enticing. I’ve even added a surprise ingredient to encourage the younger ones to reach out for it eagerly. Want to know more? Read on for the recipe….

            ALLERGY INFORMATION

            • Does not contain gluten, lactose, dairy, corn, soya, yeast, eggs.
            • Suitable for gluten or lactose intolerant people.
            • *Contains nuts. People with nut allergy can omit the nuts in this recipe.

            Preparation time – 15 minutes + 30 minutes chilling time, Cooking Time – nil,  Serves – 2 main servings or 4 as accompaniment to meal

            You Need -

            Cookware – Peeler, Grater, Knife, Mixing Bowl, Mortar and pestle

            Ingredients -

            1. 1 cup grated red carrot (I used 1 long red carrot)
            2. 1/4 cup thinly sliced onion
            3. 1 fistful alfalfa sprouts
            4. 1 cup chilled drinking water
            5. 1 green chilli OR 1/2 tsp crushed black pepper
            6. 1/4 tsp salt
            7. 2 tbsp apple cider vinegar
            8. a 1” square of peanut brittle or any nut brittle* (optional)

            Method -

            1. Rinse the alfalfa sprouts in running water and steep in the chilled drinking water until needed.
            2. Immerse the thinly sliced onion in the vinegar. Set aside.
            3. Rinse, scrub, peel and grate the carrot. Slice the green chilli into thin slanting slivers.  Coarsely crush the peanut brittle in a mortar and pestle. Do not powder it. Leave behind some small bits for your kid to pick up and and bite into with glee!
            4. Place all the ingredients in a mixing bowl, drain water from the sprouts, add to the bowl, and give them all a good toss with salt. You may need to separate the sprouts with fingers.
            5. Chill before serving for flavours to marry each other well.

            Phulka, Rajma and Salad - balanced meal

            Feb 10, 2015

            Nellikkai Thair Pachadi / Amla Raita

            Do you know that Amla or the Indian Gooseberry has the highest Vitamin C content among all vegetables and fruits? That it has mention in ancient Sanskrit texts, is used extensively in Ayurvedic medicine, and is considered a miracle fruit. Amla can be used to treat eye disorders, increase calcium absorption in the bones, help build strong bones, cure skin ailments, strengthen and nourish hair, promote hair growth, actually just about do anything healthy and nourishing for our bodies.

            The Indian Gooseberry (Amla) also has known anti oxidant properties. Amla has been found to offer a full range of benefits from free radical scavenging, anti inflammatory properties, beneficial effect on diabetes.   It is also widely used for its ability to dissolve plaques in arteries, reducing serum cholesterol levels.

            Studies have also shown that even preserving in brine or pickling does not reduce the availability of vitamins, especially Vitamin C. Readers may be aware that vitamins B and C are easily destroyed when food is exposed to sunlight or heat, or excess water during cooking. So excessively cooked foods or preserved foods lose their vitamin content over time. Not so with Amla. This miracle fruit continues to dole out its health benefits even when cooked or preserved.

            Despite having such a wonder fruit growing in our midst, I feel people in India do not make full use of it. We are in search of that elusive magic potion sourced from deep in the Amazon forests or some wonder drug that is shipped from a Scandinavian country. While those drugs/potions/foods may be good in them selves, I ask myself and everyone reading this – Is it wise to ignore the wealth in your backyard and seek something from far away? Are the money, effort, rising fuel costs, justified?

            I, for one, am going to include more of this wonder fruit ‘Amla’ in my family’s meals. I am sure all of you have recipes from different cuisines with Amla as the main ingredient. Do share your favourite recipes with Amla in the comment section below.

            Here is one simple, really quick, tongue tickling recipe with Amla. Perks up any meal and loads you up with its nutrients. Go on. Try it out.

            Luminous Amla

            ALLERGY INFORMATION

            • Does NOT contain gluten, lactose, nuts, corn, soya.
            • Suitable for people with gluten or lactose intolerance, or nut allergy.

            Preparation Time – 10 minutes, Cooking Time – 5 minutes, Serves – 4-6

            You Need -

            Cookware – Small wok, Mixer grinder

            Ingredients -

            1. 4-5 Amla fruits
            2. 2 tbsp fresh grated coconut
            3. 3-4 green chillies
            4. 1/2 cup skim milk curd
            5. 1/4 tsp salt

            For Seasoning -

            1. 1/4 tsp oil
            2. a pinch mustard seeds
            3. a pinch fenugreek seeds
            4. a pinch asafoetida
            5. 3 curry leaves
            6. 1/2 red chilli (optional)

            Method -

            1. Rinse the Amla well. Cut incisions along the segments. Pull out the flesh and discard the seeds.
            2. Grind along with coconut, green chilli, and part of the curd to make a paste. Grind more than a coarse paste but stop short of a fine paste.  Add the rest of the measured curd and whip along with the paste.
            3. Heat oil in a small wok/kadai/fry pan.
            4. Add ingredients for seasoning in order. When mustard crackles, pour in the ground mixture, and add salt. Simmer until the liquid foams up.  Do not boil this mixture. Keep stirring over medium heat for it to cook lightly.
            5. Remove to serving bowl and enjoy with hot phulkas,  or steamed rice, a dal and some stir fried vegetables.

            Quick Amla Raita


            Nov 9, 2014

            Chole Kachumber Salad

            Hearty, nourishing, vibrant, colourful. These are the descriptions that come to my mind as I think of the salads we make often at our home. And I am talking about vegetarian salads here. No, we do not miss the meat in salads or in anything else for that matter. Actually nobody would.
            If we know how to bring together a medley of textures, colours, aromas and flavours, we can create amazing fresh, healthy salads for ourselves with just about as few or as many ingredients.
            Salads such as these can be rustled up and forked down with guilt-less relish. At any time of the day. As part of a meal. As a meal in itself. As a filler between meal times. As a post workout snack. As an after school snack. …
            Which is why I stock some soaked and cooked beans such as mung, brown or green chana (varieties of chickpeas), rajma (red kidney beans) or lobia (black eyed beans) in my freezer. They come in handy to spruce up a salad like this one.
            I am calling this as chole – kachumber salad. It also closely resembles ‘Balilah’, a salad from Middle Eastern or Moroccan cuisine which is centred around chickpeas too. Here is the recipe for my chole – kachumber  salad.
            Luscious colourful salad
            ALLERGY INFORMATION
            • Does NOT contain lactose, soya, gluten, nuts.
            Preparation Time* – 15-20 minutes + 30 minutes chilling, Cooking Time – nil, Serves – 4-6.
            You Need
            Cookware – Steel/glass mixing bowl, Knife, Grater
            Ingredients
            1. 1 cup of cooked chickpeas/kabuli chana
            2. 1/4 cup finely diced red onion
            3. 1/2 cup chopped tomatoes
            4. 1/2 cup diced/grated cucumber**
            5. 1/2 cup grated  carrots
            6. 1/2 cup pomegranate arils
            7. A few lettuce leaves torn by hand (optional)
            8. 1 tbsp chopped parsley OR 2 tbsp chopped coriander leaves
            9. 1 tbsp lemon juice
            10. 1 tsp sesame oil
            11. Salt and pepper to season
            To Assemble
            1. To make the dressing, mix salt, pepper, oil and lemon juice. Whisk well and set aside.
            2. Prepare all the vegetables as mentioned for the salad.
            3. **Peel and core the cucumber if you find it has big seeds. Then chop or grate as preferred.
            4. Mix all the ingredients in a bowl, drizzle the seasoning. Add salt and pepper. Toss well.
            5. Chill for half an hour before serving.
            * The preparation time is lesser only if you have cooked chana ready. Else, you may have to soak and cook ahead to use for the salad.  In that case, allow for 8 hours Soaking Time + 1 hour Cooking Time.
            Single serve bowls of salad
            High protein snack - chole kachumber salad

            Jul 25, 2014

            Plum and Elaneer Terrine

            (Elaneer–Tender Coconut Water)

            Ok, so it has been raining plums all over the country and beyond too! Wonder not at the surfeit of interest that all bloggers seem to have in plums. The reason is the contest announced jointly by KitchenAid India and the Indian Food Bloggers Meet. Here is my last attempt at all things ‘plummy’.

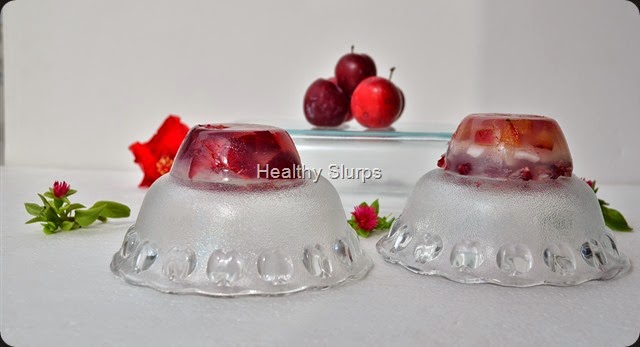
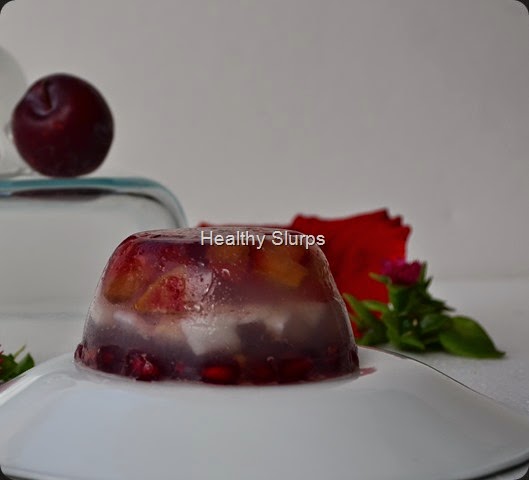
            A simple, visually stunning dessert that has been born of the desire to create a new, uncomplicated, breath taking dish. Of marrying French sensibilities with Indian flavours. Of paying tribute to my home state, Kerala. What can capture the essence of Kerala better than it’s famous coconuts? The Elaneer or tender coconut water is an excellent base for this refreshing fruit terrine. Juicy plum bits suspended in a clear, delicately flavoured tender coconut jelly and shining like a jewel! Have a look at this.

            Jewel in a bowl - Plum Terrine

            This plum terrine, with it’s gorgeous appearance has to be the least sinful and most healthy of desserts. With zero fat and very minimal calories from added sugar, the terrine is a great option for dieters of every hue. Besides, it’s glamorous appearance will surely earn you plenty of applause at a potluck or from dinner guests. The best part is it takes very little time to assemble, but the final outcome belies that (We are not going to let our guests know that, are we?)

            Triple layered Plum Terrine

            A few tips to keep in mind are to select tender coconut which is slightly sweeter. Retain the tender meat from inside the coconut too. Select ripe but firm plums that are just short of over ripe or squishy.

            Without further ado, here goes..

            Preparation time – 45 minutes+1 hour setting time, Cooking Time – 15 minutes, Serves - 6

            Allergy Information

            Does not contain egg, soya, wheat, dairy, nuts.

            Ingredients

            1. Firm ripe plums – 8-10
            2. Tender coconut water – 2 cups (I got it from 2 tender coconuts)
            3. Flesh from the tender coconuts, chopped
            4. Agar agar – 2 gms
            5. Fresh water – 1 cup +1/2 cup if needed
            6. Sugar – 3 heaped tbsp (or less if the coconut water is sweet enough)
            7. Pomegranate pearls – 1/4 cup (optional)
            8. Flavourless vegetable oil like sunflower or canola oil – a few drops to grease

            Chilled no-guilt dessert

            Method

            1. Wash the plums, pat dry and stone the fruit by cutting from all four sides close to the seed, and then from top and bottom! Dice the pulp into an even small size taking care not to squish the flesh. Set aside.
            2. Chop the agar agar into small pieces, soak in 1 cup water in a small sauce pan, bring to boil, stirring continuously for 4-5 minutes, until the strands dissolve through. Strain the liquid through a metal sieve into a clean bowl. Return the remaining strands to the same sauce pan, add 1/4 – 1/2 cup water, and boil again while stirring all the time. Strain again into the same bowl, discard any leftover agar agar bits.
            3. Warm up the tender coconut water very gently for a minute, (do not boil). Remove from flame and add in a thin stream to the warm agar agar liquid, whisk well. Taste and add as much sugar as needed. Keep stirring until sugar has dissolved. Keep the agar agar sauce pan over flame. When sugar has dissolved, and the liquid looks clear and transparent, remove from flame.
            4. Grease a 8” by 4” loaf tin or several small ramekins/bowls/katoris (about 5-6, each of 120 ml capacity).
            5. Place the chopped plums in a single layer at the bottom of the prepared tin/bowls. Gently pour the tender coconut liquid over the fruit until the fruit pieces are drenched and submerged in the clear liquid. Tap sharply on the counter and rest on the counter for 15 minutes. (no need to refrigerate)
            6. After 15 minutes, check if the top of the liquid layer has set. If yes, proceed to add the chopped coconut pieces, again in a single layer. If not set, wait for 5 minutes, check and then layer the coconut. Repeat the gentle pouring of the agar agar liquid over the coconut. If this liquid has begun setting, warm it up gently until clear liquid and then pour. Tap over counter again and leave to set for 15 minutes.
            7. Once this layer too has set, scatter a few pomegranate pearls over if using. Else you could use up the rest of the diced plums too. Finish off by pouring the coconut water+agar agar liquid over the fruit. Tap the container sharply again (to avoid air pockets) and set in refrigerator for an hour.
            8. To unmould, dip a knife in hot water, wipe and run carefully around the set terrine. Loosen the sides alone and invert onto serving plate. Cut into slices if set in loaf tin using a serrated knife. Serve chilled as is, or accompanied with whipped cream or ice cream.
            9. Sit back and enjoy this absolutely guilt free dessert and bask in appreciative applause!

            Terrine loaf

            Terrine from the top!

            Jul 23, 2014

            Luscious Plum Panna cotta–A plum assignment!


            The countdown to the first ever Indian Food Bloggers’ Meet has begun. The organisers are busy on their toes looking into every detail. The participants? They are busy as well, cooking up storms in their kitchens and all over the internet! Oh yes, I am going to the event too. After racking my recalcitrant grey cells for several days, and after trying out several recipes in my head, some actually in the kitchen, I’ve finally gathered courage to pitch for the lovely prize announced by KitchenAid, India.

            Plums, glorious plums!

            ‘Cook with plums and blog about it, it’s that easy’, coaxed the organisers. Is it really? When you are setting yourself up against some of the most talented, creative cooks in the country, even an easy task can seem daunting. Still, I can always try, can’t I?

            Succulent, lush plums, cooked with aromatic star anise, turned wicked and hot with a generous dash of chilli, caressed and enfolded into a milk-cream mixture and patiently allowed to set into a panna cotta. As if this was not sublime enough, a rich, buttery, crisp, orange lace cookie that holds the silky smooth, gently quivering panna cotta in its fold. This marriage of the crisp and the soft brought together with a drizzle of plum compote! What would you say?

            Here is what you need to make this heavenly dessert.

            For the plum compote

            Ingredients

            1. Ripe plums – 250 gms, weighed after deseeding
            2. Sugar – 125 gms
            3. Star anise – 2 arms of a star anise pod
            4. Kashmiri chilli powder – 1 level tsp

            Method

            1. Wash, pat dry and stone the plums. For this, cut into half close to the seed on either side of the seed and remove seed. Retain skin+pulp.
            2. Place them in a heavy bottomed saucepan, add the sugar and star anise, set to a medium flame and keep stirring. After  4-5 minutes, when the plums get cooked and the skins peel off, keep removing as much skin as possible with a fork. Continue stirring the mixture to avoid charring.
            3. When the pulp looks well cooked (about 8 minutes), add the chilli powder, mix in well and remove from fire. Once cooled,remove the star anise, run the pulp in a blender, sieve through a metal sieve and reserve the smooth compote.

            For the Panna cotta

            Ingredients

            1. Milk – 1 cup
            2. Fresh cream – 1/2 cup (I used Amul)
            3. Sugar – 1/4 cup + 2 tbsp extra if needed
            4. Agar agar – 8 gms
            5. Fresh water – 1cup +1/2 cup if needed
            6. Plum compote – 1/2 cup (Reserve the rest of prepared compote)

            Method

            1. Boil the milk in a saucepan, dissolve sugar in it and keep warm.
            2. Chop up the agar-agar strands, place in 1 cup water in a small saucepan, and bring to boil over low flame. Keep stirring continuously. When most of the strands have dissolved, pour through a metal sieve into the saucepan with milk. Return the un-dissolved strands of agar agar to the small saucepan add 1/4 cup extra water and boil again over low flame. Repeat the sieving into the milk once it is dissolved. Discard any leftover strands after this step.
            3. Warm the cream carefully, stirring all the time. When bubbles appear around the corners, pour the cream into the milk mixture, bring the milk saucepan to boil. Stir, stir, until the liquid is homogenous.
            4. Switch off flame, blend in 1/2 cup of prepared plum compote. Use a whisk if needed, make sure the compote and the milk are fully blended.
            5. Grease 4-5 molds (each approx. 120 ml), with a light flavourless oil. Pour the prepared panna cotta into these molds, tap the molds sharply to avoid air bubbles and set in refrigerator for at least 2 hours. I set them overnight.

            Orange lace cookies embracing the smooth panna cotta

            For the Orange Lace Cookie (Recipe adapted from Pastry Pal)

            Ingredients

            1. APF – 85 gms
            2. Granulated Sugar – 225 gms
            3. Orange Juice – 120 ml
            4. Melted butter – 100 ml

            Method

            1. Powder the sugar in a mixer to a fine powder. Once it is fine, add the measured flour to the mixer jar and run both together so that they blend well.
            2. Remove to a mixing bowl. Add the orange juice and whisk thoroughly until well combined.
            3. Now add the melted butter and keep whisking till you get a smooth batter. Leave in the refrigerator overnight.
            4. The next day, when you are ready to bake, preheat the oven to 180 C.
            5. Line a baking try with Silpat. If you do not have a Silpat mat, grease the baking tray ‘very generously’ with butter. You can make these cookies in batches, so use any size tray you have.
            6. Drop ‘only’ half teaspoonfuls of batter onto the tray leaving large gaps between each cookie batter. Bake for 5 minutes at 180 C, then reduce temperature to 170 C and bake again for 5 minutes. Watch out in the last 2 minutes. The edges should get golden and the middle should look orange-gold in hue.
            7. Remove tray from oven, let the cookie cool for a minute. Then ease it out gently with a metal spatula, drape over a rolling pin or katori if you want a bent shape. Else, remove to a platter to cool in a single layer. Store in an air tight box until needed.

            Don't we look pretty?

            To Assemble the Dessert

            1. When you are ready to serve, pour the reserved plum compote into a small saucepan, add 2 tbsp fresh water, bring to boil. Mix well and remove from fire.
            2. Place 1 or 2 orange lace cookies in a serving plate.
            3. Dip a knife in hot water. Wipe and run through the edges of the set panna cotta bowl. Loosen only the edges carefully. Invert over the waiting cookie.
            4. Drizzle the plum compote over the panna cotta and serve immediately. The delicate lacy crisp cookie embraces the smooth panna cotta resulting in gustatory ecstasy! Some desserts are best experienced to be believed!

            Hot Plum Panna cotta served with Orange Lace cookie and plum compote

            A marriage made in dessert heaven! Enjoy.

            Nov 20, 2013

            Sweet Corn and Pomegranate Salad

            Colourful Salad
            Ingredients for a salad are never fixed at my home. Assembling a salad is a flexible exercise, often involving the bringing together of whatever is available in the fridge, and finishing it off with a dressing, which is most often a citrus-y one. This salad too was created similarly with foods present at hand. Sweet corn kernels and juicy pomegranate do a pretty tango here, with some worthy add-ons such as red onion and grated carrot thrown in to merrily add to the colour riot. I’ve noticed quite often that my kids need no coaxing to try a salad that is as vibrant in colour as this one.
            Apart from being loaded with Beta Carotene from the vegetables and anti oxidants from the fruit, salads help to increase the dietary fibre of our daily meal.
            As per the recommendations of the National Institute of Nutrition, an adult person must have 40 gm. of fibre in a day, which includes soluble and insoluble fibre. Dietary fibre is needed for
            1. Proper bowel function,
            2. To prevent Haemorrhoids
            3. To prevent Coronary heart disease
            4. To control diabetes and obesity
            5. To reduce plasma cholesterol
            6. To protect against colon cancer.
            Salads are the tastiest way to consume fibre in a meal. In addition, they provide colour, texture and variety resulting in a satisfying meal experience.
            Go ahead and make this salad for yourself and share it with me too!
            You Need
            1. Sweet corn kernels – 1/2 cup
            2. Pomegranate pearls – 1/2 cup
            3. Carrot grated – 1/4 cup
            4. Roma tomato, diced fine – 1 medium tomato
             For the dressing
            1. Salt – 1/4 tsp
            2. Pinch of sugar
            3. Juice of 1 medium lemon
            4. Crushed black pepper – 1/4 tsp OR Green chilli – 1 minced fine
            5. Red onion, diced fine – 2 level tbsp
            To Assemble
            1. Steam the sweet corn kernels for 2 minutes in the microwave at high power. Set aside.
            2. Remove the pomegranate pearls from the fruit, keep aside.
            3. Combine all ingredients for dressing, mix well with a fork.
            4. Bring all ingredients for salad together, toss well with the dressing.
            5. Chill for half an hour in the fridge in a covered bowl.
            6. Serve along with warm pulkas or freshly grilled garlic bread or as a side with tadka dal and steamed rice.
            Healthy and Radiant


            Aug 7, 2012

            Cauliflower Koshimbir


            When I heard my friend, Geetanjali tell me about the several koshimbir or salads that she rustles up often at her home, I was all ears. I am always on the look out for newer healthier food options. This salad, apart from new ingredients for koshimbir, also packs in freshness, sweet, tangy and citrusy flavours in.

            While Geetanjali’s version had cauliflower as the sole vegetable, and used lemon juice for the tang, I added some carrots for colour, and had to improvise with grated raw mango since I did not have lemon at hand. You could try both versions. They taste just right with steamed rice and dal combo or with hot phulkas too. In fact, you could make a wrap with a hot phulka, some mustard smeared on it, filled in with the koshimbir, rolled up and enjoyed!

            What’s good about this dish?

            • Cauliflower is a cruciferous vegetable, similar to cabbage or broccoli.
            • Fresh cauliflower is an excellent source of Vitamin C, Vitamins B1, B3, B5, B6. A great source of minerals like iron, manganese, potassium, too.
            • Di-indolyl methane (DIM), a substance found in this family of vegetables have anti viral, anti bacterial properties and also functions as immune modulator. This property is being used in clinical trials for treating Human Papilloma Virus (the virus that causes cervical cancer)
            • Cauliflower has several other cancer fighting compounds too – they protect against prostrate, cervical, colon, breast, and ovarian cancers. All this makes it a very important vegetable in every woman’s diet.
            • When cooking, wash the head under running water, parboil in salted water, rinse again and use in recipes.

            Go on, realise the benefits of this wonder vegetable using it in recipes such as the one below - 

            Cauliflower Koshimbir

            You need

            1. Cauliflower – 1 medium head
            2. Carrot – 1 medium Or Grated Carrot – 1/2 cup
            3. Raw mango – 1 small OR Grated mango – 1/4 cup
            4. Fresh grated coconut – 2 tsp, optional
            5. Salt- 1/2 tsp or more if needed
            6. Sugar – 1/4 tsp,optional

            For seasoning -

            1. Fresh coriander leaves – chopped, 2 tbsp
            2. Oil – 1/2 tsp
            3. Mustard – 1/4 tsp
            4. Asafoetida powder (hing) – a pinch
            5. Green chilli – 2, finely chopped

            To assemble

            1. Break the cauliflower head into small florets.
            2. Boil about 1 litre water in a saucepan, add about a tsp of salt to it, drop the florets in the boiling water, turn off the stove, steep for a couple of minutes in the water. Drain, rinse under clean cold water. Now use a steel grater and grate the cauliflower florets into a finer texture.the grated cauliflower - a closer look
            3. Grate the raw mango, and the carrot too.
            4. Toss all the grated veggies together, mix in the coconut, (if using) add salt and sugar and mix well without bruising the vegetables. Add in the chopped coriander too.

            tossed salad ingredients

            5. Heat the oil in a pan, add the mustard, allow to splutter, tip in the chilli and hing, and pour over the salad.

            6.Chill for half an hour before serving.

            chilled and portioned koshimbirCauliflower Koshimbir

            Jun 2, 2012

            Sweet Potato Halwa


            Sweet potato is a very healthy tuber and can be used in several dishes.I have found dishes made from this wonder tuber in several cuisines across the world. The many health benefits associated with sweet potato made me want to use it at my home too.To my delight, my old neighbour Renuka had a simple recipe using this vegetable.  I learnt this unbelievably simple-to-prepare-yet-very-tasty halwa from her.  After jazzing it up with some fragrant cardamom powder, no one could guess the base of the halwa. Do try it out for it’s ease of preparation and for the whole world of benefits this wonder tuber has to offer.

            What’s good about sweet potato?

            • Topping the list of benefits is the high Vitamin A content of sweet potato – 25 times more than that of carrots!
            • One serving  (200gm,= 1 cup) of sweet potato cooked, takes care of a quarter of fibre needed for a day, Staying away from refined, sweet foods and still getting a ‘healthy sweet dessert’ was never so easy and rewarding !
            • Sweet potato is a great source of Vitamins B and C too - Again 10 times more Vitamin B and C available than in carrots.  It scores high on minerals such as Magnesium, Manganese, Potassium and Calcium too. This unique combination makes it worthwhile to include the tuber in diets of teenagers (rapid growth), sports people (essential minerals). Good for people with high blood pressure too since it is naturally low in sodium.
            • The purple-flesh varieties are outstanding sources of anthocyanins, especially peonidins and cyanidins –very powerful natural anti –oxidants. This group of flavonoid compounds also help in maintaining strength of blood vessels and capillaries, reduces inflammation at the tissue levels and inhibits formation of LDL cholesterols.

            Interested in including sweet potato in your diet? Read on for a simple recipe…

            warm halwa


            You needSweet potato

            1. Sweet Potatoes – 750 gms
            2. Jaggery – 300- 400 gms, depending on your sweet tooth
            3. Fresh grated coconut – 100 gms ( desiccated coconut will do just fine too)
            4. Ghee – 1+1/2 tbsp.
            5. Fresh water – 1 cup
            6. Green cardamom powder – 1/2 tsp.

            To assemble

            Wash, peel and chop sweet potatoes into 1” squares, any even size will work.

            chunks of sweet potato

            Pressure cook the sweet potatoes with 1 cup water for 2 whistles. I used a pressure handi and pressure cooked, and stirred up the halwa in the same pot.

            pressure cooked

            Mash the cooked tubers into a coarse mush.

            Mushed up glory

            Pound the jaggery into small chunks (if you had a huge chunk to begin with). Measure out 300 gms with a kitchen scale or you could use 2 level cupful. Add it to the mushed up sweet potatoes, add 1/2 cup water if the mixture looks very dry, and stir up over medium heat. Once the mixture begins to bubble, add the ghee and blend it in too.

            Blend in jaggery and ghee

            Your halwa should be ready in 10 minutes of stirring over medium heat. Look for a glaze, sheen to the halwa to check it’s done-ness. Mix in the grated coconut, sprinkle green cardamom powder and you are ready to go! Serve warm, garnished with extra grated coconut if you wish.

            dressed halwa ready for hungry kids


            Plated and presented by - Raja