Showing posts with label high calcium. Show all posts

Sep 30, 2015

Chocolate Marbled Energy Bars

Breakfast is the most neglected meal of the day. On busy weekday mornings, most people are in a great rush to reach workplaces, schools, just about anywhere. No wonder then, that, people do not spare time for breakfast. Yet, starting a day without breakfast just works against what we set out to achieve. We are more likely to be zapped of energy and enthusiasm early into the workday. To help us perform better at our tasks, a healthy breakfast is vital. If so, would it not be wonderful if we could have breakfast on the go? Enter granola bars, energy bars, muesli bars. Call them by any name. They are just as convenient, delicious and perfect snacks or meal on the go.

Energy bars can be made ahead, store well, and can be packed as breakfast on the go, or anytime snacks, or on road trips, picnic munchies. They are great for a pre workout or a post workout snack too.

I came across these chocolate marbled energy bars first in ‘Chocolate’ by Delia Smith. The book is filled with decadent chocolate based recipes. However, these energy bars were the ones that caught my eyes first. I tweaked around the ingredients and proportions to suit my requirement. I have substituted the condensed milk with brown sugar/jaggery syrup. You could add both the condensed milk and jaggery syrup to increase the richness of the energy bar too. If using condensed milk, keep the total liquid at the same volume as mentioned in this recipes. I have added popped amaranth seeds to add a good protein to the bar. The only part I have left unchanged is the beautiful marbled chocolate topping! I had to work on the recipe a few times to get a proportion that works best. One that gave just the right hint of sweetness, and had just enough liquid to solid ratio to bake well. I also made sure that the baked energy bars could be cut into neat squares!

Healthy Chocolate marbled Energy Bars

I am sure you are eager to get to the recipe and make some for yourself too. So here goes…

ALLERGY INFORMATION

  • Has gluten from oats. NOT SUITABLE for people with gluten intolerance. Substitute oats with total 5 cups rice flakes to make it gluten free. 
  • This recipe does NOT contain lactose. Suitable for people with lactose intolerance. However, adding condensed milk will bring lactose into the recipe.
  • Does NOT contain corn, soya, eggs.
  • Contains nuts. Omit nuts if you have nut allergy.

Preparation Time – 20 minutes, Cooking Time – 30 minutes, Makes 9 squares

YOU NEED

COOKWARE – Convection oven, 8 inch square baking tray, baking paper to line tray, deep mixing bowl, rubber spatula, sauce pan, 2 glass bowls, steel fine mesh filter, sharp knife

INGREDIENTS

  1. 4 cups quick cooking oats
  2. 1 cup popped amaranth seeds
  3. 1 cup thin rice flakes (poha, aval, attukulu, avalakki)
  4. 1 cup deseeded, chopped sweet dates
  5. 1/2 cup dried cranberries/strawberries/blueberries (optional)
  6. 1/4 cup chopped walnuts/almonds
  7. 1 cup powdered jaggery/brown sugar
  8. 1/2 cup drinking water
  9. 1/2 cup dark cooking chocolate
  10. 1/2 cup white cooking chocolate

METHOD

  1. Bring the water to boil in a saucepan, add the jaggery, mix and let it rest for a few minutes for the jaggery to dissolve. When the jaggery has dissolved completely, strain through the mesh filter to remove impurities. Collect the jaggery solution in the deep mixing bowl.
  2. To the bowl add the oats, popped amaranth, rice flakes, dates, dried berries (if using), and nuts. Mix all the ingredients together until the liquid has coated all dry ingredients.
  3. Preheat oven to 180 C.
  4. Line the baking tray with paper leaving an overhang.
  5. Pat the mixture into the tray, pressing down firmly with a rubber spatula. Make sure there are no dry bits of ingredients on the surface. If needed, sprinkle a few drops of water on top to moisten, and pat down again.
  6. Bake in preheated oven for 20-23 minutes.
  7. Remove and cool the tray on a cooling rack. Do not remove granola from tray. Cool for 20-30 minutes.
  8. Chop the dark and white cooking chocolate into different glass bowls. Microwave in bursts of 20-30 seconds until just beginning to melt. Do not overheat the chocolate, stop heating when there a few bits of chocolate left to melt. Keep stirring with a metal spoon, to get a smooth melted chocolate.
  9. Spoon both the dark and white melted chocolate alternately in a wave pattern over the baked granola. Drag wavy lines using a fork tip or toothpick to create marbled patterns while chocolate is still wet. Tap the tray sharply on the counter top a few times for chocolate to even out.
  10. Place the tray in the fridge to set quickly.
  11. After half an hour, remove from fridge and set on counter top. Wait for the chocolate layer to warm up to room temperature a bit. I left it on the countertop for 10 minutes. Room temperature at my home is around 23C-25C. Cut into 9 squares with a sharp knife. If the chocolate layer seems to crack rather than cut up, wait for some more time and then cut up. The marbled energy bars are ready.
  12. Store in air-tight box. Stays good for at least 1 week, maybe more. I never got a chance to find out! Pack in baking paper for road trips or any place out of home. These marbled energy bars are great for breakfast on the go, for school snack boxes, for pre or post workout snacks, as well as a healthy snack option.

Guilt free healthy snacks

Notes -

  • Diabetics may/may not be able to eat these energy bars. Remember although the recipe uses jaggery, there is more sugar in the dates as well as chocolate. Omitting the chocolate could bring the sugar content of the energy bars lower.
  • The energy bars cut up neatly if baked through well. Also wait patiently for the top chocolate layer to set before cutting into squares.
  • Do not over heat the chocolate. Stop heating when three fourths of the chocolate is melted. Keep stirring in a circular motion, in the same direction for a smooth glossy chocolate.

Aug 28, 2015

Pineapple Pulissery

Happy Onam to all readers who celebrate. May there be good health, peace, joy, and plenty in all your homes. Enjoy the day with your loved ones and with an extensive Onam Sadya!
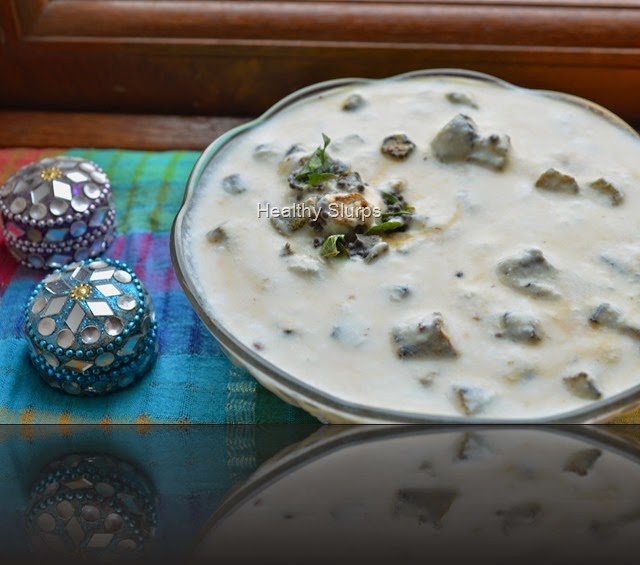
Here is an unusual recipe in time for the Onam Sadya. Pulissery or Moru Kuzhambu is a staple dish in a Malayalee menu. Usually made with vegetables boiled and then simmered in a spicy coconut and curd paste, this Pulissery uses pineapple as the ‘vegetable’. The fruit gives the dish a unique flavour and a welcome tartness. Whether you celebrate Onam or not, this Pulissery will lift your meal to a gourmet level. So go ahead, and cook it up at your homes too.

Pineapple Pulissery

ALLERGY INFORMATION

  • Does NOT contain gluten, soya, eggs.
  • Contains coconut. People with nut allergy usually tolerate coconut.
  • Contains yogurt/curd. Usually tolerated by people with lactose intolerance.

YOU NEED

COOKWARE – Small fry pan/tadka pan, mixer grinder, Pressure cooker.

INGREDIENTS

  1. 1 cup chopped pineapple
  2. 1 cup sour thick curd or 2 cups buttermilk
  3. 1/4 cup fresh grated coconut
  4. 1 tablespoon fenugreek seeds
  5. 4 red chillies
  6. 1 teaspoon salt
  7. 2 tablespoon powdered jaggery
  8. 1/2 teaspoon turmeric powder

For Tempering -

  1. 1 teaspoon coconut oil
  2. 1/2 teaspoon fenugreek seeds
  3. 1/2 teaspoon mustard seeds
  4. 1 red chilli
  5. 7-8 curry leaves, torn up

METHOD -

  1. Place chopped pineapple, salt, turmeric powder, and jaggery in pressure cooker, add half cup water and pressure cook for 3 whistles.
  2. Fry 1 tablespoon fenugreek seeds and 4 red chillies in 1/4 teaspoon coconut oil. Fry on medium flame until just fragrant. Grind this with fresh grated coconut to smooth paste using water/buttermilk/curd.
  3. Mix the ground paste, cooked pineapple, curd/buttermilk and stir over medium heat. Remove from flame as soon as the mixture begins to boil. Do not leave it unattended or over high flame.
  4. Add coconut oil to fry pan, add tempering ingredients to it, and pour sizzling hot over the moru kuzhambu/pulissery. Cover with a tight fitting lid and let the flavours develop.
  5. Serve with steamed rice and a thoran. Crispy papads are welcome too!

Pineapple moru kuzhambu Happy Onam!

Mar 16, 2015

Methi Muthia – Party Appetiser

Muthia, the traditional Gujarati snack, is served either steamed or deep fried. Muthias are a favourite among all. I wanted to glam it up further and make it healthier, if that were possible. Is it even? Why not? Improving the protein by adding Rajgira atta/Amaranth flour is one step. You can be sure of meeting your growing child’s protein needs by using Amaranth flour in dishes such as this. Removing the whole wheat flour makes it gluten free. Serving it with grilled vegetables on a satay stick makes it chic and fit to be a party appetiser. Grilling the vegetables and steaming the muthia keeps the oil used to a minimum, thus making it a super healthy food. This dish is also fit for eating during religious fasting, because amaranth flour is used instead of wheat flour.
 Muthia on a skewer

ALLERGY INFORMATION
  • Does NOT contain gluten, lactose, corn, soya, yeast eggs.
Preparation Time –15 minutes, Cooking Time – 15 minutes, Serves – 12-14 skewers

You need -

Ingredients -
For Muthias -
  1. 1 cup Amaranth (Rajgira /Ramdana) seeds / 1 cup Rajgira flour
  2. 1 cup Gram Flour (Besan)
  3. 2 packed cups Fenugreek leaves (Methi)
  4. 1 thumb size knob fresh ginger
  5. 3 green chillies
  6. Juice of 1 lemon
  7. 1-2 tablespoon thick curd
  8. 1 teaspoon salt
For Chutney –
  1. ½ cup Mint leaves (pudina)
  2. 2 green chillies
  3. Juice of half lemon
  4. ¼ teaspoon salt
  5. A pinch sugar
To Season –
  1. 2 tablespoons Fortune Rice Bran Oil 
  2. ½ teaspoon mustard seeds
  3. 2 tablespoons white sesame seeds
To Serve as Appetiser –
  1. 2 medium onions
  2. 2 each of yellow capsicums, red capsicums, green capsicums
  3. 2 tablespoon Fortune Rice Bran Oil
  4. 2 pinches salt
  5. 12-14 satay sticks/toothpicks
Method -
  1. Clean pudina leaves and grind all ingredients for chutney together in a small mixer grinder. Grind to smooth paste and set aside.
  2. Pick only methi leaves from the bunch, discard stems. Measure 2 packed cups. Rinse well, drain and chop fine.
  3. Peel ginger and make a coarse paste of ginger and green chillies.
  4. Grind the Rajgira seeds in a mixer to a coarse powder.
  5. In a mixing bowl, mix this powder along with besan, ginger-chilli paste, salt, chopped methi leaves and lemon juice. Add curd, 1 teaspoon at a time, mix well by hand into a stiff dough. Use only as much curd as is needed to make the dough.
  6. Shape into smooth cylindrical logs about2 inches thick. Grease a container that fits into your pressure cooker. Place the muthia cylinders in the greased container and steam inside the pressure cooker without whistle for 10-12 minutes. A knife inserted into the muthia should come clean. If sticky, steam for 2 more minutes. 
  7. While the muthia is steaming, preheat your grill to 240C.
  8. Peel onions and cut into quarters. Chop the coloured capsicums into big even sized chunks. Place on a greased plate, drizzle with Fortune Rice Bran oil, and sprinkle salt over the vegetables. Mix well by hand, spread in a single layer on the plate and grill for 10-13 minutes.
  9. Heat 2 tablespoons Fortune Rice Bran oil for seasoning.
  10. Crackle mustard seeds in the hot oil. Add the white sesame seeds, brown slightly and switch off. 
  11. Once the muthias have cooled slightly, cut into half inch thick slices. Pour half of the seasonings over the muthias and reserve the other half.
To Serve –
  1. Arrange different coloured capsicums, onion wedges and the muthia slices alternately on the satay stick.
  2. Drizzle the seasoning oil over the muthias again. Dot with pudina chutney or serve the satay sticks on a platter with a bowl of chutney as accompaniment.
Party Appetiser - Muthia with grilled vegetables
A word about the oil used in this recipe. Fortune Rice Bran Health Oil is made from Rice bran. Rice bran is the outer covering of the rice grain. So this oil is not made from rice. By virtue of this, Fortune Rice Bran Health Oil is perfectly suitable for using during religious fasting also.
While making the muthias, I observed that the oil has a high smoke point(260 C). This makes it a stable cooking oil and does not make food greasy.
This blog post is in association with Fortune Foods as a part of their Desi Health Bites activity – The Hunt for the Best Rice Bran Oil Recipes. For more updates and healthy recipes using Fortune Rice Bran Health Oil, follow Fortune Foods at www.fortunefoods.com , on Facebook at www.facebook.com/FortuneFoods and on Twitter at @fortunefoods (https://twitter.com/FortuneFoods)

 Colourful array     


Feb 10, 2015

Nellikkai Thair Pachadi / Amla Raita

Do you know that Amla or the Indian Gooseberry has the highest Vitamin C content among all vegetables and fruits? That it has mention in ancient Sanskrit texts, is used extensively in Ayurvedic medicine, and is considered a miracle fruit. Amla can be used to treat eye disorders, increase calcium absorption in the bones, help build strong bones, cure skin ailments, strengthen and nourish hair, promote hair growth, actually just about do anything healthy and nourishing for our bodies.

The Indian Gooseberry (Amla) also has known anti oxidant properties. Amla has been found to offer a full range of benefits from free radical scavenging, anti inflammatory properties, beneficial effect on diabetes.   It is also widely used for its ability to dissolve plaques in arteries, reducing serum cholesterol levels.

Studies have also shown that even preserving in brine or pickling does not reduce the availability of vitamins, especially Vitamin C. Readers may be aware that vitamins B and C are easily destroyed when food is exposed to sunlight or heat, or excess water during cooking. So excessively cooked foods or preserved foods lose their vitamin content over time. Not so with Amla. This miracle fruit continues to dole out its health benefits even when cooked or preserved.

Despite having such a wonder fruit growing in our midst, I feel people in India do not make full use of it. We are in search of that elusive magic potion sourced from deep in the Amazon forests or some wonder drug that is shipped from a Scandinavian country. While those drugs/potions/foods may be good in them selves, I ask myself and everyone reading this – Is it wise to ignore the wealth in your backyard and seek something from far away? Are the money, effort, rising fuel costs, justified?

I, for one, am going to include more of this wonder fruit ‘Amla’ in my family’s meals. I am sure all of you have recipes from different cuisines with Amla as the main ingredient. Do share your favourite recipes with Amla in the comment section below.

Here is one simple, really quick, tongue tickling recipe with Amla. Perks up any meal and loads you up with its nutrients. Go on. Try it out.

Luminous Amla

ALLERGY INFORMATION

  • Does NOT contain gluten, lactose, nuts, corn, soya.
  • Suitable for people with gluten or lactose intolerance, or nut allergy.

Preparation Time – 10 minutes, Cooking Time – 5 minutes, Serves – 4-6

You Need -

Cookware – Small wok, Mixer grinder

Ingredients -

  1. 4-5 Amla fruits
  2. 2 tbsp fresh grated coconut
  3. 3-4 green chillies
  4. 1/2 cup skim milk curd
  5. 1/4 tsp salt

For Seasoning -

  1. 1/4 tsp oil
  2. a pinch mustard seeds
  3. a pinch fenugreek seeds
  4. a pinch asafoetida
  5. 3 curry leaves
  6. 1/2 red chilli (optional)

Method -

  1. Rinse the Amla well. Cut incisions along the segments. Pull out the flesh and discard the seeds.
  2. Grind along with coconut, green chilli, and part of the curd to make a paste. Grind more than a coarse paste but stop short of a fine paste.  Add the rest of the measured curd and whip along with the paste.
  3. Heat oil in a small wok/kadai/fry pan.
  4. Add ingredients for seasoning in order. When mustard crackles, pour in the ground mixture, and add salt. Simmer until the liquid foams up.  Do not boil this mixture. Keep stirring over medium heat for it to cook lightly.
  5. Remove to serving bowl and enjoy with hot phulkas,  or steamed rice, a dal and some stir fried vegetables.

Quick Amla Raita


Nov 25, 2014

Cabbage and Carrot Thoran

Cabbage does grow all year round, but acquires its best flavours only in winter. Since cabbage is quite sweet and less pungent in these months, it is easy to include it in several dishes. I often make a cabbage soup in this chilly weather too. It actually tastes much better than we would imagine. None of the bitter, sulphurous, menacing notes to it – just some crisp sweetness and heart warming honesty. Well about the soup, later. About cabbage first.

Cabbage has most of the vitamins and minerals we need daily. It has a high content of vitamin B and C. Besides, it is also high in fibre, potassium as well as low in sodium. It is also a fair source of Omega 6 fatty acids. These point to it being an excellent vegetable for people with high blood pressure, or are pregnant, or suffering from constipation too. Cabbage has small amounts of an ‘anti nutrient’ called as ‘protease inhibitor’. This prevents proteins from being digested well in the body. Hence it is better to cook cabbage lightly and then eat. Cooking deactivates the inhibitors and improves digestion of the vegetable and the entire meal.

Stir frying cabbage is the best way to cook it. The vegetable is stripped of its anti nutrients through minimal cooking, yet, the vitamins lost by heating are reduced too. Adding carrots to this recipe is optional. I’ve just added them for extra colour.

Select cabbage that has a compact oblong head vs a flat-ish round shape. Also, if a smaller cabbage weighs more than a larger one, then you can be sure the smaller dense cabbage will taste better.


Cabbage Thoran


Now I’ll walk you through one traditional Kerala recipe. It is as simple as it gets. Thinly shredded cabbage is tossed in a seasoning of oil, mustard and curry leaves. It is salted, stir fried and finished off with fragrant coconut and green chillies. A worthy accompaniment to tangy spicy sambar or kadhi/ moar kuzhambu and steamed rice. Can be tweaked a little to work as side dish to bhakri or phulkas too.


Dal and Cabbage stir fry vying for attention

ALLERGY INFORMATION

  • Does not contain egg, gluten, soya, corn, nuts, lactose or dairy.
  • Suitable for people with lactose intolerance or gluten sensitivity, or nut allergy.

Preparation Time – 15 minutes, Cooking Time – 15 minutes, Serves – 4.

You Need

Cookware – Knife, Cutting Board, Wok/Fry pan of about 4 litre capacity, metal spatula, mixer grinder,

Ingredients

  1. 1 whole cabbage weighing 800-1000gms
  2. 1/4 kg Orange/Red Carrots (optional)
  3. 2 tsp cooking oil
  4. 1 tsp salt
  5. 1/2 tsp mustard seeds
  6. 1/2 tsp urad dal
  7. 10-12 curry leaves torn up
  8. 1/4 cup grated fresh coconut
  9. 2-4 green chillies depending on heat preference
  10. 1/4 tsp cumin seeds
  11. 1-2 cloves garlic(optional)

To Assemble

  1. Remove outer bruised leaves of cabbage, if any, and shred/chop finely.
  2. Peel carrots and grate on the large hole of grater.
  3. Heat up oil in a wok. Season oil with mustard seeds and urad dal. Add curry leaves when the mustard crackles, and tip in the chopped vegetables.
  4. Stir fry over high heat for a couple of minutes. Sprinkle a few tablespoons of water, cover and let cook for 3-4 minutes. Open lid and mix well a couple of times in between for uniform cooking.
  5. Meanwhile, whizz the grated coconut with chillies, cumin, and garlic (if using) in a mixer to a coarse mixture. Do not add any water while grinding this.
  6. After 3-4 minutes, when the cabbage feels cooked through, yet retaining some crispness, add salt and then add the coconut mixture and fold through the stir fry well. Keep stirring over high heat, especially if using garlic, to eliminate raw odour. Remove from flame. Cover and let flavours mingle for 5-10 minutes.
  7. Serve warm with steamed rice, and tomato dal, or sambar, or kadhi. I served it with a ‘Basella greens’ and tomato dal and steamed rice.

The red chilli in the dal does not taste as sinister as it looks!

A complete meal

Nov 17, 2014

Roasted Brinjal Raita / Eggplant Raita / Roasted Eggplant Dip

The best meals are often the simplest ones. Those which can be rustled up with really few ingredients, in minimum time, and deliver high on nutrition, as well as satisfaction. Quick cooking=happy eating=content tummies.

This raita is one such recipe. Besides, the dish is versatile in that it can be used in many ways. The day I made it at home, we used it as raita, dip, as well as a substitute for mayo in sandwiches! So does it taste like baba ghanoush? Well, not quite. Tzatziki? well, maybe. Punjabi Baingan Bharta? mmm, not that either.

Why don’t we  just delve in and find out? Shall we?

Chilled bowl of smoky raita

The secret to an amazing brinjal raita lies in how it is smoked. While purists will tell you to rub some oil on the skin and roast on all sides over an open flame patiently turning it over and watching lest it char beyond recognition, i am going to let you in on a secret!

Just rinse the brinjal, wipe dry, slit into four long pieces, place in a microwave safe glass bowl and cook on the highest power for 6-7 minutes. Now take each piece and roast them individually over an open flame for just a minute per piece.  Dunk them in a bowl of cold water, peel the charred skin and reserve the pulp. This whole process takes less than 15 minutes. This gives the right amount of smokiness to the pulp without being overpowering. It also frees you up to attend to the rest of the meal while it cooks in the microwave. No need to tend to it constantly. Plus a total reduction in cooking time.

Now that I have simplified it for you, go ahead and make yourself some fragrant raita/dip/sandwich filling/meal by itself.

Come and eat me!

ALLERGY INFORMATION

  • Does NOT contain gluten, nuts, corn, soya, eggs.
  • Has dairy in the form of skim milk curd (yoghurt). Usually tolerated by people with lactose intolerance.

Preparation Time – 15 minutes, Cooking time – 15 minutes, Serves – 4

You Need

Cookware – Knife, Cutting Board, Small Sauce pan / Tadka pan,  Bowl of 1 litre capacity.

Ingredients

  1. 1 Big Violet Brinjal/Eggplant weighing approximately 500gms
  2. 1 cup Fresh curd
  3. 1/2 tsp salt
  4. A pinch sugar
  5. 1/4 tsp mustard seeds
  6. 1 small green chilli
  7. 1/4 tsp cooking oil
  8. a pinch of asafoetida powder
  9. a few curry leaves and coriander leaves for garnish – optional

To Assemble

  1. Prepare the brinjal/ aubergine/eggplant as described earlier. To repeat – wash, wipe dry, slit along length of brinjal into 3 pieces. cook for 6-7 minutes in microwave safe glass bowl at highest power. You may add 2-3 tbsp water to the bowl to help cook without shrinking. I find this method works best for me.
  2. After this, place each piece individually over an open small flame and char the skin. Dunk all of them into a bowl of cold water. When cool enough to handle, peel the skin off and reserve the pulp.
  3. Mash the pulp with potato masher/fork.
  4. Whip curd with sugar and salt. Add the mashed brinjal, and stir in well to combine. Raita just needs seasoning now.
  5. Prepare the seasoning by heating oil in a small sauce pan/tadka pan. Add mustard seeds, when they crackle, add slit green chilli, asafoetida powder. Switch off flame. Pour over the raita. Add the curry leaves and coriander leaves, if using, stir in and let it rest for few minutes.

Your delicious fragrant raita is ready! Serve with hot phulkas, paratha, bisi bele bhath, biryani, filling for sandwich, dip for crudites, wraps. Don’t want to make anything else? Just have it chilled. A bowlful. As it is.

Get me a bowl of this,quick!

Notes -

  • This method of cooking first and smoking next allows for a good desirable smokiness. Even agnostics of smoky flavours will find it appealing.
  • Do not omit the seasoning. It is crucial in bringing all the flavours together.
  • Some chilling will really help in elevating this simple creation. However, if you are in a hurry, don’t worry. Just dig in.

Oct 21, 2014

Ragi Chocolate Laddu

Deepawali, the festival of lights, eagerly anticipated and celebrated throughout India, is here. There is so much excitement, happiness, festivities in the air. It is also fun to run around shopping for new clothes, gifts, fire crackers.

As with most festivals, the stories behind celebrating this festival too are several. Sri Krishna killed Narakasura on this Chaturdashi day. Lord Rama returned to Ayodhya after His exile after killing Ravana and freeing Sita from his evil clutch.

Whatever be the legend, the common theme is the victory of good over evil. The assurance from Divinity that evil, cruelty, jealousy and hatred do not last long. That truth, goodness and virtuous living always triumphs. A very heartening reminder in a world where the opposite seems to be true. An assurance for those who believe. A great reason to celebrate. To meet up with family, close or extended. To renew friendships, to form new ones, to look forward with hope.

So here is wishing you happiness, good health, joy in your lives!

In continuation with my efforts at finding and documenting healthy recipes, I am very happy to share with you this new attempt of mine. The nutty aroma of roasted ragi combined with seductive cocoa, taken a notch festive with fragrant ghee all come together delightfully in this healthy dessert.

Rich, fragrant Ragi Laddus

Millets are quite the rage in the diet of every health conscious person and rightly so. They are packed with several nutrients, richer in calcium, fibre and other vitamins than grains like rice or wheat. Ragi, or Finger Millet forms the staple grain of a large part of rural India. Here is my shot at making a festive dish with this humble grain. A successful undertaking, even if I say so myself. This Diwali, when you dig into this dark, mysterious confection, you can feel a tad less guilty at indulging knowing that there is this super healthy millet at its base.

Dark, handsome laddus ready!

ALLERGY INFORMATION

  • Does NOT contain gluten, lactose, egg, soya, peanuts, any nuts.
  • Suitable for people with gluten sensitivity, lactose intolerance, nut allergy.

EDITED – A reader expressed concern about using butter or ghee in this recipe for lactose intolerance. Usually ghee is digested even by people with lactose intolerance, since it is ‘fully clarified butter’, but if you are intolerant to ghee as well, do use margarine warmed in the same proportions. I have not used margarine myself, and am only suggesting it as an alternative.

Preparation time – 30 minutes, Cooking time – 5 minutes, Makes – 12 laddus

YOU NEED

Cookware – Thick bottomed fry pan, Mixer grinder, Metal spatula, Small Saucepan.

Ingredients

  1. 1 heaped cup Ragi flour (I used store bought)
  2. 1 scant cup powdered sugar
  3. 1/4 cup cocoa powder (I used Hersheys)
  4. 1/2 tsp Vanilla essence
  5. 1/4 cup ghee (Can use melted butter too)

Method

  1. Set a thick bottomed fry pan/ skillet on fire. Dry roast the ragi flour on medium heat stirring briskly all the time. This step removes the raw flavour of the flour and gives it a good nutty tone. 2-3 minutes later, you should sense a change in aroma. The flour is then ready.
  2. Switch off flame, add in cocoa powder, mix well with ladle. Also add the powdered sugar,  and vanilla essence, and mix in thoroughly. You could use a wire whisk to mix well too.
  3. Heat up the ghee over a low flame in a different small sauce pan. If using butter, heat a similar quantity of butter for such time until you find the butter slowly changing hue to a pale gold.
  4. Drizzle this hot ghee over the ragi-sugar mixture. Mix again with ladle, and when it is of bearable heat, grab a fistful and compress using fingers to a round ball shape. The laddu can be set aside to rest when it keeps its shape. It will harden on cooling. Finish off making laddus with the rest of the mixture. Halfway through, if you find the mixture cooling and the laddu does not shape well, then warm the flour mixture gently again to help shaping the laddus.
  5. Your delicious, laddu redolent of cocoa with a hint of vanilla is ready!

DSC_3959Happy Deepawali

          HAPPY DEEPAWALI EVERYBODY. STAY HEALTHY, BE HAPPY!

Sep 15, 2014

The Quickest Kathi Roll

The original Kathi roll is a street food from Kolkata. This legendary dish has taken on many avatars since and has evolved into a versatile snack popular all over India. Kathi rolls are a great way to jazz up boring meals. The best part is there are no rules. While street food dishes out less healthier options, (read fat drenched, artery clogging, refined flour) we need not fret at all. We can easily make these at our homes using much healthier alternatives too.

Home made kathi rolls on a platter

To begin with, I always use organic whole wheat flour for the rotis. I normally have a stock of home made skim milk paneer in the freezer as well. This 5 minute 3 pepper paneer curry is my go-to recipe when hard pressed for time. Throw in a few salad vegetables and some fresh lettuce, and a wholesome meal / snack / appetiser is ready. Cremica’s Korma Sandwich Mayo came in handy this time around. This was part of our goodie bags at the IFBM.

Now, I am no friend to convenience foods or ready to eat products. While I am all for economic growth, feeding on chemicals which get added to foods to increase shelf life or flavour or taste, is really not up my alley. In this recipe, I have used the Cremica sandwich spread. It is definitely handy and does zing up the roll. However, you can choose to omit or replace with a different home made spread too.

You could hop over to these blogs to view their favourite kathi roll recipes as well.

Vegetable Platter’s Alu Gobhi wrap here, and Hamaree Rasoi’s Paneer Kathi Rolls here.

Here is how I assembled my kathi roll last week. Helped to satiate the hunger pangs of the teen and the tween. Ticked all boxes - flavour, crunch, health, easy assembling . Need I say more?

Kathi Rolls with elegant companions

Allergy Information

  • Contains wheat and dairy.
  • NOT suitable for gluten intolerant or lactose intolerant people.
  • Can be made dairy free by substituting paneer with tofu.
  • Does NOT contain egg, corn, soya or nuts.

Preparation Time – 20 minutes, Cooking Time – 30 minutes, Serves – 3-4.

You Need

Skillet, Rolling Pin, Shallow steel mixing bowl, Plates to assemble

Ingredients

  1. 2 cups Whole wheat flour + extra for dusting
  2. 1/2 tsp Salt 
  3. 3/4 cup Water (more or less depending on flour)
  4. 1 tsp Oil
  5. 1 recipe 5 minute 3 Pepper Paneer Curry
  6. 10-15 leaves of leafy lettuce or Romaine Lettuce
  7. 1 medium cucumber, peeled and thinly sliced into semi circles
  8. About 6 tsp of Mrs. Bector’s Cremica Korma Sandwich Mayo

Method

  1. Take a shallow steel mixing bowl. Place the flour and salt in the bowl. Mix the salt and whole wheat flour with finger tips. Drizzle water slowly and knead into a smooth dough. You may need more or less water depending on type of flour. I used 24 Mantra Organic whole wheat flour. Once dough is smooth, gather into a ball. Press the top of the ball with thumb. The dough should spring back. If not, knead again for a minute or more and check again. Grease the dough all around with 1/2 tsp oil, cover and leave to rest in a cool place for half an hour.
  2. Pinch or cut out equal portions of the dough. 2 cups of flour can make 8-10 balls depending on the size you cut.
  3. Roll out each ball into thin flat round.
  4. Heat a flat iron griddle / skillet. Place the roti on the skillet. Turn around when brown spots appear on one side. Cook both sides of roti well taking care to adjust flame and not burn, smear with a few drops of oil if you wish. Remove to a platter. Repeat with all the balls of dough. Set the rotis aside.
  5. Rinse the lettuce well and drop in chilled ice water.
  6. Follow the recipe for the 5 minute 3 pepper paneer curry. Set aside.
  7. Peel the cucumber, remove the seeds if any and slice into thin semi circles.
  8. Assemble the kathi roll just before eating.
  9. Smear the sandwich mayo around the roll leaving a cm around the sides free.
  10. Place the paneer curry, cucumber slices as shown in picture.Just wrap up and chomp away
  11. Drain the lettuce, shake well, tear up and add them along to the roti too.
  12. Wrap the roti inward from both sides, secure with toothpick if needed, and enjoy!

While the individual components of this roll can be made ahead, the roll is best assembled just before consuming. It does get soggy in half an hour. So it may not work well in a packed school lunch box. It does make a great after school snack. You could also prepare and pack the different components of the rolls separately and assemble at a picnic.

Dear friends, How do you like your rolls / wrap / frankie / meals on the go? Would you make it any other way? I would love to hear from all. Please do write in at my facebook page here or in the comments section below.

Till next time, eat healthy, stay happy.

Jul 19, 2014

My Bircher Muesli


We first sampled Bircher Muesli a couple of years ago at  Hong Kong Sky City, Marriott. Vacationing at Hong Kong, we were tucking into the amazing breakfast spread (which is a lot to say for vegetarians.)  My interest was sparked at the sight of very cute jars of muesli sitting on a bed of crushed ice. I enjoy hot muesli by pouring steaming skim milk over muesli, but this? On crushed ice? After confirming with the wait staff that it had all vegetarian ingredients (you never know, after all, even congee there has bacon in it) we tentatively sampled one jar, and boy, fell in love with it. My son declared, “Mom, we have been wasting life by not having this wonderful breakfast dish”.

I researched into it’s origin, and discovered that Bircher muesli was first developed by a Swiss doctor, Dr. Bircher – Brenner. First used for patients, the recipe has become hugely popular in Switzerland and Germany. It is traditionally made by soaking rolled oats in yoghurt/curd along with grated apple, apple juice and left overnight in the fridge. The next morning, it is enjoyed for breakfast along with choice of toppings such as roasted nuts, or more fresh fruit. With it’s easy make-ahead prep, versatile choice of toppings, and deliciousness in every spoonful, it’s not difficult to love Bircher Muesli.

But wait, what’s a recipe without customisation? I am a big fan of eating local, buying seasonal. So the muesli had to be localised and include seasonal fruit too. The apple had to give way to mango, the fruit of the season.The Bircher muesli became muesli parfait. Another ingredient, popped amaranth just begged to go in too. Some easily available dry fruits and nuts completed the meal-in-a-jar. Local ingredients, global flavours! Good morning muesli

So I set about soaking oats in skim milk yoghurt. I also soaked some pitted dates and raisins in honey in a separate bowl and left them to rest in the fridge overnight. The next morning, I chopped up some mangoes, toasted a few almonds and walnuts. Now I was ready to assemble. The layering of the ‘breakfast-parfait’ began with a few spoons of the soaked oats. On this, I piled some chopped mangoes, then came the turn of another star ingredient, popped amaranth. A few drizzles of honey and then the turn of the oats again. The soaked dates+raisins went in next followed by some more chopped mangoes and popped amaranth. The parfait was finished off with nuts and another drizzle of honey. There, so simple. It took 5 minutes to assemble two servings. A most delicious, filling, uber healthy breakfast ready. Needless to say it was demolished as quickly as it was assembled.

While you can play around with ingredients and serving size, I am giving the ingredients and measures I followed. Feel free to play around the main theme and come up with a combination that your family loves.

Preparation time –15 minutes+8 hours soaking time, Cooking Time –3 minutes, Serves – 2

Allergy Information

  • Does NOT contain egg, soya, peanuts, corn, milk.
  • Contains yoghurt, some gluten from oats.

You Need

Cookware –2 mixing bowls, chopping board, knife, small saucepan,300-400 ml jars to assemble the meal.

Ingredients

  1. Quick cooking oats – 4 tbsp
  2. Skim milk yoghurt – 400 ml ( 2 cups)
  3. Skinned and chopped mango – 1/2 cup
  4. Popped amaranth – 3-4 tbsp
  5. Dates – 6-8
  6. Golden raisins – 12
  7. Almonds – 6
  8. Walnuts – 2
  9. Honey – 2 tbsp+2 tsp

To Assemble

  1. Mix the measured oats into the yoghurt, stir in well, cover and rest in refrigerator overnight. Also place the pitted dates and raisins with 2 tbsp honey in a small bowl, cover and store in refrigerator.
  2. I popped the amaranth at home from amaranth seeds. To pop, you add amaranth seeds to a super hot wok, a tsp at a time, stir gently and watch them seeds merrily popping and dancing in front of your eyes! You could use store bought popped amaranth or omit it entirely too. Or attempt popping at home if you get hold of amaranth seeds.
  3. Chop the mangoes and almonds, keep aside.
  4. Take the serving bowls, or jar or tall glass to assemble the parfait. Rinse well and wipe dry.
  5. Layer the soaked oats at the bottom, 2 tsp should suffice. Place the chopped fruit on the oats. Next, add the popped amaranth, about 1 tbsp would do. Place the soaked and plump dates+raisins mixture over this and cover again with a couple of tsp of soaked oats. A drizzle of honey, then fruit, popped amaranth and finally topped with toasted nuts follow. Finish off with a good drizzle of honey.
  6. Enjoy for breakfast, or assemble in ajar with screw top lid, and carry to work. Ideal for mid-morning or 4 p.m. hunger pangs.

Meal in a jar


Bircher Muesli Parfait

Jun 21, 2014

Five minute Three Pepper Paneer Curry

Check-out Allergy Information.

Every parent with school-going kids has to face the morning or the night before with a very important question – what to pack in the school lunch box? What’s there in my pantry? Also, when you have to feed more than one kid, the agony is doubled, believe me!

If my older one wants muesli for breakfast, the younger one fancies ‘Chocos’. The day the older one thinks of a sandwich for lunch, the younger one would like rice. If one feels like some thing sweet, the other wants a savoury treat right then! The Universe connives with my kids such that, they have exactly opposite moods at any time. At such times, nothing helps - not requests to adjust with each other, not promises to make it tomorrow, not threats, nothing! Trust me.

And, I have an hour to make breakfast for them, make acceptable (read different gourmet meals) lunches, pack them, fill their water bottles, make sure they have brushed, showered, prayed (yes, that is important in my home), combed, attired in mandatory school regalia!, find random books/papers/assignments/stationery that they have forgotten to stuff into their school bags, find their socks, salvage their shoes from the chasm between the shoe racks and the wall, and make sure they reach the school bus on time!

I know I am not alone. Most mothers/parents in my city and maybe, the world over, go through some variation of this vertigo-inducing routine in the morning! Well, after going through this rigmarole for more than 15 years, I have a few tricks up my sleeve. Some recipes which help me assemble quick, hearty, nourishing home-made lunches for my children.

This paneer curry is one such easy-peasy life saver on such insanity-causing weekday mornings!

If you have paneer ready, that is.

And coloured capsicum (bell peppers), and a couple of sauces.

It is versatile, easy to put together, can be used to partner with chapatis, filled into a sandwich, rolled into a kathi roll, or add pizzazz to some fried rice. Most important, when packed in a lunch box, it will come back home empty. Hopefully your child got to eat some of it Smile

Preparation Time – 10 minutes; Cooking time – 5 minutes; Serves – 4-5.

ALLERGY INFORMATION

  • Does NOT contain egg, nuts, corn.
  • Has dairy and lactose. Can be made dairy- and lactose-free by substituting paneer with extra-firm tofu.
  • Has MSG. Not suitable for children below 2 years.

The 3 pepper paneer sandwich

You Need

Cookware – Cutting Board, Knife, Colander, 9” Diameter frying pan / Wok.

Ingredients

  1. Paneer (Or extra firm tofu) – 200 gm
  2. Green, red and yellow capsicum, chopped – 1/3 cup each
  3. Red Onion – 1 big, or measure 1 cup, finely diced
  4. Fresh coriander leaves (Cilantro), chopped fine – 1/4 cup
  5. Schezwan Sauce (any brand) -  2 tsp
  6. Tomato Ketchup – 3-4 tbsp
  7. Salt – a couple of pinches ( if needed)
  8. Any vegetable oil – 2 tsp
  9. Saunf ( fennel seeds) – 1 tbsp*
  10. Honey – 1 tsp OR Sugar – 2 pinches (Optional)

*Do not omit the saunf in this recipe. It adds a unique flavour to the dish.

To Assemble

  1. Rinse paneer or tofu in drinking water. Carefully place it in colander to drain. Then, you can choose to either dice the paneer (or Tofu) or roughly crumble it. I prefer to dice, as then, the diced vegetables and the paneer all look similarly proportioned.
  2. Rinse, and finely dice all the capsicum into the same size. Peel, rinse and finely dice the onion too. Happy day with happy veggies
  3. Set frying pan/wok on fire and heat the oil in it. Add saunf, let it sizzle and release its’ aroma. Inhale - the aroma of saunf
  4. Tip in the onion before the saunf browns. Sauté for a minute. Add a pinch of salt to speed things up.
  5. As soon as the onion looks pink,  tip in the diced capsicum, toss. Sauté for another two minutes.Veggies in a merry sizzle
  6. Now the sauces can go in. The sight of these liquids hitting the hot pan and then the aroma around – I’ll leave you to savour in your kitchen!
  7. A quick mix of the sauces and veggies, and now it is the turn of diced paneer followed by chopped coriander to hit the pan. Switch off flame, mix all contents well, taste and add more salt now if needed. Some paneer will get crumbled while mixing, that is fine. Add the (sugar /honey if you are using), now. Mix through, taste again to make sure the flavours satisfy your palate.*Tri-colour glory
  8. The 5 minute 3 pepper paneer curry is now ready. Use it as filling in whole wheat chapatis – spread 2 tbsp of curry per chapati, roll up, cover in foil and pack for lunch. Or, use as filling for sandwiches. it is a great accompaniment to Chinese fried rice too. Sandwiches in the making

* My family found the play of texture and flavour in this recipe to be very appealing! You could add more or less of the sauces, or add more seasonings as you prefer. Add red chilli paste instead of Shezwan sauce, omit the sugar, try the dish with any one type of capsicum – all these are variations you could try.

Pick-me-up Sandwiches for anytime of the day

We are enjoying these filling, healthy and absolutely lip-smacking sandwiches at our home, in our lunch boxes and as after-school snacks too! Go ahead, make some for yourself, enjoy and let me know if you liked them.

Apr 14, 2014

Vendakkai Thair Pachadi / Crispy Okra in Chilled Yoghurt


A very Happy New Year to all who celebrate today. Happy Vishu to all Malayalees across the world! All family members taking time off from busy lives, praying and eating together, tables rich with culinary treats– these surely are some special features of festivals. Celebrations always involve good food. Contrary to popular thought, festive food need not all be time consuming to prepare, nor be calorie-rich.

Today, I would like to share a lip-smacking, simple recipe which you can use to grace the table at any festive menu. This recipe has distinct south Indian flavours, so you can tweak the seasonings to accommodate the demands of your palate or cuisine. (Read notes)

Happy New Year to all

The key point here is how the vendakkai / lady’s finger / bhindi / okra is cooked - crispy ‘fried’ okra is first readied by slicing it thin, drizzling with a quarter tsp cooking oil and grilling it for 10 minutes. This then is lovingly folded into a bowlful of thick skim milk yoghurt, seasoned with salt.The dish is finished off with a fragrant tadka of mustard seeds, curry leaves and pinch of hing in some oil. The grilling ensures that you save fuel, oil and time. The crisp texture encourages even die-hard okra haters to try it out. The chilled yoghurt is just so perfect for this blazing summer season. While this recipe is an accompaniment, you will soon find yourself eating a chilled bowlful on its own. Here is what you need -

You Need

  1. Okra / Lady’s finger / Bhindi / Vendakkai – 200 gm
  2. Skim milk yoghurt – 500 ml
  3. Salt – 1/4 tsp
  4. Sugar – a pinch
  5. Cooking Oil – 1/4 tsp

For seasoning

  1. Cooking oil – 1/4 tsp
  2. Mustard seeds – 1/4 tsp
  3. Curry leaves – 3
  4. Asafoetida Powder (Hing) – a pinch

To Assemble

  1. Wash the vendakkai by immersing in a bowl of water, drain on colander and spread out to dry on a kitchen towel. Snip off the tops and tails, and slice into even thin disks.
  2. Preheat the grill to 250 C.
  3. Place in a single layer on a baking tray. Drizzle 1/4 tsp oil over the disks, and spread in a single layer.
  4. Once the grill is ready, place the tray of vegetables inside, and grill for 10 minutes. Toss and scrape the contents at half time to ensure even browning. By the end of 10 minutes, the Vendakkai would have shrunk to half – size pieces, and would have browned evenly without being charred. You may need to watch the grill in the last minute to ensure correct browning without charring.
  5. Let it cool in the tray. Meanwhile, whip up the skim milk yoghurt with salt and sugar.
  6. Prepare the seasoning by heating oil in a small pan, adding all the ingredients for seasoning in order. Pour over the whipped yoghurt.
  7. Gently fold in the cooled Vendakkai into the yoghurt, chill for half an hour before serving.
  8. Serve with steamed rice, sambar, papads.

Bowl of chilled pachadi flecked with crisp okra

Notes

  • Avoid mixing the grilled vegetable too vigorously into the yoghurt, it will darken the colour of yoghurt.
  • You can experiment with flavours by adding roasted jeera powder, coriander leaves instead of hing and curry leaves.
  • Can be used as a dip for crudites or rolls too by seasoning with a tbsp of chopped, fried onion, a pinch of red chilli powder and a tsp of chopped fresh parsley instead of above seasonings.
  • Grilling the vegetables as opposed to deep frying them helps to cut down on cooking oil used.

Enjoy the cool pachadi!