Showing posts with label anaemia. Show all posts

Apr 16, 2015

Jowar dosai

Why millets? Why so much brouhaha over these pseudo cereals? Why is it important in a modern urban diet? Are they good at all? Who should eat millets? Who should not? These and many more facts set out for you here. Read on to know more.

Millets are not cereal grains, so they are called pseudo grains. Millets are smaller grains. They belong to five (or more) different botanical families, but are classified under one name as millets. Millets are grown for bird, animal and human consumption. Factors that go in favour of their cultivation are that they have a short growing season, grow in semi arid regions, (they need very little water) need very little attention. Different countries across the world have been growing and consuming millets for thousands of years. Unfortunately, urban diets have not included millets for about 50 years now.

So what is the good and bad about eating millets? Here, I split it up into its constituents and make it simple for all to understand.

The Carbohydrates -  Millets have complex starches in form of amylose and amylopectin. Such a starch can only be digested in cooked form by humans. Since they not easily digestible, they have a low glycemic index. That means they release their sugars into the blood stream in a slow steady fashion. Much like how a sustained release medicine works. There are no highs and lows in blood sugar when you are eating such starches. And yes, you guessed it right: this is great news for diabetics and pretty much everybody else.

The Proteins – After carbohydrates, proteins form the major part of millets. Egg and human milk are considered perfect proteins because they have the best combination of amino acids that the human body needs. When compared to these proteins, most millets are found to have insufficient amino acids to provide all nutrients for infants and growing children. Millets have been found to be deficient mainly in lysine, an essential amino acid. What are amino acids?

Amino acids are the building blocks of proteins. There are 21 amino acids that form all the proteins ever known. Several of these amino acids are made in the human body. These are called non-essential amino acids because the body can make it on its own. Some of these are called essential amino acids. Why are they called so? Because they are necessary for growth and cell repair but cannot be synthesised in the human body. So they have to come from the food we eat. Lysine is one of these essential amino acids.

Does this mean that millets are not good enough for weaning food? Or to feed growing children? No. Millets are very good for children, when cooked well and when paired with a legume such as mung bean or tuvar dal. Legumes are naturally rich in lysine and by combining them in the same meal ensures that the meal gives complete protein for the growing body. Besides, millets are gluten free as well. So they are a safe bet for all, children, older people or those with gluten allergy.

Look forward to more information and recipes with millets in my forthcoming posts.

Meanwhile, here is a recipe for Jowar Dosai. This recipe is good for beginners who are not sure about how to begin including millets. Millets are great for people who need a gluten–free diet as well. Besides, here, the ground batter is fermented which increases the food’s digestibility as well as increasing the availability of several vitamins and minerals from the grains.

The initial trouble of soaking, grinding and fermenting is well worth the effort. The batter keeps well in the fridge for up to a week. When you have batter ready in the fridge, making dosai for a meal takes only a few minutes. You can choose to make regular size dosai for breakfast, dinner or coin-sized ones for your child’s lunch box.

Coin Dosai platter dotted with molaga podi

ALLERGY INFORMATION

Preparation Time – 8 hours soaking+1 hour grinding+8 hours fermentation, Cooking Time – 10-15 minutes, Makes – about 20 dosais.

YOU NEED -

COOKWARE - Wet grinder or mixer grinder, Iron skillet/griddle, Big deep dish mixing bowls, ladle, sharp metal spatula

INGREDIENTS -

  1. 1 cup Jowar grains
  2. 1 cup salem idli rice/boiled rice/raw rice
  3. 2 tbsp fenugreek seeds
  4. 2 tbsp urad dal
  5. 1 heaped tsp salt
  6. Sesame oil for drizzling over dosais, about 1/4 cup oil

METHOD -

  1. Measure out all ingredients except salt and oil. Rinse the grains well, Soak overnight. To do this, steep in enough water to cover the grains plus an inch higher.
  2. The next morning, grind the soaked grains. If using wet grinder, keep sprinkling water every 7-10 minutes. You can use up to 3 cups water for grinding. I grind my batter in a wet grinder. When using jowar grains, it takes longer to grind. About 1 hour of grinding gives me a smooth batter. When the batter looks smooth, add salt, mix well and remove to a deep bowl. Allow plenty of head room for fermentation. Leave overnight for fermentation.
  3. The batter is ready when it has risen to double volume.
  4. Heat up an iron skillet/dosa tawa. Smear oil all over to grease.
  5. Pour a ladleful batter in the centre of skillet. Spread with back of ladle in concentric circles. Drizzle few drops of oil around the sides. When brown at edges, loosen the edges, flip over with a sharp spatula and cook on other side. Repeat for the next ladle of batter.
  6. Alternately, pour tiny spoonfuls of batter all over the skillet to make ‘coin dosais’. Drizzle oil around the sides, flip over to cook briefly on other side. Remove to serving platter when done.
  7. Serve with any chutney of choice or with dosai molaga podi!

Coin dosai topped with molaga podi

Crispy or soft - fragrant Jowar Dosai

Mar 9, 2015

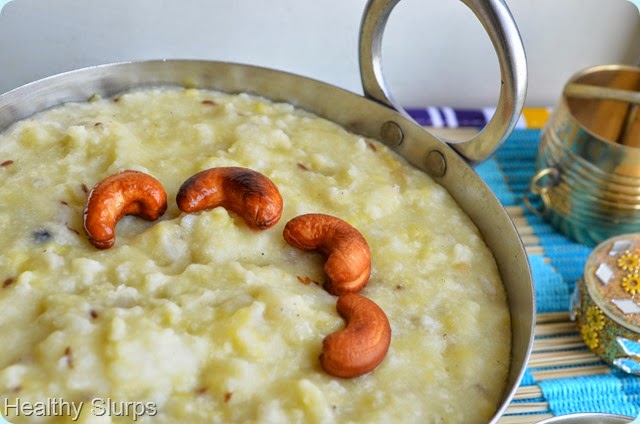
Samai Pongal / Little Millet Pongal

Ven Pongal or Khara Pongal is a much loved breakfast food in South India. However, you can have it any time of the day. Ven Pongal works at the brunch or dinner table with equal ease.  With the millet wave sweeping the diets of all, I feel this is a good time to share a recipe with millets.

Samai rice/Little Millet replaces white rice in this preparation. Not only is it far healthier, the millet also cooks faster than rice. Isn’t that great news? Samai has 8 times more iron than white rice and 10 times more fibre. If that was not enough, it is higher in thiamin(vit. B1) , riboflavin(vit. B2) and folic acid content as well. Owing to their low glycemic index, millets are good grains to include in diets for weight management, diabetes, as well as in pregnancy. Since Pongal is usually cooked to a soft mush, this dish can be fed to weaning babies or toddlers also.

Pongal tastes best when served hot, so packing for school lunch may not be a great idea. However, you can pack for an office lunch if you can re-heat your food at work place. Now that I have shared enough reasons to switch to the millet from rice, let us proceed to the recipe, shall we?

Making Pongal is really simple. Cook a grain and a lentil together, fry some seasonings in a fry pan, mix the two with some salt and your dish is ready! Read on for the proportions and method here -

Samai Pongal with chutney

ALLERGY INFORMATION

  • Does not contain gluten, corn, soya, eggs, lactose, dairy.
  • Adding nuts is optional. Omit if you have nut allergy.

Preparation time –10 minutes, Cooking Time –15 minutes, Serves – 4-5.

You Need

Cookware – Pressure Cooker, fry pan, mortar and pestle

Ingredients

  1. 1 cup Samai rice
  2. 1/2 cup Moong Dal
  3. 4 cups water
  4. 1/2 tsp salt
  5. 1 tsp cooking oil
  6. 1 tsp ghee
  7. 10 whole cashew nuts (optional)
  8. 1/2 tsp Cumin seeds
  9. 1 tsp black pepper
  10. 1 tsp ginger juliennes
  11. 7-8 curry leaves, torn up
  12. 2 green chilli, slit (optional)

 Method -

  1. There are two methods to cook this pongal. You can choose between – 1. Pressure cook the Samai rice and Moong dal together in the pressure cooker. For this, rinse the grains together, cover with 3 times the volume of  water and pressure cook for 2 whistles. Or, 2. Pressure cook the dal alone, and the Samai rice on the stove top. For this, cover dal with double volume of water and cover the millet with double the volume of water and cook for about 3-4 minutes. Mix both in a serving bowl.
  2. Coarsely pound the black pepper and cumin in a mortar and pestle.
  3. To a fry pan, add in the oil + ghee, fry the cashew nuts (if using) to a golden brown.
  4. Tip in the pounded pepper +cumin, curry leaves, ginger juliennes, and green chilli.
  5. Add salt to the cooked mixture, pour in the seasonings and mix well. You may add 1/2 cup of hot boiling water to the mixture if it looks very hard. We want a soft mushy texture to the pongal.
  6. Serve steaming hot pongal with a spicy chutney, or sambar or even the traditional gothsu! Here I have served it with a tangy raw mango chutney.

Perfect weekend breakfast or brunch

Enjoy your power packed meal!

Feb 10, 2015

Nellikkai Thair Pachadi / Amla Raita

Do you know that Amla or the Indian Gooseberry has the highest Vitamin C content among all vegetables and fruits? That it has mention in ancient Sanskrit texts, is used extensively in Ayurvedic medicine, and is considered a miracle fruit. Amla can be used to treat eye disorders, increase calcium absorption in the bones, help build strong bones, cure skin ailments, strengthen and nourish hair, promote hair growth, actually just about do anything healthy and nourishing for our bodies.

The Indian Gooseberry (Amla) also has known anti oxidant properties. Amla has been found to offer a full range of benefits from free radical scavenging, anti inflammatory properties, beneficial effect on diabetes.   It is also widely used for its ability to dissolve plaques in arteries, reducing serum cholesterol levels.

Studies have also shown that even preserving in brine or pickling does not reduce the availability of vitamins, especially Vitamin C. Readers may be aware that vitamins B and C are easily destroyed when food is exposed to sunlight or heat, or excess water during cooking. So excessively cooked foods or preserved foods lose their vitamin content over time. Not so with Amla. This miracle fruit continues to dole out its health benefits even when cooked or preserved.

Despite having such a wonder fruit growing in our midst, I feel people in India do not make full use of it. We are in search of that elusive magic potion sourced from deep in the Amazon forests or some wonder drug that is shipped from a Scandinavian country. While those drugs/potions/foods may be good in them selves, I ask myself and everyone reading this – Is it wise to ignore the wealth in your backyard and seek something from far away? Are the money, effort, rising fuel costs, justified?

I, for one, am going to include more of this wonder fruit ‘Amla’ in my family’s meals. I am sure all of you have recipes from different cuisines with Amla as the main ingredient. Do share your favourite recipes with Amla in the comment section below.

Here is one simple, really quick, tongue tickling recipe with Amla. Perks up any meal and loads you up with its nutrients. Go on. Try it out.

Luminous Amla

ALLERGY INFORMATION

  • Does NOT contain gluten, lactose, nuts, corn, soya.
  • Suitable for people with gluten or lactose intolerance, or nut allergy.

Preparation Time – 10 minutes, Cooking Time – 5 minutes, Serves – 4-6

You Need -

Cookware – Small wok, Mixer grinder

Ingredients -

  1. 4-5 Amla fruits
  2. 2 tbsp fresh grated coconut
  3. 3-4 green chillies
  4. 1/2 cup skim milk curd
  5. 1/4 tsp salt

For Seasoning -

  1. 1/4 tsp oil
  2. a pinch mustard seeds
  3. a pinch fenugreek seeds
  4. a pinch asafoetida
  5. 3 curry leaves
  6. 1/2 red chilli (optional)

Method -

  1. Rinse the Amla well. Cut incisions along the segments. Pull out the flesh and discard the seeds.
  2. Grind along with coconut, green chilli, and part of the curd to make a paste. Grind more than a coarse paste but stop short of a fine paste.  Add the rest of the measured curd and whip along with the paste.
  3. Heat oil in a small wok/kadai/fry pan.
  4. Add ingredients for seasoning in order. When mustard crackles, pour in the ground mixture, and add salt. Simmer until the liquid foams up.  Do not boil this mixture. Keep stirring over medium heat for it to cook lightly.
  5. Remove to serving bowl and enjoy with hot phulkas,  or steamed rice, a dal and some stir fried vegetables.

Quick Amla Raita


Feb 20, 2011

Lemon Poha / Aval

The humble aval / avalakki / poha at its tangy best. An anytime meal / snack, kids and adults alike love the tang, the crunch of peanuts and it’s inviting colour. What I love best about this dish is the nutritive punch it delivers.
lemon poha
You need rinsed poha
  1. Medium thick poha – 2 cups, heaped
  2. Lemons – 2
  3. Turmeric powder – 1 tsp
  4. Hing powder – a good pinch
  5. Salt – 1 tsp or more
  6. Sugar – 2 tsp or more (optional)
For seasoning ingredients for seasoning
  1. Vegetable oil – 2 tbsp
  2. Mustard seeds – 1 tsp
  3. Urad dal – 1 tbsp
  4. Chana dal – 1 tbsp
  5. Peanuts – 2-3 tbsp
  6. Curry leaves – 7-10, torn up
  7. Green chillies – 3-4, slit lengthwise
  8. Coriander leaves – chopped, 3/4 cup
To assemble
  • Wash the poha under running water in a colander, allow the water to drain, set aside. 
rinsed poha in colander
  • Heat oil in a deep sauce pan, add ingredients for seasoning in order, save coriander leaves for later.
mustard crackling in oil  add urad dal,chana dal,peanutsadd curry leaves,chillies,hing and turmeric
  • Add the rinsed poha now, tip in sugar, salt, coriander leaves in this order and gently fold the mixture to avoid squishing the poha.
fold in poha gently
  • Now is when you can squeeze in juice of two lemons (you can increase or decrease quantity of juice as suits your taste). Fold in the mixture with a gentle hand until poha, lemon juice and seasonings are well incorporated.
Your tangy poha is ready to be gobbled down.
Tasty, tangy poha
Variations
  • This is my basic version of lemon poha. You can add any or all of these vegetables to the seasoning mixture to add variety to the dish – chopped green or any coloured capsicum (peppers), grated carrot, boiled green peas.
Nutri notes
When compared to raw rice -
  • Rice flakes /poha have twice the calcium  and three times the fibre content. 
  • Poha also has thrice the thiamin (Vitamin B1) and twice the niacin (Vitamin B ) content.
  • The absolute stunner comes from the whopping 20 times more iron than in raw rice!! Add to this the availability of copper too, poha is a nutrient storehouse.It is a valuable food for those who are – anaemic, sportspeople, teenagers, pregnant or lactating women.
  • With the presence of Copper at  0.37mg /100gm in poha, and with the addition of lemon juice (Vitamin C) in this recipe, the dish is an excellent iron source especially for vegetarians. Reason – Copper and and Vitamin C are necessary for iron absorption in the body.
  • Addition of dals and peanuts also add to the protein content of the meal, apart from adding texture.
  • The dish can be made more wholesome by adding boiled green peas (protein), boiled corn, capsicum or shredded carrots(vegetables).
I hope I have conveyed the importance of using poha in our weekly diet well enough. Do let me know what you think about the nutrition information I have given here.

Oct 12, 2010

Pudina chutney

I was looking for a zesty pick me up to brighten up a usual rice-dal routine.As I rummaged though the fridge,this bright dark green bunch of pudina invited me with it's lovely aroma-this was exactly what could fit my need!I could not wait to convert it into this chutney below; once you have separated leaves from stalks, go ahead and make this quick, delicious pick me up!

You need
  1. Pudina leaves-1 1/2 cups packed
  2. Green chillies-3-4 big
  3. Root ginger-2 tsp chopped
  4. Garlic-7-8 cloves,peeled
  5. Fresh coconut-grated-1/4cup or chopped-1/2 cup
  6. Juice of 1 lemon (can add more if you feel the need for a super tangy taste)
  7. Salt-1/4 tsp
  8. Vegetable oil-1/4 tsp
To assemble
  1. Remove stalks,clean and wash pudina leaves under several changes of water,drain and keep aside.
  2. Take a flat bottomed pan,heat oil in it.
  3. Add chopped green chillies, ginger, garlic to the pan, swirl the pan and let sizzle.
  4. After a minute you can add the washed pudina leaves, toss in the oil for a quick coating.Do not fry for more than a minute-you will lose the flavor and colour if you do.
  5. Take a fresh coconut halved, and grate or chop out the white flesh (use quantity, as given in ingredient list)
  6. After the fried ingredients have cooled, place these and the coconut in a mixer grinder, add the salt and grind to a smooth paste.Use the lemon juice instead of water,midway through the grinding.You can add another tsp or two of water after adding the juice,(if required).
  7. Your tangy bursting-with -good-health-pudina- chutney is ready!
Notes
  • This chutney can be stored in the fridge for a couple of days,and upto 10 days in a freezer box in the freezer;thaw only as much as you would use up each time.
  • The chutney works great to perk up a meal,as a sandwich spread,or a tangy spread for rotis-fill up with salad veggies,roll and eat!
  • You can use fresh raw mango in season instead of lemon juice-it adds body to the chutney too.
  • Can avoid ginger and garlic and use only green chillies for a slight change in flavour.
  • Can make the same chutney using fresh coriander (cilantro) leaves too,use 1 1/2 cup of chopped leaves to substitute for every cup of pudina leaves.
  • Take care-Do not  fry the leaves for more than a minute.
Now for the nutri notes
  • Ginger, garlic and pudina are known to be excellent digestive aids, they relieve gas, distension, and improve digestion.
  • At a good 15mg of iron per100g of pudina leaves, mint packs in good punch!
  • Combining lemon juice or raw mango in the chutney makes Vitamin C readily available.Vitamin C improves iron absorption in the body.
  • Pudina also adds to the fibre content of the meal.
  • With virtually no sodium, it is a good choice for both hypertensive (blood pressure) and some renal patients, who need to control sodium intake.Of course, adding salt to the dish increases the sodium content.You can use low sodium salt insted of regular table salt in case of sodium restriction.
Here follows the visuals


    frying ingredients
    toss pudina leaves in oil

     fresh coconut
    pudina chutney