Showing posts with label low sodium recipe. Show all posts

Mar 11, 2016

Apple Berry Milkshake

It feels wonderful to be back after a long break. How have all of you been?
Before we knew it, winter turned to summer in Bangalore. With exams on, and summer heat in full force, we are constantly searching for chilling, refreshing drinks. Surely, staying cool and hydrated has to include delicious and inviting options, correct?
This apple berry milkshake has been the answer to such heated discussions about the best drink in summer. The sudden jump in season from winter to summer made plenty of winter produce like apples and strawberries still available in the market. So, we are making the best use of it.
Made with only 3-4 ingredients, this milkshake can be blended in no time, but tastes best when chilled. So make sure you stock up on chilled milk in your fridge! We are exploring many more liquid deliciousness at our home. Stay tuned for more such chilling posts!Winking smile
Healthy delicious Apple Berry Shake
ALLERGY INFORMATION
  • Contains lactose. People with lactose intolerance can substitute coconut milk or almond milk in place of dairy milk.
  • Does NOT contain gluten, yeast, soya, nuts, corn, eggs.
Preparation time – 10 minutes, Cooking time – nil. Chilling time – 2 hours, Serves - 2
YOU NEED
COOKWARE – Blender, peeler, knife, glasses to serve
INGREDIENTS -
  1. 1 Red Delicious or Fuji apple
  2. 4-5 strawberries
  3. 400 ml chilled skim milk
  4. 1 drop vanilla extract
  5. 1-2 teaspoons sugar (optional)
METHOD
  1. Rinse the fruits thoroughly. Peel and core the apple. Hull the strawberries. Chop the fruits up roughly.
  2. Add the chopped fruits to a blender, pour in half the chilled milk, vanilla extract and blend to super smooth and frothy milk shake. Top up with rest of milk and blend in too.
  3. Taste and add sugar only if needed. Blend for another minute if you are using sugar.
  4. Serve in tall glasses. Top with ice cubes if you wish to.
Cool shakes to beat the heat
Apple Berry Milkshake

Mar 13, 2015

Carrot and Alfalfa Salad

When did winter zoom past? Nobody knows. Not only is summer on us but it is exam season too. That means two things – light refreshing meals and hydration. When spending time over the stove top is a agony, we must think smart and eat sensibly. Salads are great additions to a meal and good at quenching thirst also. Salads are great even for snacking in between meals.

Salads are mostly made of raw vegetables and fruits which have a higher moisture content. Since there is no cooking involved, the vegetables retain their juices and nourishing properties to the fullest. For more on how to make or when to not have salads, read through my article here.

So, are alfalfa sprouts good for you? Here is the lowdown on alfalfa sprouts.

These are a great source of protein, B complex vitamins, Vitamin K, Calcium, Iron, Potassium, Zinc, Copper. Also high in phytoestrogens. Traditionally used to treat  kidney ailments, diabetes, these wonder sprouts also mop up cholesterol from arteries. Great news for people with high cholesterol, or arterial plaques. While they are a wonder food for most people, some sets of population may have to proceed with caution.

Pregnant women or convalescent people are better off eating all foods that are cooked, avoiding any raw sprouts including alfalfa. Since the sprouts mimic estrogen, women with low progesterone may do well to avoid eating it daily. People who have auto immune disorders such as Rheumatoid Arthritis, Multiple Sclerosis, or Lupus may find an increase in their symptoms with prolonged daily consumption of these sprouts.

It is also useful too remember that this caution is only necessary if you plan to eat raw alfalfa sprouts daily for several months. In an otherwise balanced diet that includes alfalfa sprouts once a week or thereabouts, in combination with a variety of other foods, the food only delivers its abundant vitamins and minerals with no significant damage due to its phytoestrogen, canavanine, or other components.

Carrot and alfalfa salad

This is a salad I rustled up for lunch today. I feel it looks colourful, happy and enticing. I’ve even added a surprise ingredient to encourage the younger ones to reach out for it eagerly. Want to know more? Read on for the recipe….

ALLERGY INFORMATION

  • Does not contain gluten, lactose, dairy, corn, soya, yeast, eggs.
  • Suitable for gluten or lactose intolerant people.
  • *Contains nuts. People with nut allergy can omit the nuts in this recipe.

Preparation time – 15 minutes + 30 minutes chilling time, Cooking Time – nil,  Serves – 2 main servings or 4 as accompaniment to meal

You Need -

Cookware – Peeler, Grater, Knife, Mixing Bowl, Mortar and pestle

Ingredients -

  1. 1 cup grated red carrot (I used 1 long red carrot)
  2. 1/4 cup thinly sliced onion
  3. 1 fistful alfalfa sprouts
  4. 1 cup chilled drinking water
  5. 1 green chilli OR 1/2 tsp crushed black pepper
  6. 1/4 tsp salt
  7. 2 tbsp apple cider vinegar
  8. a 1” square of peanut brittle or any nut brittle* (optional)

Method -

  1. Rinse the alfalfa sprouts in running water and steep in the chilled drinking water until needed.
  2. Immerse the thinly sliced onion in the vinegar. Set aside.
  3. Rinse, scrub, peel and grate the carrot. Slice the green chilli into thin slanting slivers.  Coarsely crush the peanut brittle in a mortar and pestle. Do not powder it. Leave behind some small bits for your kid to pick up and and bite into with glee!
  4. Place all the ingredients in a mixing bowl, drain water from the sprouts, add to the bowl, and give them all a good toss with salt. You may need to separate the sprouts with fingers.
  5. Chill before serving for flavours to marry each other well.

Phulka, Rajma and Salad - balanced meal

Sep 4, 2014

Happy Onam with Nendra Pazham Nurukku

Traditional Onam Flower Carpet Decoration
Wishing all Keralites across the globe a very happy Onam. The very mention of the festival sends happy shivers down the spine. The excitement of meeting relatives, the rustle of new clothes, the joy of decorating the house with flowers, fills everyone with gleeful anticipation. Cooking the special Onam Sadya, the house smelling festive with the heady combination of curry leaves, coconut milk, simmering vegetables, with the inviting aroma of Payasam, with the fragrance of Nendra Pazham that lovingly follows you to every nook of the house.
That brings me to my much loved fruit – Nendra Pazham. A variety of banana grown extensively in Kerala and Tamil Nadu, it is longer than the usual Robusta or Dole variety and has a different unique flavour. It takes pride of place in Malayalee cuisine.
Ask any one from Kerala, and Nendra Pazham will count as one of their favourite fruits. Ask anyone from outside Kerala, the answer may not be the same. it could take some time to get used to. Fortunately, everyone in my family likes this special banana.
At our home, we wait patiently for it to ripen just so. It could then get plonked into the microwave for a quick steam bath, or into the sauna of a fry pan with jaggery to sweeten the deal, or if in a ‘lavish mood’ get batter fried for that crisp outside, soft, sweet, melting inside Pazham Pori. Each of these methods of enjoying the Nendra Pazham merits its own post. For now, I’ll confine my gushing to the jaggery sweetened, gooey, syrupy golden blobs called Nendra Pazham Nurukku. This is often served as part of the festive Onam breakfast menu.
Whether you celebrate Onam or not, this is a good chance to indulge in this simple sublime dessert. It fits the bill for a quick healthy snack, a solution for any time hunger pangs as much as part of an elaborate festive meal or as dessert after a spicy meal.
Don't they look smashing?
Here is how I go about making it.
Allergy Information
  • Does NOT contain gluten, egg, soya, corn, peanuts, tree nuts.
  • Suitable for gluten intolerant or lactose intolerant people.
Preparation Time – 10 minutes, Cooking Time – 15 minutes, Serves – 5-6
You Need
Knife, Kadai / Frying pan.
Ingredients
  1. 1 kg (usually 4-5 bananas) Just ripe Nendran banana
  2. 1/2 cup Jaggery OR Brown Sugar. Can take 3/4 cup if you prefer more sweetness.
  3. 1/4 cup water
  4. 1/2 tsp ghee (clarified butter) – optional
Method
  1. Rinse the bananas, peel and slice into 2 inch chunks.
  2. Combine the bananas, jaggery and water together in a kadai and set it over flame.
  3. Keep stirring once it comes to a boil. Lower flame if you find the corners browning.
  4. The bananas are done when they get a glaze and look translucent. This should come about in 7-10 minutes depending on flame and quantity cooked.
  5. Top with 1/2 tsp ghee if using, mix well and remove from fire.
  6. Serve when warm.
Golden chunks of Pazham Nurukku


Jun 3, 2014

Peerkangai chutney


I seem to be on a spree to cook with un-glamorous, un-restaurant-y, humble vegetables. Well, why not? Gourds are very easy on the wallet and the waist line, mostly neutral in flavour, lend body to various dishes, have varied nutritional benefits but are ignored despite all these.

Pic Courtesy - Sankalpfarms.com

No South Indian breakfast is complete without chutney. That inevitably means use of fresh coconut. On days when you do not have stock of fresh/frozen coconut, or want to limit it’s use in daily meals, you need some saviour to rescue the day’s chutney. Enter the star of today’s chutney - ridge gourd. I have used it in this recipe to benefit from the nutrients it offers, as much as a coconut-substitute.

  • Ridge gourd is high in moisture and crude fibre (good news for those with chronic constipation).
  • It is a very low calorie vegetable, so great to include in a weight loss diet. It adds plenty of bulk to a meal without adding significant calories! This means, you can eat a whole cupful of ridge gourd and add less than 20 calories to the meal!
  • Ridge Gourd has negligible Sodium and a fair source of Potassium. Hence it is useful for people with high blood pressure or certain kidney ailments where sodium is severely restricted.

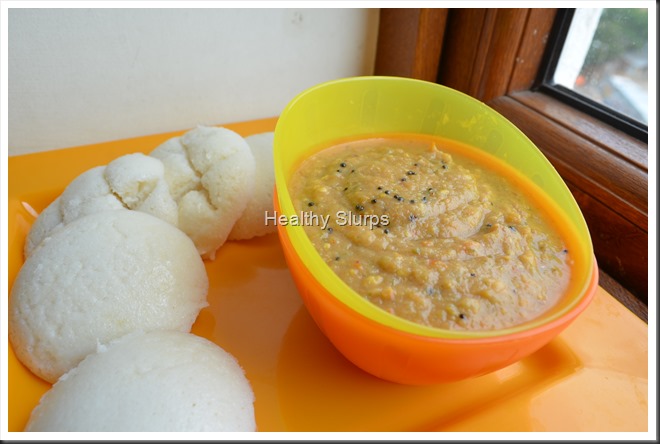
Here is how I made the chutney. We used it to complement soft idlis for breakfast. It was spicy, tangy and declared ‘good’ by my family. Do try it out and let me know how you liked it. The quantity here serves 5-6. Halve to serve 2-3.The chutney can be refrigerated and used within 2 days.

Preparation Time – 15 minutes ; Cooking Time – 5-6 minutes ; Serves – 5 – 6

Allergy Information – Does NOT contain gluten, egg, soya, peanuts, corn, lactose.

You Need

 Cookware  -  A frying pan, mixer grinder or food processor

Ingredients

  1. Red Onion – 1 medium, or measure 1/2 cup after chopping
  2. Roma Tomatoes – 2 medium, or measure 3/4 cup chopped
  3. Ridge Gourd / Peerkangai – 1 big, or measure 1+1/2 cups sliced
  4. Green chilli – 4-5 cut into halves
  5. Chana dal – 2 tbsp
  6. Tamarind – 1/4 tsp*
  7. Salt – 1/2 tsp
  8. Oil – 1/2 tsp
  9. Coriander leaves – 6-7 stalks with leaves (optional)

For Seasoning -

  1. Oil - 1/4 tsp
  2. Mustard seeds – /4 tsp
  3. Hing Powder – a pinch

* Use Tamarind if tomatoes are not tart enough, or add a couple of extra tomatoes and avoid tamarind. You can even omit tamarind entirely if you do not prefer a sour-ish chutney

To Assemble

  1. Prepare the vegetables for frying. To begin,  wash, peel and chop onions. Next, wash peel and chop tomatoes and green chilli. Rinse the ridge gourd well, peel part of the rough skin at the ridges, while leaving some skin on the vegetable. Cut into thick slices.Fry all vegetables for chutney
  2. Heat a small wok / frying pan. Add the half tsp oil, let it heat up. Add the chana dal, fry over medium heat until golden brown. Add all the prepared vegetables, chilli, tamarind and salt. Toss well, (do not add any water), cover and simmer for 2–3 minutes or until you find the tomato skin has shrunk a little bit and the gourd seems to go slightly limp. If you are using  coriander leaves, add at this point, and switch off flame.
  3. Let it cool. Grind to a coarse paste. You will not need any water for grinding. After removing to a bowl, rinse out the mixer jug with a 1/4 cup of water and add to the chutney if you wish to dilute it. Chutney with Seasoning
  4. Heat oil for seasoning. Crackle mustard seeds, add hing powder and pour over the chutney.
  5. Serve as accompaniment to idli, dosa, or over plain steamed rice, as a sandwich spread or as dip for crudites too!

Soft Idlis with Spicy Chutney

Fresh breakfast for two!

Apr 14, 2014

Vendakkai Thair Pachadi / Crispy Okra in Chilled Yoghurt


A very Happy New Year to all who celebrate today. Happy Vishu to all Malayalees across the world! All family members taking time off from busy lives, praying and eating together, tables rich with culinary treats– these surely are some special features of festivals. Celebrations always involve good food. Contrary to popular thought, festive food need not all be time consuming to prepare, nor be calorie-rich.

Today, I would like to share a lip-smacking, simple recipe which you can use to grace the table at any festive menu. This recipe has distinct south Indian flavours, so you can tweak the seasonings to accommodate the demands of your palate or cuisine. (Read notes)

Happy New Year to all

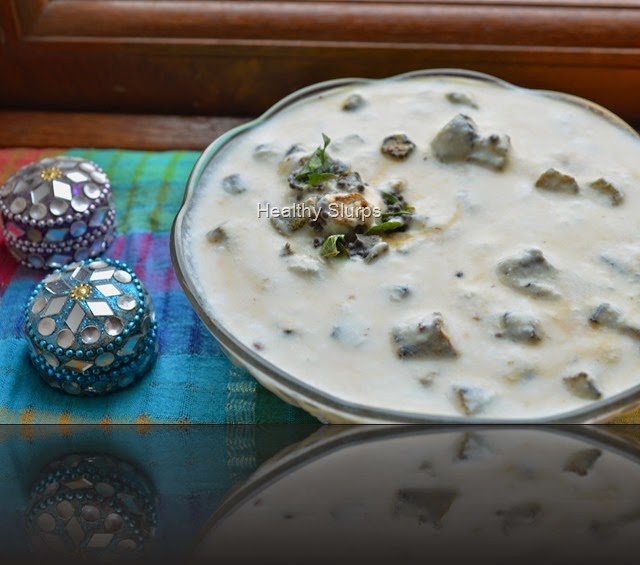
The key point here is how the vendakkai / lady’s finger / bhindi / okra is cooked - crispy ‘fried’ okra is first readied by slicing it thin, drizzling with a quarter tsp cooking oil and grilling it for 10 minutes. This then is lovingly folded into a bowlful of thick skim milk yoghurt, seasoned with salt.The dish is finished off with a fragrant tadka of mustard seeds, curry leaves and pinch of hing in some oil. The grilling ensures that you save fuel, oil and time. The crisp texture encourages even die-hard okra haters to try it out. The chilled yoghurt is just so perfect for this blazing summer season. While this recipe is an accompaniment, you will soon find yourself eating a chilled bowlful on its own. Here is what you need -

You Need

  1. Okra / Lady’s finger / Bhindi / Vendakkai – 200 gm
  2. Skim milk yoghurt – 500 ml
  3. Salt – 1/4 tsp
  4. Sugar – a pinch
  5. Cooking Oil – 1/4 tsp

For seasoning

  1. Cooking oil – 1/4 tsp
  2. Mustard seeds – 1/4 tsp
  3. Curry leaves – 3
  4. Asafoetida Powder (Hing) – a pinch

To Assemble

  1. Wash the vendakkai by immersing in a bowl of water, drain on colander and spread out to dry on a kitchen towel. Snip off the tops and tails, and slice into even thin disks.
  2. Preheat the grill to 250 C.
  3. Place in a single layer on a baking tray. Drizzle 1/4 tsp oil over the disks, and spread in a single layer.
  4. Once the grill is ready, place the tray of vegetables inside, and grill for 10 minutes. Toss and scrape the contents at half time to ensure even browning. By the end of 10 minutes, the Vendakkai would have shrunk to half – size pieces, and would have browned evenly without being charred. You may need to watch the grill in the last minute to ensure correct browning without charring.
  5. Let it cool in the tray. Meanwhile, whip up the skim milk yoghurt with salt and sugar.
  6. Prepare the seasoning by heating oil in a small pan, adding all the ingredients for seasoning in order. Pour over the whipped yoghurt.
  7. Gently fold in the cooled Vendakkai into the yoghurt, chill for half an hour before serving.
  8. Serve with steamed rice, sambar, papads.

Bowl of chilled pachadi flecked with crisp okra

Notes

  • Avoid mixing the grilled vegetable too vigorously into the yoghurt, it will darken the colour of yoghurt.
  • You can experiment with flavours by adding roasted jeera powder, coriander leaves instead of hing and curry leaves.
  • Can be used as a dip for crudites or rolls too by seasoning with a tbsp of chopped, fried onion, a pinch of red chilli powder and a tsp of chopped fresh parsley instead of above seasonings.
  • Grilling the vegetables as opposed to deep frying them helps to cut down on cooking oil used.

Enjoy the cool pachadi!

Mar 12, 2013

Lauki raita/ Sorakayi pachadi


Bottle gourd as it is known in English, was not a favourite at our home too, that is until my yoga teacher shared this recipe with me. Bottle gourd is always paired with a protein such as chana dal or tuvar dal or mung dal in traditional Indian recipes. One reason could be that the vegetable has very low protein levels. Thus creating a dish with the vegetable + protein makes it complete!

Of the several Indian recipes such as using it in koftas, avial, kootu, I took an instant liking to using it in raita. Cooling, refreshing, this extremely simple dish can be paired with any entree, any cuisine. The best part is very few ingredients are required and takes little time to put together. Use it as dip, chutney, raita, or to fill in hunger pangs between meals too.

What’s good about Bottle gourd?

  • Bottle gourd has plenty of moisture and dietary fibre. This makes it an ideal summer vegetable to replenish fluids in the body. The fibre keeps constipation, piles, cholesterol and even colon cancer at bay.
  • 100 gm of uncooked bottle gourd has only 12 calories. This makes the vegetable an instant pick me up for weight loss diets.
  • It has no protein or fat content – the only way to add that would be in a recipe that includes some protein and good fat.
  • This humble vegetable is a fair source of Magnesium, Zinc, Potassium and Copper. All minerals needed by teenagers and growing children.
  • Also a very low sodium vegetable, this is very suitable for people with high blood pressure or diabetes too.
  • Do check out this link too. http://www.thehindu.com/health/policy-and-issues/article2571430.ece

So do try out this super simple and soul satisfying recipe this summer.

You needGrated bottle gourd

  1. Bottle gourd/ lauki/ sorakayi – select tender lauki, wash, peel, grate to a medium fineness, measure 3/4 cup.
  2. Thick curd – 1 cup ( I used home made skim milk curd) If you use store bought curd, select fresh probiotic skim milk curd.
  3. Salt – 1/4 tsp.
  4. Sugar – a pinch (optional).
  5. Fresh coriander leaves – chopped fine – 1 tbsp

For seasoning

  1. Oil – 1/2 tsp
  2. Mustard seeds – 1/4 tsp
  3. Asafoetida – a teeny pinch
  4. Green chilli – 1, finely chopped
  5. Curry leaves – 3-4 torn up

To assemble

  1. Combine the grated bottle gourd, whipped curd, salt, and sugar.
  2. Heat oil in a small tadka pan, add oil and other seasoning ingredients in order.
  3. Pour over raita.
  4. Top with chopped coriander leaves.
  5. Chill for an hour before serving.

Cool curd and hot takda

Variations

  1. Omit seasoning.
  2. Add roasted jeera powder and kala namak powder if you like the piquancy.
  3. Add one half onion, finely diced, or few chopped stems of spring onion along with bottle gourd in the raita.
  4. Add grated carrot for colour!

 Chilled Bottle gourd raita