Showing posts with label low calorie. Show all posts

May 29, 2015

Watermelon Shikanjvi

In keeping with the need of the summer season, here is a winner drink recipe. Watermelon juice spiked with Indian spices. These spices were chosen not just for the flavours but also for their ability to aid digestion and add essential salts to the body.

In my earlier post, I had promised to share a drink recipe that does not include sugar. This is especially so that diabetics can also indulge in a refreshing drink. Summer need not be tiring or exhausting if we have refreshing, nourishing, hydrating drinks such as this watermelon shikanjvi in our repertoire. The ultimate thirst quencher. Rich with natural salts to rehydrate, and full of fruit vitamins and minerals. The fruit is rich in anti oxidants which helps in maintaining skin tone as well. Something we could surely use in the dry scorching months!

 
Enjoy a sip by the pool


In fact, most juices and colas are not advisable for diabetics since these release a surge of sugar into the blood stream almost immediately. A spike in blood sugar is dangerous for any diabetic. As is dehydration. In diabetics, if there is excess sugar in the blood, the kidneys will try to flush out some sugar through urine. It makes this happen by drawing on body water from blood, cells, saliva. This, in turn, increases the dehydration in the body.

Without further ado, here is the recipe for a super refreshing, very low calorie, drink. For ease, I am giving measures for 2 glasses. Of course, you can make a big batch ahead (do not add the soda ahead. Mix it in just before serving) and store chilled in the fridge. When you feel like downing a glass, pour yourself half a glass of this juice mixture, top with soda and sip for instant relief from summer.

Chilled watermelon shikanjvi


 ALLERGY INFORMATION

  • Does NOT contain lactose, soya, corn, yeast, gluten.

Preparation Time – 10 minutes + chilling time, Cooking Time – nil, Serves - 2

YOU NEED -

COOKWARE - Mixer grinder, lemon squeezer, and serving glasses

INGREDIENTS -

  1. 1 heaped cup chopped, deseeded watermelon chunks
  2. 250 ml chilled club soda
  3. Juice of 1 lemon
  4. a  big pinch of cooking salt
  5. pinch each of roasted jeera powder and kala namak powder
  6. Ice cubes to top up and serve

METHOD -

  1. Whiz the watermelon chunks in the mixer until you get a smooth puree. .
  2. Add the lemon juice also to the mixer jar.
  3. Add also a big pinch of salt, followed by a small pinch each of roasted jeera powder and kala namak.
  4. Whiz the mixture well, and divide between 2 glasses.
  5. Top with club soda, ice cubes and serve chilled!


 Watermelon Shikanjvi


Apr 25, 2015

Orange Basil Iced Tea

With summer on, in full swing, we search often for different drinks to soothe our parched throat! It is truly important to keep ourselves well hydrated in heat. Drinking plain water through the day can be boring, and nauseous at times. The trick, then, is to flavour our drinks with some palate pleasers. This way, we can drink enough fluids to keep the body hydrated well enough.

For more on hydration, and it’s importance, read my article here on importance of water.

Here is an idea which you can use to add fun to your fluid intake. Tea is a diuretic, which means it increases water excreted from the body. So to help maintain the fluid balance in the body, I have diluted the iced tea with plenty of water and added orange juice for extra vitamins and minerals.

  • People who have special fluid restrictions like in kidney aliments will have to stick to their prescribed form of fluid intake. This drink may not be suitable for them.
  • If you have diabetes, or are obese, this is not the best way to replenish fluids for you. Cheer up! I will be back with interesting drink recipes for you also.

Enjoy chilled Iced Tea

ALLERGY INFORMATION

  • Does not contain gluten, soya, corn, yeast, lactose.

Preparation Time – 10 minutes + 1 hour chilling, Cooking Time – 3-4 minutes, Serves – 4-6 glasses

YOU NEED

COOKWARE – Tea pot/saucepan, jug, glasses to serve

INGREDIENTS

  1. Juice of 2 oranges, about 1/2 cup or more, freshly squeezed orange juice.
  2. 3 tea bags of your choice of flavour. Lemon, ginger, mint teas all work well.
  3. 2 cups drinking water + 4 cups chilled drinking water
  4. A tiny fistful Basil seeds/sabja seeds
  5. 2 tbsp honey
  6. Ice cubes and orange slices to serve

METHOD

  1. Bring 2 cups of water to boil in a saucepan. Place tea bags in the saucepan, remove from heat, cover and steep for 5-7 minutes.
  2. Soak the basil seeds in the remaining 4 cups chilled water.
  3. Squeeze out the tea bags. Mix in the orange juice, strained tea, chilled water and honey.
  4. Stir well, chill for an hour.
  5. Serve topped with ice cubes and slices of orange to garnish.

Orange Basil Iced Tea

Mar 28, 2015

Recipe: Sweet and Sour Pumpkin Curry

Sweet pumpkin is also known as Kaddu, Manjal Pooshanikkai, Gummadikayi in different Indian languages. Often considered as a lowly, humble vegetable, pumpkin actually packs a great punch in terms of nutrients. It is a weight watcher’s delight.

Sweet pumpkin has less calories and more nutrients. To explain this better, it has four times lesser calories than sweet potato, 50 times lesser Sodium but 3 times more Vitamin C, double the folic acid, and similar Calcium, Magnesium, Phosphorus, Iron content. This means that you can eat more of sweet pumpkin than sweet potato (up to 4 times more) and still benefit from its rich nutrients without the calorie overload. More health for lesser calories, now is that not a winner?

Sweet pumpkin seems to be this gentle, powerful giant among vegetables. It looks elegant despite its rotund form, swathed in deep green or mustard yellow skin revealing a firm sweet golden flesh when cut. Lends a quiet dignified presence to a dish, knows to be at home in sweet or savoury recipes with equal ease. Delicious whether cooked with skin or without. Pumpkin often comes to my rescue when I have to cook in a hurry.

Every family has their favourite pumpkin recipe. This is ours. I hope you have as much fun cooking it and enjoying as we do.

Pumpkin in a bowl

Preparation Time – 20 minutes, Cooking Time – 10-15 minutes, Serves – 4-6.

ALLERGY INFORMATION

  • Does NOT contain egg, gluten, soya, lactose, yeast, corn, nuts.
  • Suitable for gluten, lactose intolerance or nut allergy.

YOU NEED -

COOKWARE – Knife, Cutting board, Fry pan

INGREDIENTS -

  1. 2 cups chopped sweet yellow pumpkin (with* or without skin)
  2. 1/2 cup finely diced onion
  3. 1 cup chopped tomato
  4. 1 scant tsp salt
  5. 1/2 tsp turmeric
  6. 2 tsp jaggery powder
  7. 1 tsp garam masala powder
  8. 1 tsp sambhar powder
  9. 2 tsp cooking oil
  10. 1/2 tsp mustard seeds
  11. 1/2 tsp cumin seeds
  12. 2 tbsp coriander leaves for garnish

*Sweet pumpkin takes longer to cook with skin and lesser time without skin.

            METHOD -

            1. Clean, peel and chop all vegetables. Set aside separately.
            2. Heat oil in a fry pan, add mustard and cumin.
            3. When they sizzle and crackle, add in onions, fry on high flame for 3-4 minutes until they turn pink-brown.
            4. Next to go in is the chopped pumpkin. Saute on high heat for a minute, sprinkle water and cover and cook for a further 2 minutes.
            5. Finally add the tomatoes. Keep tossing over high heat until tomatoes mush up.
            6. Add salt, turmeric powder, jaggery, garam masala and sambhar powder. Mix everything well. Cover and simmer for 2-3 minutes more.
            7. Garnish with fresh chopped coriander leaves and serve hot with steamed rice.

            Pumpkin Sweet and sour curry

            Notes -

            • Sweet pumpkin cooks very quickly. Cook lesser if you want to retain the shape of the vegetables. Cook longer if you like a mushy texture.
            • Keep stirring while on high heat to avoid scorching.
            • Add the powders after the vegetables are mostly done. This helps to retain flavours better.

            Life's simple pleasures

            Mar 13, 2015

            Carrot and Alfalfa Salad

            When did winter zoom past? Nobody knows. Not only is summer on us but it is exam season too. That means two things – light refreshing meals and hydration. When spending time over the stove top is a agony, we must think smart and eat sensibly. Salads are great additions to a meal and good at quenching thirst also. Salads are great even for snacking in between meals.

            Salads are mostly made of raw vegetables and fruits which have a higher moisture content. Since there is no cooking involved, the vegetables retain their juices and nourishing properties to the fullest. For more on how to make or when to not have salads, read through my article here.

            So, are alfalfa sprouts good for you? Here is the lowdown on alfalfa sprouts.

            These are a great source of protein, B complex vitamins, Vitamin K, Calcium, Iron, Potassium, Zinc, Copper. Also high in phytoestrogens. Traditionally used to treat  kidney ailments, diabetes, these wonder sprouts also mop up cholesterol from arteries. Great news for people with high cholesterol, or arterial plaques. While they are a wonder food for most people, some sets of population may have to proceed with caution.

            Pregnant women or convalescent people are better off eating all foods that are cooked, avoiding any raw sprouts including alfalfa. Since the sprouts mimic estrogen, women with low progesterone may do well to avoid eating it daily. People who have auto immune disorders such as Rheumatoid Arthritis, Multiple Sclerosis, or Lupus may find an increase in their symptoms with prolonged daily consumption of these sprouts.

            It is also useful too remember that this caution is only necessary if you plan to eat raw alfalfa sprouts daily for several months. In an otherwise balanced diet that includes alfalfa sprouts once a week or thereabouts, in combination with a variety of other foods, the food only delivers its abundant vitamins and minerals with no significant damage due to its phytoestrogen, canavanine, or other components.

            Carrot and alfalfa salad

            This is a salad I rustled up for lunch today. I feel it looks colourful, happy and enticing. I’ve even added a surprise ingredient to encourage the younger ones to reach out for it eagerly. Want to know more? Read on for the recipe….

            ALLERGY INFORMATION

            • Does not contain gluten, lactose, dairy, corn, soya, yeast, eggs.
            • Suitable for gluten or lactose intolerant people.
            • *Contains nuts. People with nut allergy can omit the nuts in this recipe.

            Preparation time – 15 minutes + 30 minutes chilling time, Cooking Time – nil,  Serves – 2 main servings or 4 as accompaniment to meal

            You Need -

            Cookware – Peeler, Grater, Knife, Mixing Bowl, Mortar and pestle

            Ingredients -

            1. 1 cup grated red carrot (I used 1 long red carrot)
            2. 1/4 cup thinly sliced onion
            3. 1 fistful alfalfa sprouts
            4. 1 cup chilled drinking water
            5. 1 green chilli OR 1/2 tsp crushed black pepper
            6. 1/4 tsp salt
            7. 2 tbsp apple cider vinegar
            8. a 1” square of peanut brittle or any nut brittle* (optional)

            Method -

            1. Rinse the alfalfa sprouts in running water and steep in the chilled drinking water until needed.
            2. Immerse the thinly sliced onion in the vinegar. Set aside.
            3. Rinse, scrub, peel and grate the carrot. Slice the green chilli into thin slanting slivers.  Coarsely crush the peanut brittle in a mortar and pestle. Do not powder it. Leave behind some small bits for your kid to pick up and and bite into with glee!
            4. Place all the ingredients in a mixing bowl, drain water from the sprouts, add to the bowl, and give them all a good toss with salt. You may need to separate the sprouts with fingers.
            5. Chill before serving for flavours to marry each other well.

            Phulka, Rajma and Salad - balanced meal

            Feb 10, 2015

            Nellikkai Thair Pachadi / Amla Raita

            Do you know that Amla or the Indian Gooseberry has the highest Vitamin C content among all vegetables and fruits? That it has mention in ancient Sanskrit texts, is used extensively in Ayurvedic medicine, and is considered a miracle fruit. Amla can be used to treat eye disorders, increase calcium absorption in the bones, help build strong bones, cure skin ailments, strengthen and nourish hair, promote hair growth, actually just about do anything healthy and nourishing for our bodies.

            The Indian Gooseberry (Amla) also has known anti oxidant properties. Amla has been found to offer a full range of benefits from free radical scavenging, anti inflammatory properties, beneficial effect on diabetes.   It is also widely used for its ability to dissolve plaques in arteries, reducing serum cholesterol levels.

            Studies have also shown that even preserving in brine or pickling does not reduce the availability of vitamins, especially Vitamin C. Readers may be aware that vitamins B and C are easily destroyed when food is exposed to sunlight or heat, or excess water during cooking. So excessively cooked foods or preserved foods lose their vitamin content over time. Not so with Amla. This miracle fruit continues to dole out its health benefits even when cooked or preserved.

            Despite having such a wonder fruit growing in our midst, I feel people in India do not make full use of it. We are in search of that elusive magic potion sourced from deep in the Amazon forests or some wonder drug that is shipped from a Scandinavian country. While those drugs/potions/foods may be good in them selves, I ask myself and everyone reading this – Is it wise to ignore the wealth in your backyard and seek something from far away? Are the money, effort, rising fuel costs, justified?

            I, for one, am going to include more of this wonder fruit ‘Amla’ in my family’s meals. I am sure all of you have recipes from different cuisines with Amla as the main ingredient. Do share your favourite recipes with Amla in the comment section below.

            Here is one simple, really quick, tongue tickling recipe with Amla. Perks up any meal and loads you up with its nutrients. Go on. Try it out.

            Luminous Amla

            ALLERGY INFORMATION

            • Does NOT contain gluten, lactose, nuts, corn, soya.
            • Suitable for people with gluten or lactose intolerance, or nut allergy.

            Preparation Time – 10 minutes, Cooking Time – 5 minutes, Serves – 4-6

            You Need -

            Cookware – Small wok, Mixer grinder

            Ingredients -

            1. 4-5 Amla fruits
            2. 2 tbsp fresh grated coconut
            3. 3-4 green chillies
            4. 1/2 cup skim milk curd
            5. 1/4 tsp salt

            For Seasoning -

            1. 1/4 tsp oil
            2. a pinch mustard seeds
            3. a pinch fenugreek seeds
            4. a pinch asafoetida
            5. 3 curry leaves
            6. 1/2 red chilli (optional)

            Method -

            1. Rinse the Amla well. Cut incisions along the segments. Pull out the flesh and discard the seeds.
            2. Grind along with coconut, green chilli, and part of the curd to make a paste. Grind more than a coarse paste but stop short of a fine paste.  Add the rest of the measured curd and whip along with the paste.
            3. Heat oil in a small wok/kadai/fry pan.
            4. Add ingredients for seasoning in order. When mustard crackles, pour in the ground mixture, and add salt. Simmer until the liquid foams up.  Do not boil this mixture. Keep stirring over medium heat for it to cook lightly.
            5. Remove to serving bowl and enjoy with hot phulkas,  or steamed rice, a dal and some stir fried vegetables.

            Quick Amla Raita


            Jan 8, 2015

            Mysore Pepper Rasam

            The nippy afternoons and cold nights are a great time to warm the innards of body and soul with steaming hot soups. A few days ago, I had two people in the family with a running nose and cough. Just the right time to stir up some peppery, tangy, rasam. Every region has its own signature soup. Rasam is ‘the go-to soup’ of most South Indians when nursing a fever or cold. It features prominently in the menu for convalescents and nursing moms too. Well, even if you do not belong to any of these categories, you can still enjoy a hot mug of this delicious ambrosia.

            I learnt this recipe for Mysore Rasam from my sister in law, Geeta. She is as creative in the kitchen as with her poetry. A truly inspiring person. We had this hot rasam at their home paired with steamed rice and a runner beans stir fry. Fond memories of that meal still linger, long after. Special people and some meals have that effect on us, don’t you agree? Well, I just had to recreate this at our home. Here, I have added extra pepper to suit our requirement. Everything else remains the same as Geeta’s rasam. Balmy, soothing, tangy, fragrant, instant comforter of stuffed noses and reliever of misery. Go on, make some for yourself.

            Mysore rasam is unique in that it uses dry coconut apart from regular spices. Besides, the spices are always freshly roasted and ground. The effort of roasting fresh spices, grinding them and adding that magical powder to the rasam makes the end result so worth it.

            The magic potion that cures all ills!

            ALLERGY INFORMATION

            • Does NOT contain gluten, soya, lactose, corn, nuts.

            Preparation time –10 minutes, Cooking time – 35 minutes, Serves - 4-6

            You Need -

            Cookware - Pressure cooker of 2 or 3 litre capacity, 1 Sauce pan/stew pot/steel pot of at least 5 litre capacity, 1 smaller steel pot, mixer grinder/coffee grinder, colander, Small ‘tadka’ pan or fry pan.

            Ingredients -

            FOR POWDER  Ingredients for Rasam Powder

            1. 1 tbsp Coriander seeds (Dhania/Sabut dhania/Malli verai/Kothambri beeja)
            2. 1/2 tbsp Cumin seeds (Jeera, Jeerige, Jeeragam, Jeelakara)
            3. 1 tsp heaped Black Pepper
            4. 1/2 tsp heaped Fenugreek seeds (Methi dana/Menthulu/Menthiam/Menthya)
            5. 1/4 tsp heaped dry coconut (copra) grated
            6. 5-6 Curry leaves
            7. 1/4 tsp ghee (clarified butter) OR 1/4 tsp cooking oil for vegan

            FOR RASAM

            1. 1/4 cup Tuvar dal (split pigeon peas)
            2. 2 tbsp Tamarind paste OR pulp and juice extracted* from 3 tbsp packed tamarind
            3. 2 medium Roma or Vine tomatoes
            4. 1/2 tsp turmeric powder
            5. 1 tsp salt (more if needed)
            6. 1 tsp jaggery/sugar/brown sugar (optional)
            7. a pinch of asafoetida
            8. 2 tbsp chopped coriander

            FOR SEASONING

            1. 1 tsp ghee (clarified butter) OR 1 tsp cooking oil for vegan
            2. 1/4 tsp mustard seeds
            3. 1/4 tsp cumin seeds
            4. 1/4 tsp fenugreek seeds
            5. a few curry leaves
            6. a pinch asafoetida

            Method

            1. Rinse the tuvar dal, place in a suitable container that fits inside the pressure cooker. Top the dal with double the volume of water, and pressure cook for 4 whistles. Let the pressure release on its own. If you do not have a pressure cooker, rinse the dal, place in a saucepan with 3 times volume of water. Bring to boil and simmer for 20-25 minutes. Check if it is cooked. The grains should be mash-able between 2 fingers. Else, top up with more water as needed and cook until done.
            2. * To extract tamarind water, soak 3 tbsp packed tamarind in 1 cup warm water. After 10 minutes, rub the tamarind with fingers to extract juice. Sieve the juice into another container. Repeat once or twice more with half a cup of water each time. Collect this tamarind juice and use in recipe. Discard the pulp and fibre or seeds.
            3. Measure all ingredients for the Powder. Fry with the ghee over a medium to low flame. Keep stirring to avoid burning. Remove to a mixer when they are golden brown in colour and begin to smell fragrant. Powder to a fine texture.
            4. Chop tomatoes. Place all the ingredients (except tuvar dal and chopped coriander) mentioned under ‘Rasam’ in a saucepan, set to boil on stove top. Once it comes to a boil, simmer for 10 minutes.
            5. Mash the cooked tuvar dal well. You could use a potato masher, or electric churner for this. Mix this into the simmering rasam. Add water  to thin down if needed. We are looking for a thin soup consistency.
            6. Add ghee to a small saucepan. Heat with the ingredients for ‘Seasoning’. When mustard splutters, pour over the simmering soup. Add the chopped coriander and remove from stove. Cover and set aside for the seasonings to infuse.
            7. Pour into mugs and enjoy warm/hot with a piece of crusty bread. Or ladle onto steamed rice and eat with a crunchy papad or a crispy stir fried vegetable curry.

            Piping hot Mysore Pepper Rasam with crunchy papads

            ,,

            Nov 17, 2014

            Roasted Brinjal Raita / Eggplant Raita / Roasted Eggplant Dip

            The best meals are often the simplest ones. Those which can be rustled up with really few ingredients, in minimum time, and deliver high on nutrition, as well as satisfaction. Quick cooking=happy eating=content tummies.

            This raita is one such recipe. Besides, the dish is versatile in that it can be used in many ways. The day I made it at home, we used it as raita, dip, as well as a substitute for mayo in sandwiches! So does it taste like baba ghanoush? Well, not quite. Tzatziki? well, maybe. Punjabi Baingan Bharta? mmm, not that either.

            Why don’t we  just delve in and find out? Shall we?

            Chilled bowl of smoky raita

            The secret to an amazing brinjal raita lies in how it is smoked. While purists will tell you to rub some oil on the skin and roast on all sides over an open flame patiently turning it over and watching lest it char beyond recognition, i am going to let you in on a secret!

            Just rinse the brinjal, wipe dry, slit into four long pieces, place in a microwave safe glass bowl and cook on the highest power for 6-7 minutes. Now take each piece and roast them individually over an open flame for just a minute per piece.  Dunk them in a bowl of cold water, peel the charred skin and reserve the pulp. This whole process takes less than 15 minutes. This gives the right amount of smokiness to the pulp without being overpowering. It also frees you up to attend to the rest of the meal while it cooks in the microwave. No need to tend to it constantly. Plus a total reduction in cooking time.

            Now that I have simplified it for you, go ahead and make yourself some fragrant raita/dip/sandwich filling/meal by itself.

            Come and eat me!

            ALLERGY INFORMATION

            • Does NOT contain gluten, nuts, corn, soya, eggs.
            • Has dairy in the form of skim milk curd (yoghurt). Usually tolerated by people with lactose intolerance.

            Preparation Time – 15 minutes, Cooking time – 15 minutes, Serves – 4

            You Need

            Cookware – Knife, Cutting Board, Small Sauce pan / Tadka pan,  Bowl of 1 litre capacity.

            Ingredients

            1. 1 Big Violet Brinjal/Eggplant weighing approximately 500gms
            2. 1 cup Fresh curd
            3. 1/2 tsp salt
            4. A pinch sugar
            5. 1/4 tsp mustard seeds
            6. 1 small green chilli
            7. 1/4 tsp cooking oil
            8. a pinch of asafoetida powder
            9. a few curry leaves and coriander leaves for garnish – optional

            To Assemble

            1. Prepare the brinjal/ aubergine/eggplant as described earlier. To repeat – wash, wipe dry, slit along length of brinjal into 3 pieces. cook for 6-7 minutes in microwave safe glass bowl at highest power. You may add 2-3 tbsp water to the bowl to help cook without shrinking. I find this method works best for me.
            2. After this, place each piece individually over an open small flame and char the skin. Dunk all of them into a bowl of cold water. When cool enough to handle, peel the skin off and reserve the pulp.
            3. Mash the pulp with potato masher/fork.
            4. Whip curd with sugar and salt. Add the mashed brinjal, and stir in well to combine. Raita just needs seasoning now.
            5. Prepare the seasoning by heating oil in a small sauce pan/tadka pan. Add mustard seeds, when they crackle, add slit green chilli, asafoetida powder. Switch off flame. Pour over the raita. Add the curry leaves and coriander leaves, if using, stir in and let it rest for few minutes.

            Your delicious fragrant raita is ready! Serve with hot phulkas, paratha, bisi bele bhath, biryani, filling for sandwich, dip for crudites, wraps. Don’t want to make anything else? Just have it chilled. A bowlful. As it is.

            Get me a bowl of this,quick!

            Notes -

            • This method of cooking first and smoking next allows for a good desirable smokiness. Even agnostics of smoky flavours will find it appealing.
            • Do not omit the seasoning. It is crucial in bringing all the flavours together.
            • Some chilling will really help in elevating this simple creation. However, if you are in a hurry, don’t worry. Just dig in.

            Jun 3, 2014

            Peerkangai chutney


            I seem to be on a spree to cook with un-glamorous, un-restaurant-y, humble vegetables. Well, why not? Gourds are very easy on the wallet and the waist line, mostly neutral in flavour, lend body to various dishes, have varied nutritional benefits but are ignored despite all these.

            Pic Courtesy - Sankalpfarms.com

            No South Indian breakfast is complete without chutney. That inevitably means use of fresh coconut. On days when you do not have stock of fresh/frozen coconut, or want to limit it’s use in daily meals, you need some saviour to rescue the day’s chutney. Enter the star of today’s chutney - ridge gourd. I have used it in this recipe to benefit from the nutrients it offers, as much as a coconut-substitute.

            • Ridge gourd is high in moisture and crude fibre (good news for those with chronic constipation).
            • It is a very low calorie vegetable, so great to include in a weight loss diet. It adds plenty of bulk to a meal without adding significant calories! This means, you can eat a whole cupful of ridge gourd and add less than 20 calories to the meal!
            • Ridge Gourd has negligible Sodium and a fair source of Potassium. Hence it is useful for people with high blood pressure or certain kidney ailments where sodium is severely restricted.

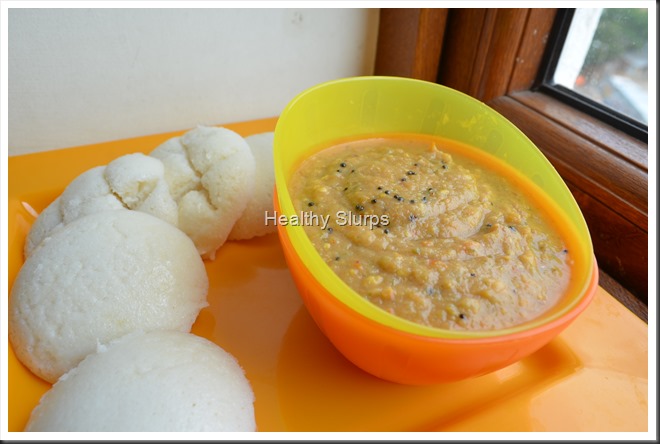
            Here is how I made the chutney. We used it to complement soft idlis for breakfast. It was spicy, tangy and declared ‘good’ by my family. Do try it out and let me know how you liked it. The quantity here serves 5-6. Halve to serve 2-3.The chutney can be refrigerated and used within 2 days.

            Preparation Time – 15 minutes ; Cooking Time – 5-6 minutes ; Serves – 5 – 6

            Allergy Information – Does NOT contain gluten, egg, soya, peanuts, corn, lactose.

            You Need

             Cookware  -  A frying pan, mixer grinder or food processor

            Ingredients

            1. Red Onion – 1 medium, or measure 1/2 cup after chopping
            2. Roma Tomatoes – 2 medium, or measure 3/4 cup chopped
            3. Ridge Gourd / Peerkangai – 1 big, or measure 1+1/2 cups sliced
            4. Green chilli – 4-5 cut into halves
            5. Chana dal – 2 tbsp
            6. Tamarind – 1/4 tsp*
            7. Salt – 1/2 tsp
            8. Oil – 1/2 tsp
            9. Coriander leaves – 6-7 stalks with leaves (optional)

            For Seasoning -

            1. Oil - 1/4 tsp
            2. Mustard seeds – /4 tsp
            3. Hing Powder – a pinch

            * Use Tamarind if tomatoes are not tart enough, or add a couple of extra tomatoes and avoid tamarind. You can even omit tamarind entirely if you do not prefer a sour-ish chutney

            To Assemble

            1. Prepare the vegetables for frying. To begin,  wash, peel and chop onions. Next, wash peel and chop tomatoes and green chilli. Rinse the ridge gourd well, peel part of the rough skin at the ridges, while leaving some skin on the vegetable. Cut into thick slices.Fry all vegetables for chutney
            2. Heat a small wok / frying pan. Add the half tsp oil, let it heat up. Add the chana dal, fry over medium heat until golden brown. Add all the prepared vegetables, chilli, tamarind and salt. Toss well, (do not add any water), cover and simmer for 2–3 minutes or until you find the tomato skin has shrunk a little bit and the gourd seems to go slightly limp. If you are using  coriander leaves, add at this point, and switch off flame.
            3. Let it cool. Grind to a coarse paste. You will not need any water for grinding. After removing to a bowl, rinse out the mixer jug with a 1/4 cup of water and add to the chutney if you wish to dilute it. Chutney with Seasoning
            4. Heat oil for seasoning. Crackle mustard seeds, add hing powder and pour over the chutney.
            5. Serve as accompaniment to idli, dosa, or over plain steamed rice, as a sandwich spread or as dip for crudites too!

            Soft Idlis with Spicy Chutney

            Fresh breakfast for two!

            May 22, 2014

            Keerai Masyial

             
            Few dishes can beat the simplicity of Keerai Masiyal. However, as a child, this was not my favoured dish. I have pretended every ailment to escape eating this ‘ green paste’. Now I am better able to appreciate it’s subtlety of flavour, the health benefits, ease of preparation, and the brilliant hue of this humble dish. When the summer heat is making cooking a painful chore, I urge you to try this out. Can be put together in under 15 minutes, needs very few ingredients, and supremely healthy, what’s not to like?
            Steaming Keerai Masiyal
            I have used Palak in this dish, but Amaranth, Arai Keerai, Siru Keerai, can also be used. In fact, using different greens in rotation brings each one’s unique health benefits to the table.
            • Agathi Keerai has more than 12 times the Calcium found in Palak and more than 3 times that found in Methi leaves.
            • Radish Leaves, Siru Keerai, Arai Keerai, Manathakkali Keerai and Paruppu Keerai are all very rich in Iron. They have more than 3 times the Iron found in Agathi Keerai or Palak .
            • Amaranth and Agathi Keerai lead in Vitamin C while Palak, Mint and Amaranth lead in Folic Acid content.
            • Paruppu Keerai and Palak have a low Sodium and high Potassium combination which makes it ideal for people with high BP or kidney ailments or gout.
            In a survey conducted by the National Nutrition Monitoring Bureau (NNMB), Indians were found to consume far lesser (average - 48gm/day) than the recommended 300 gm vegetables per day.Of this RDA of 300 gm, The National Institute of Nutrition, recommends at least 100 gm greens per person per day.
            Here is the Food Pyramid picture as released by the National Institute of Nutrition, 2011. It helps to form a visual idea of what should be on our plate everyday!
             
            Pic Courtesy - Dietary Guidelines for Indians, NIN
            Finally to the recipe of the day -
            You Need-
            1. Palak or any other greens – 4 packed cups of leaves.
            2. Salt – 1/2  tsp to 3/4 tsp ( use as needed)
            For seasoning -
            1. Oil – 2 tsp
            2. Mustard seeds – 1/2 tsp
            3. Urad Dal – 2 tbsp
            4. Red Chilli – 2, broken into halves
            5. Grated fresh coconut – 1/2 tsp (optional)
            To Assemble -
            1. Pick leaves and tender stems. Discard stems that are thick. Measure 4 packed cups.
            2. Wash well in a colander in several batches. Or fill water in the kitchen sink and submerge the greens in the sink tub. This is a great way to wash quickly and effectively.
            3. Drain well. Chop roughly. Any size and shape will do. It needs to be blended anyway.
            4. Place a large wok on heat, add the greens and let it cook in it’s own juices. If it looks like it is sticking to the bottom of the pan, add half a cup of water. stir through a couple of times so that the greens get cooked uniformly. After 5-7 minutes, the greens should be just cooked enough. Cool and grind to smooth paste with any water that may be left over in the pan.
            5. Return the puree to the wok, place wok over fire, rinse the blender jar with 1/4 cup water, add that too to the wok. Add salt, mix well, taste and add more as/if needed.
            6. To a small seasoning pan, add oil, place over heat, add mustard seeds, urad dal, red chillies. When you hear happy crackles, enjoy the sizzle and the aroma, pour it into the Masiyal before it chars! Smile If using grated coconut, add it to the seasoning pan last, stir around until the coconut turns a golden hue and pour over the Masiyal.
            7. Enjoy hot with steamed rice, sambar and a cucumber carrot salad with lemon dressing.  Vitamin C in the lemon juice helps in better iron absorption.
            NOTES -
            • For local and botanical names of all the Greens mentioned in this post, please refer to Glossary of Ingredients Page.
            • To retain nutrients in greens cook in just enough water until just cooked. Do not discard the water, use it up in the recipe.
            • To retain the colour of greens, add half a tsp sugar while cooking, leave pan uncovered, cook quickly over high heat instead of low flame for a longer time.
            • Add a sliced onion and couple of crushed garlic cloves to the seasoning for a twist in flavour.
            Enjoy Masiyal with Steamed Rice
             

            Apr 30, 2014

            Cantaloupe smoothie


            It feels like the worst April ever in my city, unimaginably hot these days.  To add to my woes, I suffered a hit in an amusement park that has left me with a broken rib. I expect it should heal in two months. Added to this are children having summer vacations who keep darting in and out of home in between their endless rounds of play – more thirsty than hungry.  Finding simple recipes to hydrate the children and the rest of the family while trying to ‘bed-rest’ my broken rib is quite a juggle.
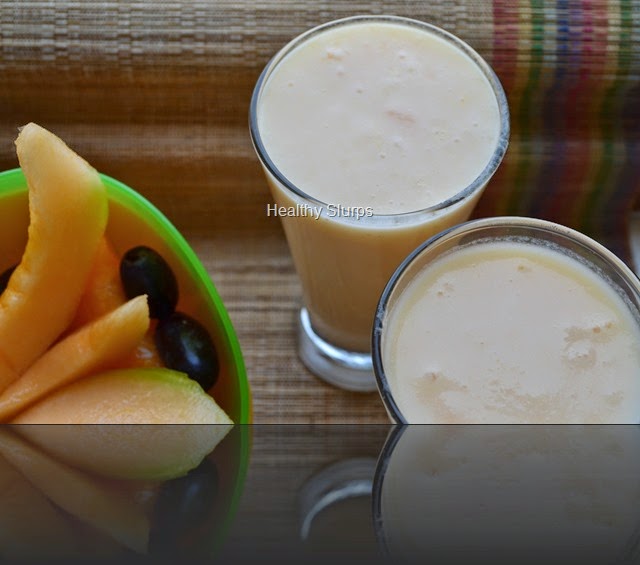
            In summer, we are naturally inclined to drinking more fluids to overcome thirst, cool the body and keep us sane! I am experimenting with more smoothies, shakes, juices as tasty ideas to rehydration and energy. This Cantaloupe smoothie is the result of one such experiment. When the fruit is made into a smoothie, it is more refreshing and filling. The well ripened fruit gives the drink an amazing flavour and we do not miss the sugar at all.
            Cool chilled smoothie
            • Cantaloupe or Musk Melon, as it is called in India, is more available in summer than other seasons. The melon is very rich in Vitamin A, C, Folate, Niacin,  Potassium.
            • These vitamins are important during pregnancy, so the fruit is a good choice along with others for a pregnant woman.
            • The sweet taste of the melon comes from sugars, so diabetics need to work with your nutritionist to find it’s appropriate use in your diet.
            • The fruit’s high moisture content makes it ideal for summers, for rehydration during workouts. The smoothie thus is a very good pre / post workout meal. Made even healthier with addititon of flax powder (Omega 3 and 6 fatty acids) or sabja seeds.
            You Need
            1. Skim Milk – 500 ml
            2. Cantaloupe / Musk Melon – Skinned and chopped – 2 heaped cups
            3. Honey – 1 tbsp, optional
            4. Ice cubes – optional
            Method
            1. Wash, skin and deseed the melon.
            2. Chop it into largish chunks and blend into a smooth puree in the mixer.
            3. Add 1/2 cup milk, blend again. Pour into a large jug, add the rest of the milk and stir to homogenise. Taste and add honey if needed.
            4. Chill for half an hour before serving. Serve with ice, if you like!
            Enjoy the fruit and the smoothie!

            Nov 20, 2013

            Sweet Corn and Pomegranate Salad

            Colourful Salad
            Ingredients for a salad are never fixed at my home. Assembling a salad is a flexible exercise, often involving the bringing together of whatever is available in the fridge, and finishing it off with a dressing, which is most often a citrus-y one. This salad too was created similarly with foods present at hand. Sweet corn kernels and juicy pomegranate do a pretty tango here, with some worthy add-ons such as red onion and grated carrot thrown in to merrily add to the colour riot. I’ve noticed quite often that my kids need no coaxing to try a salad that is as vibrant in colour as this one.
            Apart from being loaded with Beta Carotene from the vegetables and anti oxidants from the fruit, salads help to increase the dietary fibre of our daily meal.
            As per the recommendations of the National Institute of Nutrition, an adult person must have 40 gm. of fibre in a day, which includes soluble and insoluble fibre. Dietary fibre is needed for
            1. Proper bowel function,
            2. To prevent Haemorrhoids
            3. To prevent Coronary heart disease
            4. To control diabetes and obesity
            5. To reduce plasma cholesterol
            6. To protect against colon cancer.
            Salads are the tastiest way to consume fibre in a meal. In addition, they provide colour, texture and variety resulting in a satisfying meal experience.
            Go ahead and make this salad for yourself and share it with me too!
            You Need
            1. Sweet corn kernels – 1/2 cup
            2. Pomegranate pearls – 1/2 cup
            3. Carrot grated – 1/4 cup
            4. Roma tomato, diced fine – 1 medium tomato
             For the dressing
            1. Salt – 1/4 tsp
            2. Pinch of sugar
            3. Juice of 1 medium lemon
            4. Crushed black pepper – 1/4 tsp OR Green chilli – 1 minced fine
            5. Red onion, diced fine – 2 level tbsp
            To Assemble
            1. Steam the sweet corn kernels for 2 minutes in the microwave at high power. Set aside.
            2. Remove the pomegranate pearls from the fruit, keep aside.
            3. Combine all ingredients for dressing, mix well with a fork.
            4. Bring all ingredients for salad together, toss well with the dressing.
            5. Chill for half an hour in the fridge in a covered bowl.
            6. Serve along with warm pulkas or freshly grilled garlic bread or as a side with tadka dal and steamed rice.
            Healthy and Radiant


            Mar 12, 2013

            Lauki raita/ Sorakayi pachadi


            Bottle gourd as it is known in English, was not a favourite at our home too, that is until my yoga teacher shared this recipe with me. Bottle gourd is always paired with a protein such as chana dal or tuvar dal or mung dal in traditional Indian recipes. One reason could be that the vegetable has very low protein levels. Thus creating a dish with the vegetable + protein makes it complete!

            Of the several Indian recipes such as using it in koftas, avial, kootu, I took an instant liking to using it in raita. Cooling, refreshing, this extremely simple dish can be paired with any entree, any cuisine. The best part is very few ingredients are required and takes little time to put together. Use it as dip, chutney, raita, or to fill in hunger pangs between meals too.

            What’s good about Bottle gourd?

            • Bottle gourd has plenty of moisture and dietary fibre. This makes it an ideal summer vegetable to replenish fluids in the body. The fibre keeps constipation, piles, cholesterol and even colon cancer at bay.
            • 100 gm of uncooked bottle gourd has only 12 calories. This makes the vegetable an instant pick me up for weight loss diets.
            • It has no protein or fat content – the only way to add that would be in a recipe that includes some protein and good fat.
            • This humble vegetable is a fair source of Magnesium, Zinc, Potassium and Copper. All minerals needed by teenagers and growing children.
            • Also a very low sodium vegetable, this is very suitable for people with high blood pressure or diabetes too.
            • Do check out this link too. http://www.thehindu.com/health/policy-and-issues/article2571430.ece

            So do try out this super simple and soul satisfying recipe this summer.

            You needGrated bottle gourd

            1. Bottle gourd/ lauki/ sorakayi – select tender lauki, wash, peel, grate to a medium fineness, measure 3/4 cup.
            2. Thick curd – 1 cup ( I used home made skim milk curd) If you use store bought curd, select fresh probiotic skim milk curd.
            3. Salt – 1/4 tsp.
            4. Sugar – a pinch (optional).
            5. Fresh coriander leaves – chopped fine – 1 tbsp

            For seasoning

            1. Oil – 1/2 tsp
            2. Mustard seeds – 1/4 tsp
            3. Asafoetida – a teeny pinch
            4. Green chilli – 1, finely chopped
            5. Curry leaves – 3-4 torn up

            To assemble

            1. Combine the grated bottle gourd, whipped curd, salt, and sugar.
            2. Heat oil in a small tadka pan, add oil and other seasoning ingredients in order.
            3. Pour over raita.
            4. Top with chopped coriander leaves.
            5. Chill for an hour before serving.

            Cool curd and hot takda

            Variations

            1. Omit seasoning.
            2. Add roasted jeera powder and kala namak powder if you like the piquancy.
            3. Add one half onion, finely diced, or few chopped stems of spring onion along with bottle gourd in the raita.
            4. Add grated carrot for colour!

             Chilled Bottle gourd raita

            Jan 19, 2013

            Cherry tomato Lettuce Salad


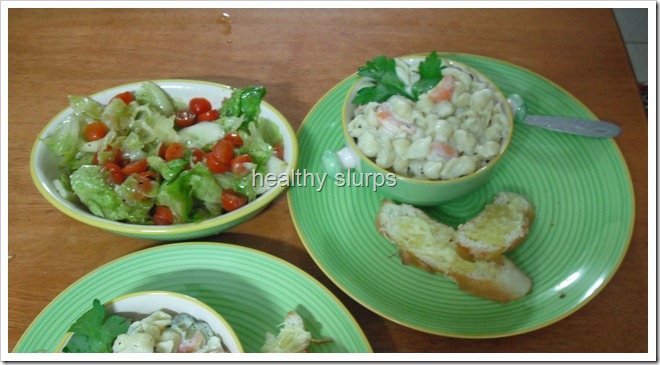
            Well, this salad does not even need a recipe. It is such a simple combination of veggies and dressing. In fact, I am sure several of you will have tried out some version of this salad. I made this salad to accompany the Low Fat Creamy Pasta. The salad, pasta and fragrant garlic bread comprised dinner last weekend. Quite a combination of textures, colours, flavours and tastes. It was a very satisfying meal.
            Taking some time to plan, shop and create good meals is so fulfilling. The happiness I feel when I sit down with loving family members eager to sample the latest creations and finding their faces light up with joy and hearing those happy exclamations – these make all the effort of cooking worthwhile. Well let me also admit that I go through my good share of disasters, and food that no one wants to touch. But thankfully, these happen lesser than the former.
            As I said, this salad is a simple combination of dressing, veggies and tossing them together.
            You need
            For the veggies -
            1. Iceberg lettuce – 1 small head
            2. Cherry tomatoes – 22-25 numbers
            3. Cucumber – 1-2 medium (really, your choice)
            4. Ice cold water – enough to dunk the lettuce in (approx. 4 cups)
            For the dressing -
            1. Balsamic vinegar – 1 tbsp
            2. Extra virgin Olive Oil – 4 tbsp
            3. Crushed black pepper – 1-2 tsp
            4. Salt – 2 pinches
            5. Sugar – 1 pinch (optional)
            To assemble
            1. Wash the lettuce head, tear leaves apart by hand into bite size pieces and keep immersed in ice cold water until needed.
            2. Dunk the cherry tomatoes in a bowl of water for 5 minutes, drain, pat dry and cut into halves. Place in a large mixing bowl.
            3. Rinse the cucumber thoroughly with the peel on . You can retain the peel on the cucumber or partly peel them too. If there are too many seeds along the middle of the cucumber, you may want to discard them. If so, cut into half lengthwise, remove the ‘seedy’ parts and slice into half circles. Else, if the seeds are tender, you can slice the cucumber into thin disks. Place along with the tomatoes in the mixing bowl.Veggies - washed, scrubbed, waiting for their dress!
            4. Pour the balsamic vinegar into a bowl. Pour the Olive oil in a thin drizzle whisking with a fork all the while. Continue to whisk well until all the vinegar and oil have blended into an almost homogenous mixture. Add the crushed pepper and salt now, whisk them in too. Dressing is ready.
            5. Now is the time to drain the lettuce in a colander – drain it well, shake up the colander and coax the last drops of water out! Add the lettuce to the mixing bowl, pour the salad dressing on top and mix well, toss, shake – do whatever except spilling the contents!
            6. Chill the salad for at least half an hour before serving so that it is at the right temperature and the flavours settle well.
            Some salad everyday keeps tummy trouble away
            Notes
            • You can add pitted black olives, walnuts, coloured peppers (capsicum), rocket leaves or any preferred vegetables to the salad. Use dressing in proportion to the vegetables used.
            • Using fresh tender vegetables, and chilling well before serving help to enhance the taste of the salad.

            Dec 18, 2012

            Stir Fried Capsicum

            It appears that people either love or hate capsicum / bell peppers. Me – I love it in all forms. I enjoy it’s raw crunch in salads, add it lovingly to sambar to perk it up, toss it with paneer for a smart bhurjee,…
            …Or I make this stir fry. Capsicum is the star in this dish, it does not play the role of accompanying artist. Rather, the spices and seasonings added, only serve to add to the punch of this amazing vegetable.


            What’s good about Capsicum?

            1. The best contribution from Capsicum to a meal would be it’s high Vitamin C, B and carotene (Vitamin A) content. While Vitamin C  and B reduces with heat and cooking, stir frying can ensure minimal losses. 
            2. Capsicum has virtually no Sodium, so it is a great addition to salads for a person with high blood pressure.
            3. The coloured peppers such as red, yellow, purple have a higher sugar content than the green coloured one. So it is recommended that diabetics use more of green pepper and lesser of the other coloured ones.
            4. Capsicum also is a low calorie, no - fat vegetable. People keen on weight maintenance / weight loss can include this wonder veggie freely in their diets.
            5. A note about the compound Capsaicin – this compound is isolated from other chillies of the capsicum family and used in several topical medications to relieve pain. This compound does not exist in sufficient quantities in Capsicum to have any pain relieving effects.

            Without further delay. here is the recipe.


            greem capsicum


            You need

            1. Green Capsicum – 5-6 medium sized
            2. Salt – 3/4 tsp
            3. Fresh Coconut – grated, 2 tbsp
            4. Chutney Dal – 2 tbsp
            5. Green chilli – 3
            6. Saunf – 3/4 tsp
            7. Garlic – 2 pods, washed and peeled
            For seasoning
            1. Vegetable Oil – 2 tsp
            2. Mustard seeds – 1/2 tsp
            To Assemble
            • Wash, deseed and cut capsicum into thin slices.
            • Powder all ingredients from 3 to 7 into a coarse powder.
            • You could warm the chutney dal and saunf together before powdering. This step is optional – it helps to release the aroma and powder better.
            • Heat oil in a wok / pan, add mustard seeds.
            • When the mustard crackles, tip in the sliced capsicum and stir rapidly.
            • Keep the heat at medium high, add salt and keep stirring for 3-4 minutes. Adding salt may release water from the vegetable. If it releases too much water, make a well in the centre of the pan and let the water sizzle out quickly. The veggies should retain the green colour and just turn soft but not soggy.
            • Add the powdered mixture and toss to coat all slices.
            • Remove from heat and serve warm with dal and rice.
            • I served it with ‘basale soppu dal’ and steamed rice.


            Steamed rice, dal and sir fried Capsicum
            Variations
            1. You could choose to include all coloured peppers such as red, yellow along with green pepper. If so, include in equal proportion, tip in the green pepper first and add the others halfway through.
            2. Slice up a red onion and stir fry that first before adding the capsicum.
            3. Add chopped coriander as a final garnish.
            Stir fried Capsicum - a closer look
            Notes
            • The key to successful stir frying, is to chop / slice vegetables to similar size, so they fry evenly.
            • Use a much larger wok / pan than needed to fit in the vegetables. This way, they swish around well and fry happily!
            • Heat minimum oil to a good heat, just below it’s smoking point. Stir fry in this hot oil at medium high to high heat. This retains crispness, colour and flavour of the vegetables.
            • Do not dump in all vegetables together. Add the ones that need more cooking first and so on till you add the quickest cooking vegetable last.
            • The best stir fry is one that takes only a few minutes on high heat.