Showing posts with label festival recipe. Show all posts

Feb 21, 2017

Mirch ka Salan with Mishti Pulao

Mirch ka Salan is a famous Hyderabadi dish. The dish is said to have originated in the kitchens of the Nizams. I would believe that, as the dish uses tamarind as souring agent, a practise mostly used in South India. Also peanuts (local produce) and sesame are used instead of other nuts and dry fruits(more prevalent in Awadhi cuisine). Whatever be its origin, Mirch ka Salan always elevates the meal from a common to an exotic one. It finds a definite place in wedding feasts and other important festive meals.

At our home, Mirch ka Salan is a holiday favourite. The star of a luxurious, happy meal. The main dish when important guests come over. Almost always, Mirch ka Salan is paired with the most fragrant Mishti Pulao, a sweet, fragrant Bengali dish, also a festive treat. One Hyderbadi, one Bengali..but the pairing is made in heaven. A happy marriage which we relish down to the last morsel. The tango of the sweet and aromatic Mishti Pulao with the tart, hot, spicy Salan has to be experienced to be understood.

I was introduced to this very fragrant Mishti Pulao by my dear friend Deepasri Deb. I have followed her recipe to the T. It never fails to make the most perfect, heavenly, fit-for-Gods Mishti Pulao. Check out her treasure trove of recipes at www.hamareerasoi.com 

Here are the recipes for both the dishes.

Mirchi ka Salan

MIRCH KA SALAN

I have adapted Sanjeev Kapoor’s recipe for this. Changes to his recipe include chopping of the fat Bhavnagari Chilli into inch long batons, deseeding them, and not using any extra chillies in the recipe. This helps to scale down the heat in the Mirch ka Salan. I have also made a few changes in the preparation method. Here is how I made Mirchi ka Salan.

ALLERGY INFORMATION

  • Contains peanuts. NOT SUITABLE for people with nut allergy.
  • Does NOT contain gluten, lactose, corn, soya, egg. Suitable for people with gluten intolerance or lactose intolerance.

Preparation Time – 15-20 minutes, Cooking Time – 30 minutes, Serves – 4 as main course or 6 as side dish if used with other accompaniments in the meal.

YOU NEED

COOKWARE – Sharp knife, cutting board, 3-4 litre wok, long flat ladle, small bowl, Mixer-grinder

INGREDIENTS -

  1. 250 gms or 15-18 fat Bhavnagari chillies (bajji mirchi)
  2. A small lemon sized ball of Tamarind
  3. 1/4 heaped cup raw peanuts with skin
  4. 1/4 level cup white sesame seeds
  5. 1/4 level cup fresh grated coconut
  6. 1 tablespoon coriander seeds
  7. 1/2 teaspoon cumin seeds
  8. 3-4 cloves garlic
  9. A thumb size knob of fresh ginger root
  10. 1 medium red onion, finely chopped (1/4 cup finely chopped red onion)
  11. 1/2 teaspoon black mustard seeds
  12. a few curry leaves
  13. 2 tablespoons cooking oil
  14. a pinch turmeric powder (add upto 1 teaspoon if you want a yellow coloured Salan)
  15. 1 heaped teaspoon salt

METHOD

  1. Wash and wipe down the fat chillies. Remove the stem, cut into inch long thick batons, and scrape out the seeds from within.
  2. Soak tamarind in half cup warm water. Squeeze out tamarind juice from it. Repeat with some more warm water. Set tamarind extract aside.
  3. Heat the wok over medium flame. Dry roast the peanuts first. As they begin to brown, tip in sesame. Roast until the sesame begins to crackle. Add the coriander and cumin seeds and roast until aromatic. Do not burn. Keep stirring. Remove to mixer grinder jar.
  4. Return wok to heat, add a drizzle of oil. Fry the ginger and garlic for a minute. Remove this to mixer jar too.
  5. Add the fresh grated coconut to the mixer jar, add some water and grind to smooth paste. Set aside.
  6. Add the rest of the oil to the wok, temper with mustard seeds and curry leaves. When this crackles, add the finely chopped onions and keep stirring over medium flame. When onions turn pink and shiny, add the chopped chilli batons. Saute over high heat for 5 minutes. Keep stirring to avoid charring.
  7. Pour tamarind juice into the wok, add salt, turmeric, cover and cook for 5-7 minutes over medium flame, until the chilli just softens.
  8. Pour in the ground mixture, add half a cup of water, and simmer covered for another 15 minutes.
  9. Switch off flame. Rest for half an hour for flavours to develop. Serve warm or hot with fragrant, sweet, Mishti Pulao.
Royal Feast - Mirch ka Salan with Mishti Pulao

MISHTI PULAO

ALLERGY INFORMATION

  • Contains Cashew nut. People with nut allergy can avoid adding cashew nuts to the recipe.
  • Does NOT contain gluten, corn, soya, egg, or lactose. Suitable for people with gluten or lactose intolerance.

Preparation time – 15 minutes, Cooking Time – 30-35 minutes, Serves – 4 as main course

YOU NEED-

COOKWARE – 3-4 litre wok with fitting lid, ladle, colander

INGREDIENTS -

  1. 1 heaped cup Gobindobhog rice, or Jeera rice, or Basmati rice
  2. 1/4 cup fresh/frozen green peas
  3. 1 teaspoon turmeric powder
  4. 2 tablespoon ghee
  5. 1/2 teaspoon salt
  6. a fistful each of broken cashews and raisins
  7. 1’' piece of cinnamon bark broken into two
  8. 2 bay leaves
  9. 3-4 cloves
  10. 2 green cardamom
  11. 2 black cardamom
  12. 1 mace flower
  13. 5-6 black peppercorns
  14. 3 tablespoon sugar
  15. 2 cups drinking water

METHOD -

  1. Rinse the rice well under running water. Set to drain in colander. Rub in the turmeric powder into the rice and spread the rice in the colander to drain well.
  2. Heat ghee in the wok, add cashews and raisins. Fry over medium flame until golden brown and raisins plump up.
  3. Add spices – cinnamon, bay leaves, mace, peppercorns, cloves, green and black cardamom.
  4. When the spices release aroma (about a minute or two over medium flame) add the rice and sugar. Stir well continuously over medium heat. Add the green peas midway and continue stirring until rice gets a sheen from the ghee. (About 7-10minutes)
  5. Add salt, 2 cups water. Increase flame to highest and bring water to boil.
  6. After water has come to a boil, set wok on your smallest burner, turn down heat to minimum, cover and cook for 10-12 minutes. Switch off flame.
  7. Let it rest for 5-10 minutes. Then, open wok, fluff up rice.
  8. Serve along with tangy, spicy Mirch ka Salan.
Fit for Gods - Mishti Pulao

Sep 6, 2015

Aval Payasam

Wishing all readers a happy Janmashtami. Praying for more love, peace and happiness in all your homes.

“Pathram Pushpam Phalam Toyam Yo Me Bhaktya Prayachati Tad Aham Bhaktyupahritam Ashnami Prayatatmanaha.” “If one offers to me with Love and devotion, a leaf, a flower, a fruit or water, I will accept it.” Bhagwad Gita, 9.26.

The humble aval, poha, beaten rice has a legendary status in Lord Krishna’s life. His childhood friend, Sudama, redeemed himself by offering a handful of beaten rice when they met after several years. It is said that Lord Krishna relished this offering of Love and Surrender so much that Sudama’s poverty stricken home was turned into a palace of riches, after the Lord accepted this offering.

Here is a recipe for Aval Payasam for Janmashtami. Let us try to make it and offer it to the Lord with single-minded devotion and Love. For He is most fond of a devotee’s Love.

Payasam fit for the Gods 

ALLERGY INFORMATION

  • Contains milk (lactose). Not suitable for lactose intolerant people.
  • Does not contain gluten, soya, corn.

Preparation time – 10 minutes, Cooking time – 30 minutes,  Serves - 4

YOU NEED

COOKWARE – Heavy bottomed sauce pan, ladle

INGREDIENTS

  1. 1/4 cup red aval/poha/beaten rice*
  2. 1 litre whole milk
  3. 1 cup sugar
  4. 1/4 teaspoon ghee

METHOD

  1. *Aval can be thick or medium aval. Do not use thin flat aval. If using thick aval, rinse under running water and soak for 10 minutes. If using medium aval, rinse under running water and add directly to boiling milk.
  2. Bring the whole milk to boil in a heavy bottomed sauce pan. Once the milk is on a rolling boil, drain water from the soaking aval, and add the soaked/rinsed aval to the milk. Keep stirring over low to medium flame to avoid charring at the bottom of the pan. Keep mashing the aval as you stir. This lends a creamy texture to the payasam.
  3. When the milk is reduced to half its volume, switch off flame and add sugar. Stir in the sugar gently until fully dissolved.
  4. Return milk to flame, keep stirring over medium to high flame for 4-5 minutes more.
  5. Switch off flame and cover with a tight lid.
  6. Add 1/4 teaspoon of ghee before offering this to God.
  7. Creamy aval payasam tastes good hot or at room temperature.

Red Aval Payasam

Aug 28, 2015

Pineapple Pulissery

Happy Onam to all readers who celebrate. May there be good health, peace, joy, and plenty in all your homes. Enjoy the day with your loved ones and with an extensive Onam Sadya!

Here is an unusual recipe in time for the Onam Sadya. Pulissery or Moru Kuzhambu is a staple dish in a Malayalee menu. Usually made with vegetables boiled and then simmered in a spicy coconut and curd paste, this Pulissery uses pineapple as the ‘vegetable’. The fruit gives the dish a unique flavour and a welcome tartness. Whether you celebrate Onam or not, this Pulissery will lift your meal to a gourmet level. So go ahead, and cook it up at your homes too.

Pineapple Pulissery

ALLERGY INFORMATION

  • Does NOT contain gluten, soya, eggs.
  • Contains coconut. People with nut allergy usually tolerate coconut.
  • Contains yogurt/curd. Usually tolerated by people with lactose intolerance.

YOU NEED

COOKWARE – Small fry pan/tadka pan, mixer grinder, Pressure cooker.

INGREDIENTS

  1. 1 cup chopped pineapple
  2. 1 cup sour thick curd or 2 cups buttermilk
  3. 1/4 cup fresh grated coconut
  4. 1 tablespoon fenugreek seeds
  5. 4 red chillies
  6. 1 teaspoon salt
  7. 2 tablespoon powdered jaggery
  8. 1/2 teaspoon turmeric powder

For Tempering -

  1. 1 teaspoon coconut oil
  2. 1/2 teaspoon fenugreek seeds
  3. 1/2 teaspoon mustard seeds
  4. 1 red chilli
  5. 7-8 curry leaves, torn up

METHOD -

  1. Place chopped pineapple, salt, turmeric powder, and jaggery in pressure cooker, add half cup water and pressure cook for 3 whistles.
  2. Fry 1 tablespoon fenugreek seeds and 4 red chillies in 1/4 teaspoon coconut oil. Fry on medium flame until just fragrant. Grind this with fresh grated coconut to smooth paste using water/buttermilk/curd.
  3. Mix the ground paste, cooked pineapple, curd/buttermilk and stir over medium heat. Remove from flame as soon as the mixture begins to boil. Do not leave it unattended or over high flame.
  4. Add coconut oil to fry pan, add tempering ingredients to it, and pour sizzling hot over the moru kuzhambu/pulissery. Cover with a tight fitting lid and let the flavours develop.
  5. Serve with steamed rice and a thoran. Crispy papads are welcome too!

Pineapple moru kuzhambu Happy Onam!

Mar 2, 2015

Eggless Thandai Mousse – Holi Special

King Hiranyakashipu hated his son, Prince Prahlada for being a great devotee of Lord Vishnu. The father wanted his son killed because he refused to worship his father as God, instead. Hiranyakashipu was a self-proclaimed Lord of all three worlds – Heaven, Earth and Hell. His ego did not permit worship of any other being. So the king tried heinous methods to finish his own son’s life! The king inflicted several cruelties like poisoning the child’s food, ordering rogue elephants to trample on the tiny child, throwing the young five year old over a precipice, and many more. Surprisingly none of these even hurt as much as a hair on the child-devotee’s head.

At his wit’s end, the evil king asked his sister Holika to sit with the child on her lap inside a raging fire. Holika had a special boon by which she would not be burnt by fire. However, the boon did not work when she sat with the evil intent of killing some one. The child sat through the raging fire on Holika’s lap with the Lord’s name on his lips and emerged safe. Holika was burnt to death instead.

Holi is the festival celebrated in memory of this great devotee’s escape from fire. A huge bonfire is lit and ‘Holika’ the demoness is symbolically burnt. The victory of true devotion and unwavering faith is celebrated by lighting the bonfire and playing with colours.

Whew, that was a long story, was it not?

If you are still with me on this page, allow me to explain why I am narrating mythology here – I am a sucker for ‘victory of good over evil’ stories. I can listen to them any number of times. They give me new enthusiasm to tackle life headlong. With Holi festival around the corner, what better time than now to dwell on this legend and the faith and hope the story brings!

I tried this Thandai Mousse as a variant from the usual Holi Thandai drink, because I wanted the flavours of Holi in a new avatar. I have adapted the basic thandai formula from Tarla Dalal’s website. Unlike my previous desserts, this one is neither low calorie nor low fat. It is indulgent, creamy, and exquisite. But then, it is so rich and flavourful that a small serving will satisfy you! Every spoonful takes you through a rhapsody of aromas, surprises you with the sharpness of pepper and engulfs you with the soothing notes of cardamom. Being eggless, this recipe can easily fit into your festive menu too.

A note on the ingredients for a better thandai. Do not substitute black for white pepper corns. White pepper has a slight difference in the sharpness from the black ones. The black colour also ruins the appearance of thandai. Use only Lucknow saunf – this is different from regular saunf. You can recognise it by the greener, thinner appearance. The aroma of Lucknow saunf is also more intense than regular saunf and more suitable for using in sweet preparations. Lastly, use real good quality saffron, if you want the colour. The aroma of saffron in thandai is unbeatable. You could omit it for a variation in thandai flavours too. *The food colouring does not add any value to the mousse other than tingeing.

Do yourself a good turn and try out this mousse this Holi.

Eggless Thandai Mousse - Happy Holi!

ALLERGY INFORMATION

  • Contains milk. NOT suitable for lactose intolerance.
  • Contains almonds. NOT suitable for nut allergy.
  • Contains soya as soy lecithin.
  • Does NOT contain egg, yeast, corn.

Preparation Time –30 minutes + 8 hours chilling time, Cooking Time – 10 minutes, Makes about 10 servings.

You Need -

Cookware –Hand-held electric whisk, Mixer grinder, bowls, thick bottomed sauce pan, stirring spoon/ladle, refrigerator,

Ingredients -

For the thandai paste -

  1. 1/3 cup whole almonds
  2. 15 white pepper corns
  3. 2 tablespoon poppy seeds
  4. 2 tablespoon Lucknow saunf
  5. 3/4 teaspoon fresh ground cardamom powder
  6. A few teaspoons water
  7. a few strands of saffron (optional) OR* a tiny pinch orange food colouring (optional)

For the mousse -

  1. **200 ml Tropolite (OR any non dairy whip topping) OR 200 ml fresh cream, preferably heavy cream
  2. 200 ml whole milk
  3. 1/2 cup sugar (taste and add more if needed)

Method -

  1. **Chill whatever whipping cream you are using for the recipe well ahead of preparation.
  2. Soak the poppy seeds in boiling hot water for half an hour. Soak the almonds in boiling water separately for 10 minutes. Peel skin after 10 minutes of soaking.
  3. Drain water from poppy seeds, and grind with the skinned almonds, white pepper corns, and Lucknow saunf in a coffee grinder/small jar of mixer grinder to a very smooth paste. Add just enough water to help grinding.
  4. Heat milk in a thick bottomed saucepan. When milk comes to a boil, switch off flame. Add 3 tablespoons of the ground thandai mixture, stir in the sugar. Dissolve well and return the saucepan to flame. Stir over medium heat until the mixture thickens slightly. You may need to boil for about 4-5 minutes. Cool to room temperature, pass through a sieve if it looks grainy, and chill in refrigerator at least for an hour.
  5. Whisk the chilled whipping cream you are using in a deep bowl until it forms stiff peaks. Whisk in the chilled ‘thandai milk mixture’ also.
  6. Ladle out about 3-4 tablespoons into each dessert bowl for individual portions, top with rose petals or saffron strands and chill for at least 4 hours before serving.

Happy Holi everybody! Wishing for good to triumph over evil in your lives as well.

Thandai Mousse garnished with rose petals

Dessert for two

Oct 21, 2014

Ragi Chocolate Laddu

Deepawali, the festival of lights, eagerly anticipated and celebrated throughout India, is here. There is so much excitement, happiness, festivities in the air. It is also fun to run around shopping for new clothes, gifts, fire crackers.

As with most festivals, the stories behind celebrating this festival too are several. Sri Krishna killed Narakasura on this Chaturdashi day. Lord Rama returned to Ayodhya after His exile after killing Ravana and freeing Sita from his evil clutch.

Whatever be the legend, the common theme is the victory of good over evil. The assurance from Divinity that evil, cruelty, jealousy and hatred do not last long. That truth, goodness and virtuous living always triumphs. A very heartening reminder in a world where the opposite seems to be true. An assurance for those who believe. A great reason to celebrate. To meet up with family, close or extended. To renew friendships, to form new ones, to look forward with hope.

So here is wishing you happiness, good health, joy in your lives!

In continuation with my efforts at finding and documenting healthy recipes, I am very happy to share with you this new attempt of mine. The nutty aroma of roasted ragi combined with seductive cocoa, taken a notch festive with fragrant ghee all come together delightfully in this healthy dessert.

Rich, fragrant Ragi Laddus

Millets are quite the rage in the diet of every health conscious person and rightly so. They are packed with several nutrients, richer in calcium, fibre and other vitamins than grains like rice or wheat. Ragi, or Finger Millet forms the staple grain of a large part of rural India. Here is my shot at making a festive dish with this humble grain. A successful undertaking, even if I say so myself. This Diwali, when you dig into this dark, mysterious confection, you can feel a tad less guilty at indulging knowing that there is this super healthy millet at its base.

Dark, handsome laddus ready!

ALLERGY INFORMATION

  • Does NOT contain gluten, lactose, egg, soya, peanuts, any nuts.
  • Suitable for people with gluten sensitivity, lactose intolerance, nut allergy.

EDITED – A reader expressed concern about using butter or ghee in this recipe for lactose intolerance. Usually ghee is digested even by people with lactose intolerance, since it is ‘fully clarified butter’, but if you are intolerant to ghee as well, do use margarine warmed in the same proportions. I have not used margarine myself, and am only suggesting it as an alternative.

Preparation time – 30 minutes, Cooking time – 5 minutes, Makes – 12 laddus

YOU NEED

Cookware – Thick bottomed fry pan, Mixer grinder, Metal spatula, Small Saucepan.

Ingredients

  1. 1 heaped cup Ragi flour (I used store bought)
  2. 1 scant cup powdered sugar
  3. 1/4 cup cocoa powder (I used Hersheys)
  4. 1/2 tsp Vanilla essence
  5. 1/4 cup ghee (Can use melted butter too)

Method

  1. Set a thick bottomed fry pan/ skillet on fire. Dry roast the ragi flour on medium heat stirring briskly all the time. This step removes the raw flavour of the flour and gives it a good nutty tone. 2-3 minutes later, you should sense a change in aroma. The flour is then ready.
  2. Switch off flame, add in cocoa powder, mix well with ladle. Also add the powdered sugar,  and vanilla essence, and mix in thoroughly. You could use a wire whisk to mix well too.
  3. Heat up the ghee over a low flame in a different small sauce pan. If using butter, heat a similar quantity of butter for such time until you find the butter slowly changing hue to a pale gold.
  4. Drizzle this hot ghee over the ragi-sugar mixture. Mix again with ladle, and when it is of bearable heat, grab a fistful and compress using fingers to a round ball shape. The laddu can be set aside to rest when it keeps its shape. It will harden on cooling. Finish off making laddus with the rest of the mixture. Halfway through, if you find the mixture cooling and the laddu does not shape well, then warm the flour mixture gently again to help shaping the laddus.
  5. Your delicious, laddu redolent of cocoa with a hint of vanilla is ready!

DSC_3959Happy Deepawali

          HAPPY DEEPAWALI EVERYBODY. STAY HEALTHY, BE HAPPY!

Apr 14, 2014

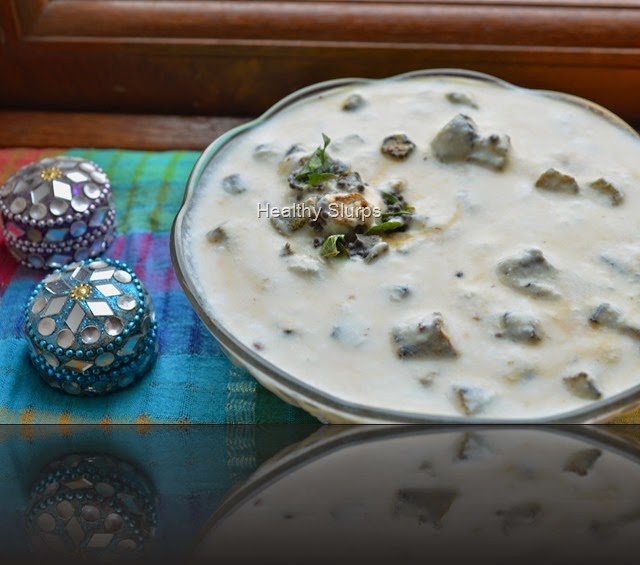
Vendakkai Thair Pachadi / Crispy Okra in Chilled Yoghurt


A very Happy New Year to all who celebrate today. Happy Vishu to all Malayalees across the world! All family members taking time off from busy lives, praying and eating together, tables rich with culinary treats– these surely are some special features of festivals. Celebrations always involve good food. Contrary to popular thought, festive food need not all be time consuming to prepare, nor be calorie-rich.

Today, I would like to share a lip-smacking, simple recipe which you can use to grace the table at any festive menu. This recipe has distinct south Indian flavours, so you can tweak the seasonings to accommodate the demands of your palate or cuisine. (Read notes)

Happy New Year to all

The key point here is how the vendakkai / lady’s finger / bhindi / okra is cooked - crispy ‘fried’ okra is first readied by slicing it thin, drizzling with a quarter tsp cooking oil and grilling it for 10 minutes. This then is lovingly folded into a bowlful of thick skim milk yoghurt, seasoned with salt.The dish is finished off with a fragrant tadka of mustard seeds, curry leaves and pinch of hing in some oil. The grilling ensures that you save fuel, oil and time. The crisp texture encourages even die-hard okra haters to try it out. The chilled yoghurt is just so perfect for this blazing summer season. While this recipe is an accompaniment, you will soon find yourself eating a chilled bowlful on its own. Here is what you need -

You Need

  1. Okra / Lady’s finger / Bhindi / Vendakkai – 200 gm
  2. Skim milk yoghurt – 500 ml
  3. Salt – 1/4 tsp
  4. Sugar – a pinch
  5. Cooking Oil – 1/4 tsp

For seasoning

  1. Cooking oil – 1/4 tsp
  2. Mustard seeds – 1/4 tsp
  3. Curry leaves – 3
  4. Asafoetida Powder (Hing) – a pinch

To Assemble

  1. Wash the vendakkai by immersing in a bowl of water, drain on colander and spread out to dry on a kitchen towel. Snip off the tops and tails, and slice into even thin disks.
  2. Preheat the grill to 250 C.
  3. Place in a single layer on a baking tray. Drizzle 1/4 tsp oil over the disks, and spread in a single layer.
  4. Once the grill is ready, place the tray of vegetables inside, and grill for 10 minutes. Toss and scrape the contents at half time to ensure even browning. By the end of 10 minutes, the Vendakkai would have shrunk to half – size pieces, and would have browned evenly without being charred. You may need to watch the grill in the last minute to ensure correct browning without charring.
  5. Let it cool in the tray. Meanwhile, whip up the skim milk yoghurt with salt and sugar.
  6. Prepare the seasoning by heating oil in a small pan, adding all the ingredients for seasoning in order. Pour over the whipped yoghurt.
  7. Gently fold in the cooled Vendakkai into the yoghurt, chill for half an hour before serving.
  8. Serve with steamed rice, sambar, papads.

Bowl of chilled pachadi flecked with crisp okra

Notes

  • Avoid mixing the grilled vegetable too vigorously into the yoghurt, it will darken the colour of yoghurt.
  • You can experiment with flavours by adding roasted jeera powder, coriander leaves instead of hing and curry leaves.
  • Can be used as a dip for crudites or rolls too by seasoning with a tbsp of chopped, fried onion, a pinch of red chilli powder and a tsp of chopped fresh parsley instead of above seasonings.
  • Grilling the vegetables as opposed to deep frying them helps to cut down on cooking oil used.

Enjoy the cool pachadi!

Mar 16, 2014

Thandai Panna cotta


Wishing all readers a very colourful and happy Holi. The season is filled with fun, happiness, spring and a riot of colours. I find all food sites, blogs filled with recipes for the special festival menu. Mawa gujiya, samosa, kachori, and several other delicacies.

Festive Dessert Platter

My dessert is inspired by the flavours of the festival too. I had tried out a Thandai mousse last year. Somehow, I’m surprised it has not found it’s way to the blog. So it had to be panna cotta this time. I have kept the cream to milk ratio at 1/2:1, thereby reducing on the fat content. I plan to try it out with skim milk alone the next time.

Initially, I was quite worried about getting the consistency, flavour and proportions right. After making a mental map of the procedure, and after discussing the recipe with two of my great friends, Deepa and Sreelatha, I decided to go ahead and test it out. Quite happy with the outcome, even if I say it myself. But then, unless you try it out and fill me in, I wouldn't know for sure.

For the main flavouring, I followed Tarla Dalal's recipe to make the thandai paste. For the Panna cotta, here is what you need -

  1. Home made or store bought Thandai paste – 2 level tbsp
  2. Skim milk – 1 cup
  3. Fresh cream – 1/2 cup ( I used Amul )
  4. Sugar – 5 tsp
  5. Agar agar – 7 gm
  6. Water – 1/2 cup
  7. Butter or vegetable oil – 1/4 tsp, for greasing

Optional – 2 tbsp Khus Syrup as a top layer for the panna cotta. I used store bought syrup.

Scooped out deliciousness!

To Assemble

  1. Combine the skim milk, fresh cream, sugar in a heavy bottomed saucepan, and set on heat. Keep over medium flame and stir constantly.
  2. In a separate smaller saucepan, heat the 1/2 cup water, and stir in the agar agar. Set this over a low flame too and keep stirring to mix well and to avoid burning. If you cannot manage to stir both at the same time, get the milk mixture boiled first and then proceed with the agar agar.
  3. When  the milk mixture reaches a boil, add the thandai paste and simmer for a minute, and keep stirring again. After a minute, set aside. Be alert to the milk mixture, it can boil over quite suddenly. Strain through a mesh sieve into a suitable bowl.
  4. If you have not started on the agar agar + water boiling as yet, go ahead with it now. You may need to simmer it for 5-7 minutes over low flame until it has blended into a homogenous jelly like texture. Pour through a sieve or tea filter directly into the milk mixture. Mix well, and return the milk to heat. Simmer again for a minute, remove from heat and cool to room temperature.
  5. Grease 6 dessert bowls / katoris / cups with the butter/oil. Divide the mixture into the bowls. Cover with cling film / lids and refrigerate for an hour or two.
  6. To unmould, run a wet sharp knife through the sides of the panna cotta and invert into serving plate. You may serve directly from the bowls too.
  7. Optional toppings include some khus syrup drizzled,  or few strands of saffron, or some cardamom powder sprinkled, or rose petals for garnish!
  8. Happy Holi and enjoy your wonderful Panna cotta.

Happy Holi with Thandai Panna cotta

Jan 14, 2011

Red rice pongal

It is my privilege to wish all readers a very Happy Sankranti / Pongal. In keeping with my wish to share tasty and healthy recipes, I have assembled a healthy version of sweet pongal. Here’s to happy, healthy eating.
Red rice pongal
red rice
You need
  1. Red Rice - 1 1/2 cups 
  2. Jaggery - 2 1/2 to 3 cups (I used the round ball kind)
  3. Cashew nuts – halved, a generous handful
  4. Ghee – melted, 1 cupful
To assemble
  1. Wash the red rice at least in three changes of water. Soak the washed rice for half an hour prior to cooking.This helps the rice to cook to a soft texture.
  2. Pressure cook the rice with 3 times volume of water.I used 4 1/2 cups of water for 1 1/2 cups of rice.I pressure cooked it up to 1 whistle on high flame and then simmered flame and cooked for a further 10 minutes.I had  a nicely cooked soft rice at the end of this.soft cooked red rice
  3. Break the jaggery you are using into large pebble sized pieces.Take the measured jaggery in a heavy bottomed pan, pour enough  water to cover the jaggery ( I needed 1 1/4 cups of water), and bring the solution to a boil. Stir lightly. When the water just starts boiling switch off flame. Wait for allDissolving jaggery in water jaggery to dissolve. Use a large fine sieve / colander to filter the impurities in the jaggery solution.
  4. Mix in the jaggery water and cooked rice, cook on high flame stirring briskly. bubbling pongal in progressOnce they are mixed well, reduce flame and keep stirring continuously, mashing with the back of the ladle as you go along.
  5. Add a couple of tablespoons of ghee as the pongal bubbles away.The pongal is done when it looks like a homogenous,semi-solid,  glossy mass.
  6. Fry the halved cashews in the rest of the ghee, pour with love over the pongal. Your delicious, healthy, fit-for-the-Gods pongal is now ready!
 Pongal fit for the Gods!
Notes
  • It is very important to cook rice to a soft mush for the pongal. Once the jaggery and cooked rice are combined, the rice will not cook any further and you could end up with a chewy or a ‘biting hard grainy’ texture.
Nutri notes
  • In India, the term red rice is used loosely to denote brown rice, unpolished rice, or hand pounded raw rice. So it  means rice where the grain is dehusked but bran is retained to a full or partial degree.
  • The benefits of rice bran are several. The bran is very rich in fibre –
  • Hence it is recommended to avoid conditions such as high cholesterol, high blood sugar, or heart disease.
  • For diabetics, and for patients of coronary heart disease, too, eating red / brown rice is recommended . It helps bring blood sugar levels down and prevents cholesterol formation in arteries.
  • Fibre helps easy normal bowel movements, so regular eating of red rice guards against constipation, piles, prevents diverticulosis, and several studies show results that  a regular high fibre diet guars against colon cancer too.
  • Besides fibre, rice bran is rich in iron, manganese, selenium, and most of the B complex vitamins. We stand to lose all these in white polished rice.
  • Apart from red rice, this recipe contains jaggery, another ‘unpolished’ food. Jaggery has higher levels of iron and trace minerals than refined sugar. Jaggery is also sweeter, hence you can use lesser quantity in a recipe. Due to this jaggery is a safe sugar substitute for people with borderline diabetes (within allowed daily limits).
  • Ghee added to this recipe does add to the fat content and to the richness of the dish – which reminds us to indulge in moderation!